In January I spent a week in the ICU with Izzy. We were back again in February. I got Covid in March, 3 days before speaking at Laracon India. I had to cancel. In April, I got hit with an unexpected tax bill. In May and June, I lost a majority of the investment fund I had grown. By July, our best option was to demolish our rental property.
Throughout the year I was continually sick from daycare "crud". I'm sleep deprived as Emma is not the sleeper Izzy is. Combined with the life blows above, I always feel drained. The self-inflected blows also shook my confidence. I try to be an optimistic, ambitious person. But this year has left me feeling not myself. Which feeds the cycle.
Needless to say, I didn't achieve many of my goals for 2023. I'll go through them briefly.
While Shift did grow, it was around 25%. That's 15% less than previous years. In fairness, I did sunset the Shifty Coders Slack group and Workbench desktop app. These only accounted for a few percent of revenue. But still a few percent.
Missing Laracon India also hurt growth. It was not only an opportunity to speak directly to my target audience, but an untapped market. Also being among peers helps keep Shift top of mind of gives me fresh insights.
As noted, we decided to demolish the rental. After two years of battling insurance, searching for contractors, and waiting on the permits it finally became clear demolishing the home was our best option. While still a loss, we would lose more attempting to rebuild. I'm giving myself a scratch here as, well, it's done.
Between being sick and sleep deprived, I rarely had energy for learning. Any extra time or energy I had was spent maintaining Shift or woodworking projects. Even that I rarely made any progress - meaning my hobby became a stressor.
For a brief stretch between August and October I worked out. It felt good. I lost a few pounds and toned my upper body. However, as above, sickness and lack of sleep made it hard to keep the routine. I'm giving myself another scratch here and will carry this over into 2024.
Over the years, I've distilled my goals into three main categories: business, personal, and family. The theme for 2024 is revival.
In the last quarter of 2023 I embarked on a new side-project. For years I thought Shift would be my last big programming project. I didn't see the need to make something else. But I saw an opportunity to improve developers lives in another market. Which is something I enjoy. So I'm launching another service (SaaS) and will try to grow it in 2024.
There's also an element of regaining confidence lost in 2023. Being able to reproduce success in a completely different market would have big meaning. And, any generated revenue would also help rebuild financial losses from 2023.
I'm going to carry this over as my personal goal into 2024. Working out made me feel good and boosts confidence. I just need to keep the routine.
I've missed travel. Another reason missing India was a hard blow. With Covid and having two kids, travel hasn't been an option the last few years. However, the girls are getting old enough now to travel. At least on some classic family road trips. So I'd like to do a few of those and maybe a bigger trip towards the end of the year.
]]>A successful Indie Hacker has two paths: continued growth or lifestyle preservation.
This is an unroll of that thread with some additional insight based on the comments. The main focus of the thread was to share the personal finance decisions I made which helped me worry less about "if it all goes away".
As always on Twitter, you're going to be misunderstood. Let me try to clarify my intention. The context for these decisions is a successful Indie Hacker. So we have two criteria: successful and Indie Hacker.
Successful in my case being grinding my SaaS to over 1 millions in revenue. Successful could also mean a high paying job. Really any success in a monetary sense.
Indie Hacker is really a way of saying individual. You don't necessarily have to a solo SaaS owner. But these decisions may not apply to a partnership or small business owner. Really anyone with employees.
Ok, back to the thread, there are two paths. I believe you can switch paths. But you can't be on both paths at the same time. Only one. So you can be on the growth path, then switch to the lifestyle path. Or vice versa. But you're always making a choice to be on the one you're on.
I'm on the lifestyle preservation path. For me, the business is a means to an end. A means to provide the life I want. Like any successful Indie Hacker, I worry, "what if this goes away?"
So I try to do what I can to prevent that scenario. That depends on business decisions, but it also depends on decisions around the income from the business.
Managing money as a successful Indie Hacker is not discussed enough. So I'd like to share some personal finance decisions which helped decrease my worry about, "what if this goes away", and increase my chances of continuing (and improving) my lifestyle.
Before I went full-time on Shift I saved a years worth of expenses. This was more than I needed, but it's what made me comfortable to leave a high-salary day job.
After I went full-time, my initial goal was simply to not decrease the runway. Once I proved that, the goal was to double the runway - so I had two years of expenses covered.
If you're an Indie Hacker, two years is a very long time. That's two years to navigate churn, pivot the product, or even build another product before needing to go back to a "day job".
Next, I paid off all my debt - student loan, car, eventually my mortgage.
Most of my replied on Twitter were in regards to paying off your mortgage. We're often taught a mortgage is "good debt". Sure. From my perspective, "debt" is "debt". I had the opportunity to pay off my mortgage with my extra income. So that's what I did. It took a little over a year.
Another point was, in today's economy, if you have a sub-3% mortgage rate and a 4.8% savings account, why use extra income to pay off your mortgage? You're giving up 1.8%, right? Well, there's more to the equation than just the rates. You also have the principle. It's very likely your mortgage amount is higher than your saving amount. Likely many multiples higher. If so, that 1.8% difference is nothing. Even if they similar amounts, I'd give up the roughly $2,000 in interest (1.8% on $100,000) to know I owned my home, outright (no mortgage).
Paying off debt removed any financial “obligation” I had, which definitely decreased my anxiety about leaving the "stability" of a salary. It also decreased my expenses (no monthy mortgage payment). Which, in turn, increased my runway. So that two years of savings now lasted even longer.
Once I didn't have any debt, I only bought things with "cash". If I wasn't able to pay for it immediately, I didn't buy it. Of course, this may not make sense if you want buy a something big, like a house. But I'd try to practice this as much as I can.
When you have a runway and no debt, I think you truly start to build wealth. For me, that means using money to make money. In a way, it's the ultimate "passive income".
Create your own "fund" - a dedicated amount of capital to invest.
Everyone's investment style is different. If you can create a big fund, then even conservative investments still provide a big return. Or, if you can take the risk, you can get a big return from even a small fund.
This fund is what lasts a lifetime. Maybe more. Now it doesn't matter if the business "goes away". It just has to last long enough for me to grow the fund to a critical amount.
This "fund" is not an IRA. While part of my "retirement plan", it is a separate amount of capital I can access now (not wait until 59). This "fund" serves the same purpose though - ideally, allowing me to continue my lifestyle without the business.
This is a sub-step, only if you have a family. I do, so I want to create separate funds for my kids. Mostly for their education. But depending on your goals, you may want to save more for them.
The important part is to keep these separate from the main "fund". I do a "fund" for each child. This not only makes it easier to track, but also manage the risk profile - as I want theirs to be conservative, steady growth over a longer period of time.
Finally, establish and maintain a circle of peers. While I'm mentioning this last, it should happen right away and evolve as your business and lifestyle does.
This is one I haven't done well on, and am now playing catch-up. But having a network of peers can not only provide business feedback, but also provides opportunities. Both of which can increase income.
It also provides a safety net if your business were to "go away". If so, it's likely someone in your network can connect you to your next thing. Having a network is a force multiplier.
It also provides an outlet for you to enjoy your success in a comfortable way. Not everyone understands your business. Not everyone is comfortable talking about money. Being able to do both is important.
So if you're an Indie Hacker who has chosen a lifestyle business, these personal finance strategies may help you "stay calm" and make the most of your success.
I like to keep them terse and fun. Hence the regular expression reference and use of emojis.
While I plan to continue focusing Shift more, I'm giving this a checkmark. After Jess joined the Laravel team, I decided to go back to working on Shift entirely myself. This forces me to continually make decisions which limit Shift's scope.
Although I partnered to add the Django Shifts, this is not something I expect to grow. So it doesn't take any of my focus. I also plan to sunset the Workbench desktop app. Instead it will be replaced by a CLI tool. All this cuts back on the amount task switching (and tech stacks) I need to support.
I did put forth the effort to learn Spanish. I even paired with some Spanish speak developers to practice. However, I have a long way to go and never give this the time it needs to achieve the goal. I considering it a scratch for 2022 and will carry it over in 2023.
In 2022 I set up a Solo 401k and contributed the maximum amount. I also contributed nearly 70% of my earnings to our investment portfolio. Unfortunately the stock market was down 20% in 2022, with the tech sector down significantly more. Nonetheless, I'm giving this a checkmark as, from a contribution perspective, I achieved my goal.
Looking ahead to 2023, I'm setting one goal in four categories: business, personal, educational, and fitness. The overall theme is refinement.
On average, Shift has a 50% year-over-year growth rate. Despite paring down Shift in 2022, I want to still see this growth rate in 2023. The goal is to see peak Shift based on a few different metrics. Shift has a limited lifespan. I know it won't have this growth forever. If the decline starts in 2024, I'd like to top out just a bit higher.
In 2021 we purchased a rental property. Unfortunately, there was a fire. So we've never actually rented our rental property. After continual back and forth with insurance, we're finally in a place to rebuild. So, to turn a negative into a positive, we're speeding up our longer-term vision for the property. The goal is to complete this in 2023, and ideally rent it.
This goal is carrying over from 2022 - with a specific focus on learning Spanish. I feel I have the vocabulary. I need to dedicate time to practicing. The goal is to become more confident speaking Spanish when working with other devs or traveling. Not necessarily to be fluent.
After having kids, the evenings are my only free time. Usually by then I'm drained and plop down on the couch. I'd like reintroduce running at least once a week. Izzy's daycare includes access to a workout facility. So I have no excuse not to spend some time in the gym after dropping her off. There's no specific goal here other than to tone up a few areas and hopefully regain some energy through exercise.
]]>In this post, I want to share the backstory leading up to this feature. If you're interested in the development of this feature, I wrote most of the code in this series of live streams.
When someone runs a Shift it is pushed onto a job queue. The job is picked up by one of the worker servers and processed. All this is managed by Laravel and Horizon.
The challenge is these jobs are pretty intense. They are very file I/O heavy, and require more CPU and memory. Each job might take anywhere from 20 seconds to 10 minutes. And multiple jobs may run concurrently.
Depending on the worker specs, there are only a certain number of jobs I can process at a time. To process more would require increasing the (v)CPUs and memory of the server. Easily solved by paying more money.
So, the feature would be to add more workers based on the job queue workload. Although these workers would be smaller (less CPU and memory), there would be more of them. The classic scale horizontally, instead of vertically. When the workload dropped, extra workers would be removed.
Y'all know me, I'm all about YAGNI (you aren't gonna need it). I call YAGNI on a lot of things. Sometimes I call YAGNI simply because other developers don't call YAGNI enough.
I called YAGNI on this feature. It bounced around my Todo List for over two years. Each time it bubbled up it was deprioritized. Either other features were more pressing or because I called YAGNI.
I felt comfortable doing so because it truly wasn't needed. Two years ago there weren't many subscribers to a Shifty Plan. So aside for a few days after a new Laravel release, I wasn't maxing out my current workers.
Last year, while subscribers had grown, there was no Laravel release. So the workers only maxed out during the weekly subscriber automation. This automation runs on a separate worker. So it doesn't affect the Shifts coming in from running immediately.
This year, with the release of Laravel 9 (which had been postponed for 18 months) there was an increase of runs. Instead of the few day surge following the release, it was over a week. In addition the new release led to more subscriptions. I'd also added additional services like the Test Generator, CI Generator, and Workbench. All of which were more intensive to run.
So when this feature bubbled up to the top of the list again, I said, "OK".
The additional worker servers were $15/month. While the feature interested me, it was impossible to justify the development cost. Sure, Shift is just me. So I can spend as much or as little time as I want on it.
It's true, Shift is a Company of One. But it's important to remember the “Company” part. Companies need to be profitable to survive. It's easy to think I individually could spend my time building any feature I want. But within the context of the company, I could be wasting resources. One little feature doesn't seem like a big deal. But enough wrong features and Shift might not be what it is today.
All this is to say that it is important to value your time. That's actually one of Shift's biggest competitors. Despite Shift's incredible value, devs want to upgrade their application manually. Simply to avoid spending $19. Some might think they're saving money. That's because they don't value their time.
I do. Time is the most precious resource I own. I'd rather spend time with my family, doing live streams, or woodworking than on a feature that no one needs.
Said another way, I don't like wasting time. And bringing that back to the servers, when purchasing a server for a month it's unused a far majority of that time. One of the things that sold me on finally building this feature was efficiency. I'd add the servers when I need them. Then remove them when I don't.
From the intro hook, we know building this feature was a win-win from a savings and user experience. So, what were the wins?
Shifts run in real time. However, some of the subscriber automation takes longer to run. Specifically the weekly automation which runs any time Laravel tags a new release. This normally happens every Tuesday. But really at any time they can tag a release. Some weeks they tag multiple.
To get through the automation for all of the subscribers could take up to 4 hours. Which initially justified creating its own worker server. But going back to the intensity of these jobs, in order to reduce the time I would need to increase the size of the server. Therefore paying more.
This feature allowed me to scale horizontally, instead of vertically. In this case, instead of one larger server processing all the jobs, multiple smaller servers would process the jobs. This switch actually reduced the runtime from the weekly automation from 4 hours to 32 minutes.
In addition because I'm spawning new workers during demand and destroying them during lulls, I pay the hourly rate. Scaling vertically I pay a continually increasing amount monthly ($30/month, $35/month, etc). With most of that time the server sitting idle.
Scaling horizontally, I use a smaller server, but spawn up to 3 of them. These servers are roughly $0.04/hour. That means instead of $30/month, I pay $0.48/month ($0.04/hour/server x 3 servers x 4 hours/month).
The savings were impressive. They surpassed the best of the best case scenario when I was running calculations to justify the feature. It's really blown me away.
Yet aside from the user experience improvements, the cost savings are a bit laughable. Shift has made over $1,000,000 in revenue. Saving $29/month is arguably inconsequential. Heck, the fact that I was only paying $30/month was already good. So paying $0.48/month is ridiculous.
That's kind of fits for Shift though - ridiculous automation for a ridiculous value. Automatically spawning and destroying servers based on queue workload means one less thing I have to worry about. Less worry keeps working on Shift and running the business fun.
]]>I like to keep them terse and fun. Hence the regular expression reference and use of emojis.
This one really gets two checkboxes. Shift definitely expanded as a business in 2021, not only in revenue, but also size. Shift grew 30% in 2021 despite no Laravel release. In doing so, it finally crossed $1,000,000 in revenue.
I increased Jess' monthly retainer. She's also partnering with me on recent projects, like the Workbench desktop app. I recently contracted Saurabh Mahajan for additional work as Jess' focus has shifted (no pun). Although not necessarily employees, they do represent a growing Shift team.
I didn't expand my knowledge base in 2021. At least not the way in which I wanted to. The goal was to read more, a carryover from 2019 goals, and learn Spanish. While I did attempt both, I by no means succeeded.
Any spare time I had was spent taking care of Izzy, working on investments, woodworking, or sleeping. All but the latter being other goals for 2021. I'll carry this goal over one more time. If I don't achieve it in 2022, it clearly is no longer a priority.
Another solid checkbox for woodworking. In 2021 I built 6 coffee tables, 3 dining tables, 2 end tables, and a cutting board. All of which was from lumber I had or took to the raw log to the sawmill.
I enjoy woodworking. To me it's a craft much like programming. It allows me to use my skill to achieve a vision. Unlike programming though, it's finite.
While I don't do it for the money, I do sell the pieces. Most of the profit goes into Izzy's college fund. Some of it I use to buy new tools for the next project.
In 2021 I diversified my investments dramatically. Previously, the bulk of my investments were in the stock market. Now I have about 10% in crypto. Anytime there is a dip in BTC or ETH, I buy more. I also buy some of the staked coins for the interest.
We also purchased a rental property. While we have a long-term vision to use the property ourselves, we plan to rent it for the next several years. Renting will should lessen our initial investment. But ultimately it's an asset, not so much an investment.
Another big checkbox for 2021. Ashley went back to work from maternity leave in February. The remainder of the year Izzy enrolled in Daddy Daycare. I watched her between her daytime naps. During which I did my best to work through my task list for Shift.
We are looking into actual daycare for 2022. Covid restrictions has delayed enrollment. In the meantime, the grandparents have helped by watching her one day a week.
Since there was neither a Laravel release this year, nor conferences in person conferences, I did have more free time. However, as much as I enjoy spending time with Izzy, I don't want to neglect Shift. After all, Shift is what affords me the flexibility to spend time with Izzy.
Looking ahead to 2022, I will carry over one goal and tweak some others. The overall theme is preparation.
Over the last few years I have been expanding Shift. This year, instead of adding new products or services, I want to focus the existing ones.
I think Shift has reached a critical mass. Possibly even beyond it. I also think 2022 (or 2023) may peak Shift. As such, I want to focus on Shift's products and services which are used most. Then, cut the rest. This way I'll be ready to turn the correct dials as things transition.
Again goal has carried over twice now. So, the realistic goal for 2022 is to read (or listen to) 10 books. In addition, I want to learn enough Spanish so I can communicate effectively when we take our vacations to Mexico.
Since I am self-employed, I don't have much in a traditional 401(k). As such, I am responsible for funding my own retirement.
Given my other investments, I haven't been too worried about this. However, with each passing year, I want to start planning for the longer term. This goal is to create a new, separate investment fund. Ideally seeding it with a few years salary to prepare for retirement.
I'll turn 40 in 2022. This sounds like a big milestone. It is just a number though. The only reason I mention it is to mark the beginning of a transitional period. One where my time and focus is spent more on life and family.
This period might be 5 or 10 years. My goals will align with this transition. Ideally making it shorter. In addition, I will make fewer goals. As the ultimate goal is to transition from work to life.
]]>This post is massive. Roughly 7500 words. I started writing it a few years ago. Mostly as a journal. Sometimes as an outlet.I've reorganized it as a review of the last 6 years I've spent working on Shift. With some personal reflection mixed in.
I did my best to focus each section on a specific topic. Each has a descriptive title and document link. I also tagged each section for Business Insights and Personal Notes. Hopefully these help you to skip around or come back later to read more.
They say as a solopreneur you never forget the day you pass $1,000,000 in revenue. Last Tuesday was that day for me. It was 6 years in the making.
Let's start at the beginning. It was php[world] 2015. I gave two talks. One being All Aboard for Laravel 5.1. It focused on the changes from Laravel 4.2 to Laravel 5.1 and provided an upgrade path between these versions.
Taylor Otwell, the creator of Laravel, was in attendance. I spoke with him after the talk and asked if he knew of any scripts for upgrading Laravel 4.2 applications. His simple, but memorable reply was, "No. But I'd use it."
As someone who had been around PHP projects, I'd seen such scripts. They existed for Magento patches, as well as other frameworks, like CakePHP. As contractor for web agencies, I thought about scripting portions of the upgrade process for Laravel projects.
The combination of Taylor's response and my own need gave me a nudge to try and build something. To add to the perfect sequence of events, the conference hosted a hackathon. I placed myself at Taylor's table. We started the evening with a discussion on YAGNI. Ironically, Taylor left the conversation to incorporate Vue into Laravel. I worked on the smaller upgrade path between Laravel 5.0 and the recently released Laravel 5.1.
I hacked together some simple PHP and shell scripts through the night, occasionally interrupting Taylor for clarifications on the Laravel code changes. After all, I was still learning Laravel.
By the end of the night I had a functional prototype to try. However, I didn't have a Laravel 5.0 application to test it on. While it might be hard to believe, neither did Taylor. I went around the room from table to table asking if anyone had a Laravel 5.0 application.
Everyone pointed me back to Taylor, saying, "That's the guy you want to talk to." This foreshadowed some of the challenges I would face down the road. Ultimately Taylor posted on Twitter to help me find some alpha testers.
I continued building the scripts on the flight home and in the following weeks. Once I completed the upgrade from Laravel 5.0 to Laravel 5.1, I move on to upgrading Laravel 4.2 to Laravel 5.0. This way, I could test the entire upgrade path on some of my own apps.
I honestly don't remember why I decided to make Shift a software as a service (SaaS). Taylor's words may have given me confidence. Or maybe after selling iOS applications I believed in paid software. Either way, over the next few weeks I developed a single page site (with design from my buddy Shawn Coots). It authenticated with GitHub and used Stripe Checkout for payment. The website spawned a PHP script in the background. When complete, the script opened a Pull Request with code changes for upgrading your Laravel application.
Even though I decided to sell the product, I priced it ridiculously low. I was attempting to balance what some might expect to be free, with the developer hours it saved. I was also heavily influenced by what I was currently familiar with, the App Store - where software was sold for pennies within a large market place.
Even in 2015, Laravel was already one of the prominent PHP frameworks. It had nearly 1,000,000 downloads. I did the same naive calculation as any founder. I figured a couple bucks from everyone and I'd reach a $1,000,000. The App Store and Google made such a long-tail approach seem doable.
The upcoming release of Laravel 5.2 gave me an opportunity. It also gave me a hard deadline. Just a few days away it forced me to launch. But I had not built the Laravel 5.2 Shift. I frantically threw it together to be able to launch with the release of Laravel 5.2.
I launched Shift on December 23, 2015. I marketed Shift as easy as 1-2-3: Sign in, pay, and review the PR. I charged $3 for the Laravel 5.1 to 5.2 upgrade. $5 for the Laravel 5.0 to 5.1 upgrade. $7 for the Laravel 4.2 to 5.0 upgrade (big money). Each of these Shifts likely saved developers hours of work.
Over the Christmas holiday I made $80. While that doesn't sound like much, it accounted for about 20 runs. During a holiday week no less. I had no social media presence. Taylor retweeted the Shift release post. So that helped. All things considered, it was a good launch.
Over the next few weeks Shift made another $140. I had taken an idea from nothing to making income in less than a month. I didn't necessarily know it at the time, but Shift had some pretty influential users. Not only did Taylor use it, but so did Jeffrey Way, Freek Van der Herten, and Adam Wathan.
What I did next was not only a personal trait, but also good practice. It's something you'll hear almost every successful founder do. I reached out to my customers. I have no doubt this helped make Shift the success it is today.
I emailed every user who ran a Shift and asked them three simple questions:
The answers to the first two weren't always so positive. In fact, I remember Jeffrey Way replying that while he liked the idea, he felt it was rather "buggy". This might have been pretty discouraging. Some may even have taken the service down until they could make it better. But I didn't.
It wasn't that he was wrong. Shift was buggy. I knew I had cut corners. I rushed the development of the Laravel 5.2 Shift. I was still pretty new to Laravel. Even though I'd been writing PHP for over 10 years, I'd been writing Laravel for less than a year.
I wasn't as familiar with all the features of Laravel. All the ways you could craft your application. Even all the changes between versions. I didn't really know the common coding conventions. Definitely not as much as Jeffrey Way. Who taught it all on Laracasts.
No matter what, I reviewed and answered every single reply. I took them as an opportunity not only to improve the automation Shift provided, but also the experience.I still personally manage all support emails. I try to reply to as many as possible. It's a big part of my day. But I will continue to do it as long as I can.
Over the next few months Shift continued to make a few hundred dollars a month. It wasn't growing in revenue, but it was growing its user base. Every month, another few dozen Laravel developers were giving it a try. Nearly all of them coming back to run more (Shift has a 90% retention rate).
Going back to the third question, I realized most of the users were reaching Shift from Twitter. The retweets Taylor provided in the beginning went straight to Shift's target audience.
Taylor's tweets are invaluable. I don't think they are a silver bullet. But, sticking with the metaphor, they do provide extra gunpowder. Anything coming out of the Laravel community would not have the same success without Taylor's backing. Shift included.
In the end, Twitter provided a network effect. When Shift did well (or I won users over during the feedback process), users would tweet about Shift. Those tweets would reach new users, I'd improve Shift, and the cycle would continue. There's a limit. But it definitely helped in the beginning.
Over the next few months I worked to establish my presence in the Laravel community. I also become more familiar with Laravel itself. I had the fortune of being asked to speak at Laracon on that very topic Taylor and I discussed back at the hackathon - Practicing YAGNI.
For me, it was an opportunity to speak at a premier conference. In my hometown no less. On a stage I grew up watching plays and bands. For Shift, it allowed me to reach 400 members of my target audience. The conference was right before the release of Laravel 5.3. After which, I noticed a 10x increase in revenue. It took Shift from a few hundred dollars a month to a few thousand.
In 10 months, I had taken Shift from $0 to $3,000 a month. It was Ramen Profitable. I wasn't familiar with this term until I completed a timeline on Indie Hackers. The amount may not be that impressive. Remember, prices were between $3-$15. So Shift was getting nearly a thousand runs a month. The trajectory was impressive.
Unfortunately, I treated Shift as a side project. Something which brought in seasonal income. I didn't prioritize it. In April 2017 I accepted a 1-year consultant role with Papa Johns. It paid double my current job and 10x Shift's annual revenue. Financially, there was no reason for me to focus on Shift.
That year I wasn't accepted to speak at Laracon. As such I didn't see a pop in revenue or Twitter followers like 2016. My audience grew organically, but I wasn't maintaining any momentum. Sales spiked in March and September for the Laravel releases. Otherwise revenue remained between $3,000-$5,000 a month.
I continued to be active within the Laravel community. Often focusing on PRs and communicating with peers. One of which being Adam Wathan. He was way farther down the road of a solo founder. I guest starred on a few episodes of his Full Stack Radio podcast. Over the years, I've been able to bounce ideas off of him. I'll absolutely credit himfor recommending tiered pricing.
Between 2016 and 2018, Laravel versions 5.4, 5.5, 5.6, and 5.7 were released. This added 4 additional SKUs to Shift's catalog. I had increased the base price to $9, and staggered each version by $2. So the most recent Laravel 5.7 Shift was $9, and the Laravel 5.0 Shift was $21.
In April 2018, I renewed my contract with Papa Johns for 6 months. The growing catalog was increasing revenue for Shift. Yet it was still no where near my salary. Nor was its trajectory indicative of passing that any time soon. The combined income from the contract and Shift also put me on track to financial freedom.
Fortunately, I was accepted to speak at Laracon 2018. This time, I felt comfortable incorporating Shift. I gave a talk called Laravel by the Numbers. It shared some of the insights into developing Laravel applications. Ideally guiding developer decisions. It was well received. To this day, developers continue to thank me for the insight it provided.
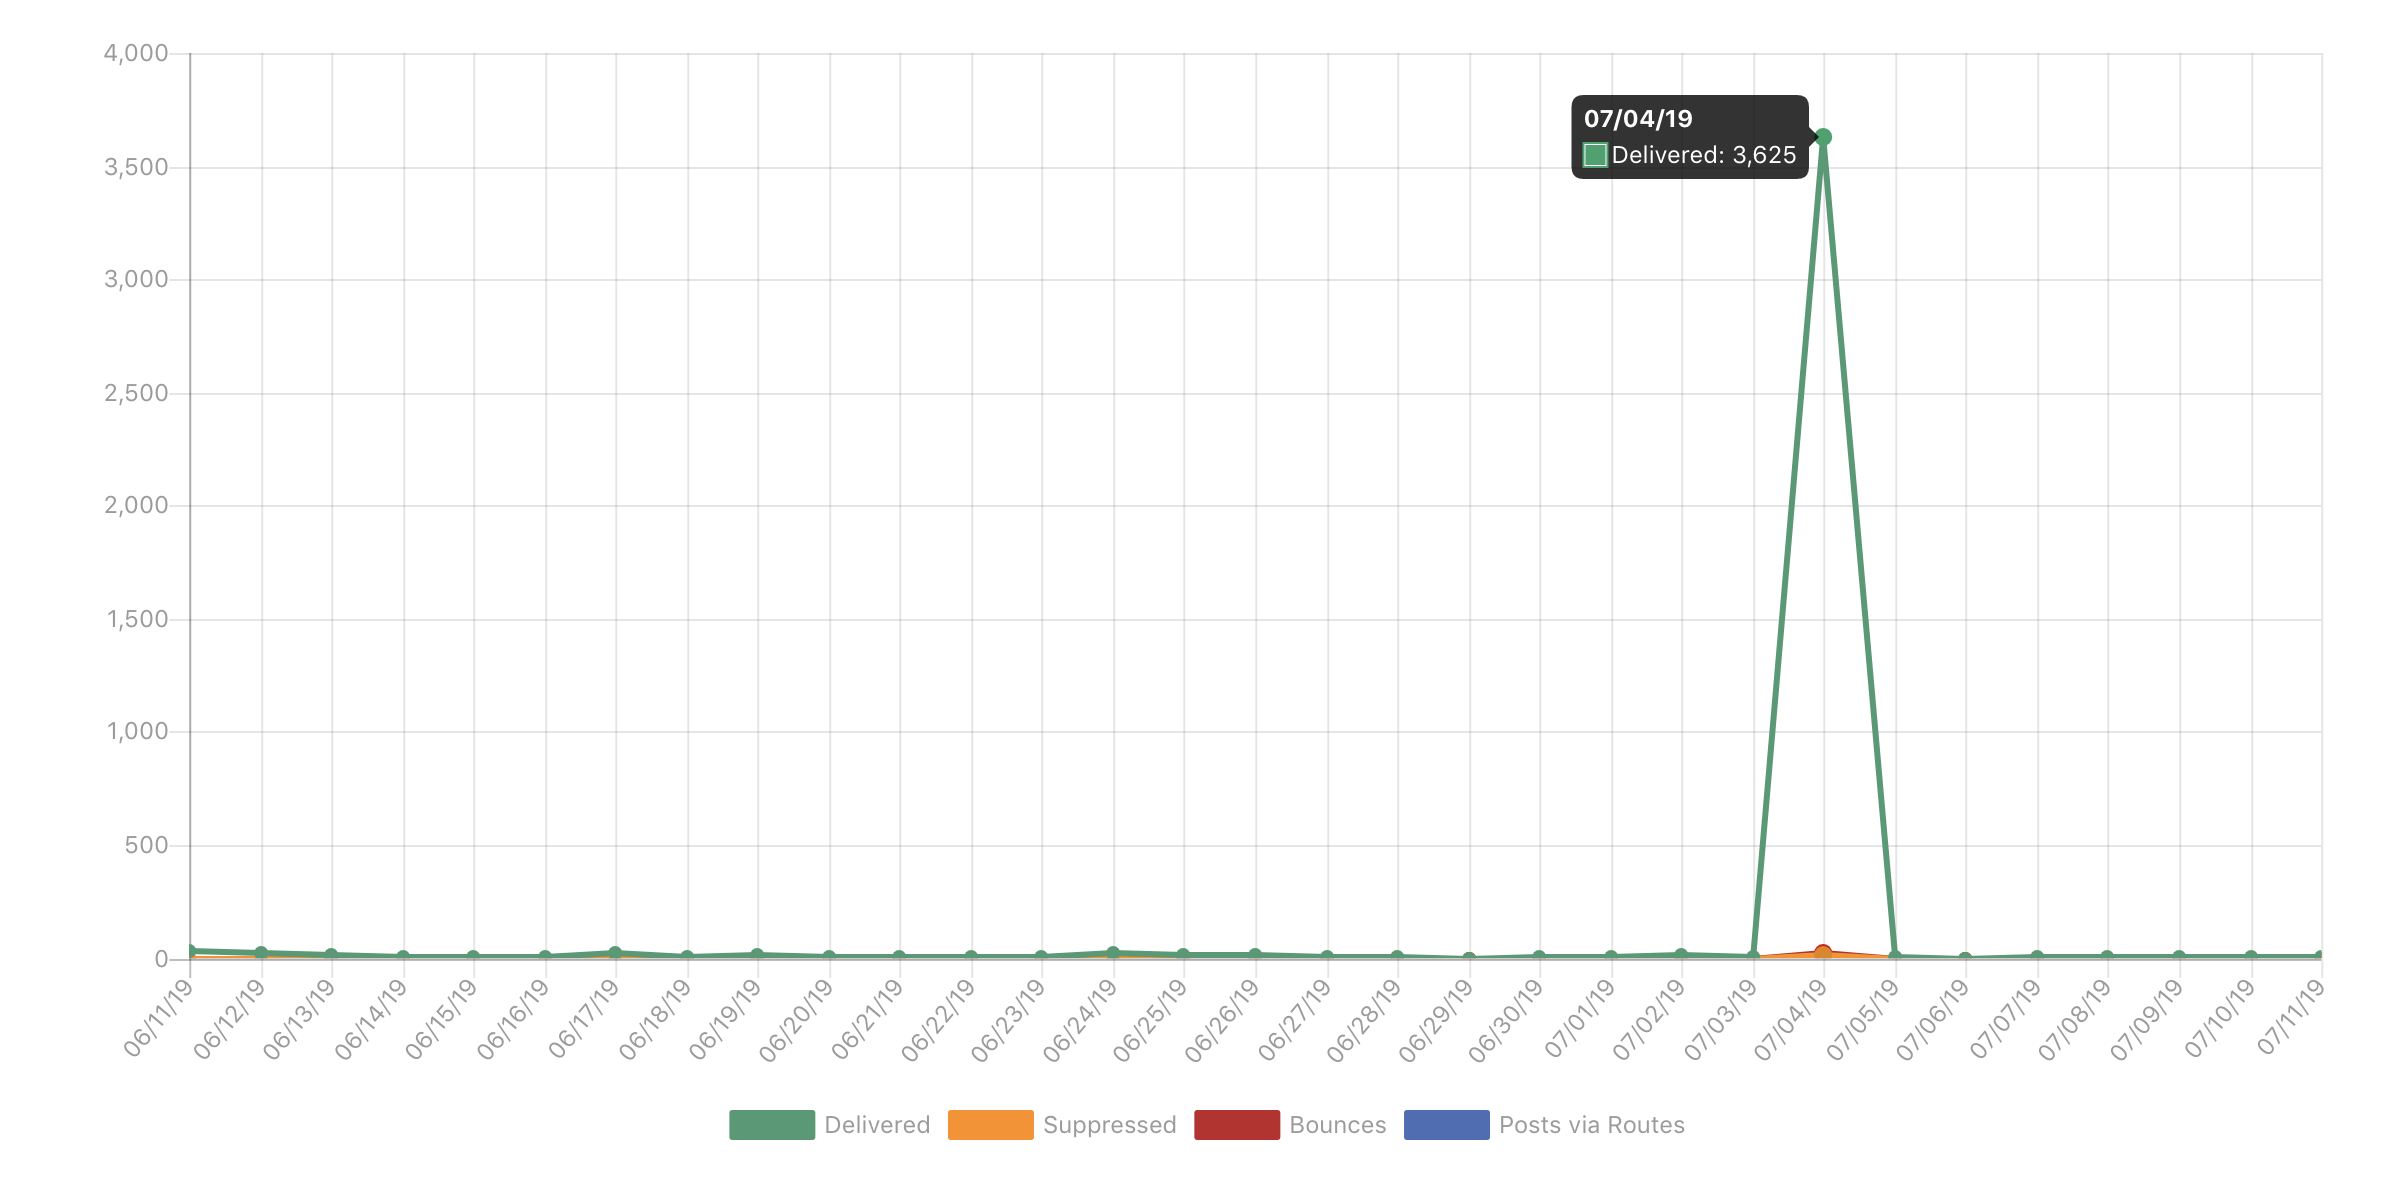
Laravel 5.8 was released a few weeks after the conference. Shift had a 30% increase in sales and hit a monthly revenue high of $6,315. When my contract ended in October 2018, I finally decided to go "full-time" on Shift.
I titled this section as a missed opportunity. Looking back I could have taken another path - I could have gone full-time much earlier. I had grown to ramen profitability in less than a year. For the next two years I let revenue stagnant. I completely lost the momentum.
Keeping the momentum, Shift may have reached the same level by the next Laravel release in March 2017, instead of October 2018. Also two years earlier. I don't think it would have taken much - a coordinated marketing effort on Twitter and leveraging some existing relationships. I don't know. I do know I lost momentum.
I don't have any regrets. But from a business perspective, this was a misstep. Going full-time on Shift wasn't my mindset at the time. I still didn't think it was anything. I am not a business guru. I am not a pushy salesperson. I am a decisive person. I am a problem solver. The truth is, I stumbled into a niche market. Nothing more. I just liked writing code automation. I never really had a business plan.
With the recent growth, I spent more time on Shift. It still wasn't making more than my day job. But Shift also didn't have its usual dip post-release. Revenue stayed above $6,000 per month heading into 2019. Since I managed to save money during my contract extension, I felt comfortable giving Shift a year. If I dipped into that savings, I would get another job.
This time, I made a plan. I would make Shift a true SaaS by introducing a subscription service. While the bi-annual release cycle created recurring revenue, it wasn't stable. Subscriptions allowed users to lock in the cost of upgrading. It also allowed me to forecast revenue. This way I could better measure growth and feel more comfortable with my decision to go full-time.
As with any launch, there were a few early adopters. But it wasn't a no-brainer purchase that I (again) naively thought it would be. Looking back I think there were two reasons for this.
First, Laravel wasn't necessarily releasing that many new features at the time. As I would learn, in the real world, not everyone cares about running the latest version right away. Second, Laravel adopted long term support (LTS). Certain versions of the framework were guaranteed support for 2 years. Further giving developers comfort to remaining on older versions of Laravel.
The combination likely prevented the subscription model from being as appealing at the time. I pivoted. I attempted to provide Shift for additional platforms. The most obvious was PHP itself. After all, if upgrading Laravel made thousands of dollars a month, upgrades for the larger PHP community should achieve an equal or higher amount.
If so, I could grow monthly revenue above $10,000 a month ($120,000/year). That would be a competitive developer salary. Although still not as much as I made consulting. Unfortunately, the PHP Shifts fell even more flat than the subscriptions. To this day, the PHP Shifts account for less than 1% of all Shifts run.
This goes back to the night of the hackathon. I didn't see it at the time, but there was a division between PHP and Laravel. This has likely been exacerbated by the rise in popularity of Laravel. We have unfortunately all been witness to the attacks on Twitter and Reddit. I myself have been caught in them a few times.
The bottom line (no pun) is the PHP community doesn't see the value of Shift. I think the Laravel community is more accepting of paid products and services. While upgrading PHP versions should appeal to a larger audience, that audience isn't as willing to pay. They would rather do it themselves. This, of course, goes for all developers. Anyone really. Some people don't see their time as a cost. Or, they just like doing it themselves.
I still make some PHP Shifts. Mostly for my own use. Or for code used by Laravel, such as PHPUnit. These Shifts are almost always free. I get asked about Shifts for upgrading PHP versions from time to time. But not enough to try again.
Shift continued to make between $6,000-$8,000 per month. In August 2019, I was accepted to speak at Laracon again. I gave a similar talk before to review the "Shifty bits" within Laravel. This time, Shift had a 50% increase in revenue.
When Laravel 6.0 was released in September, Shift hit a new monthly revenue high of $20,312. Based on the growth in August, I do think Laracon continued to help. Laravel 6.0 was also an LTS version. Likely triggering older applications to upgrade. This finally made a subscription appealing. So a portion of the increase was the influx of upfront subscription payments.
A majority of sales were still from the pay-as-you-go Shifts. There was an 80% increase in the number of Shifts run for the month. Yet they didn't make up 80% of the monthly revenue. Subscriptions generated nearly 50% of the revenue. Something didn't add up.
The release and the continued growth of Shift helped break through to the next revenue milestone (5 digits). Revenue has remained above $10,000 per month since August of 2019.
When I first launched Shift I sold each Laravel version upgrade for a few dollars. I was used to this model from selling iOS applications for $0.99. I was uncomfortable selling software. I mitigated this with a low price. I also justified it by thinking everyone would use it. Reaching a million in revenue is pretty easy when your multiplier is "everyone". It's also pretty naive.
First, not everyone is going to use your product. Some people aren't willing to pay. Some people won't believe in it. Some people just like doing it themselves.
Second, "everyone" is not really everyone. Your product has a market. That market has customers. In the case of Shift, this means Laravel developers. Technically speaking, it means Laravel projects. How many Laravel projects are there? 1,000,000, 500,000, 100,000? Stats like download counts lead you to inflate this number. In reality, once you filter down projects running old version of Laravel in production, this number becomes much smaller.
Finally, a low cost implies a low value. It's just the world we live in. When something is a few dollars, it's likely to be perceived as not very good or throw away. Sure, some will try it because of the low price. But others may not try it. A low price may hurt your value. You're also probably not attracting the type of customers you want.
It took me a long time to realize this. Over 3 years. Even then, I wasn't fully comfortable raising prices. It still took some pushing. I continually received feedback from users literally telling me "charge more". Marcel Pociot would actually buy a Shift, then PayPal me an additional "donation". I still receive emails from time to time saying charge more. But now I also receive replies from the abandoned cart emails saying Shift is "too expensive". It seems I'm getting closer to the right price.
I did raise prices over the years. Although, aside from the initial launch pricing, I only raised it after a new Laravel release. This is still how I do it today. The problem in the beginning was I'd only raise the price of the older Shifts by a few dollars.
I used staggered pricing. The oldest version would be the highest price. The next version would be a few dollars less, and the next a few dollars less. Until you got down to the latest version at the lowest price. Usually $9.
I did this to incentivize the customer to continue their upgrade to the latest version. Using the descending price as a sort of dangling carrot. I still think it's a good idea. Maybe just poorly executed.
Adam Wathan helped made me realize this in early 2019. He pointed out that my staggered pricing lacked structure. As such it was unpredictable. Customers might not be able to forecast the cost of upgrading using Shift into their budget.
He suggested using tiered pricing. Older versions were all one price and the new version another price. In the end, I actually created three tiers. I aligned them with Laravel's Support Policy. Any unsupported version of Laravel was in the highest tier ($29). Supported versions were in the middle tier ($19). The latest version was in the lowest tier ($9).
Tiered pricing did two things. First, it anchored price between the versions. It was more clear to see the pricing path if you're running older versions. In turn, this more clearly demonstrated the incentive to stay current and pay the lowest price.
Second, and most importantly, it allowed me to raise the prices for Shifts across-the-board. Under staggered pricing, upgrading a few versions might have a cost delta of just $6. With tiered pricing, the cost delta might be $30. That's a 5x increase in revenue for a common use case.
Moving to tiered pricing was the most impactful change for Shift. It allowed me to hit my revenue goals for 2019 and continue staying full-time on Shift. It also makes Shift revenue less seasonal. As those upgrading outside of the release are usually purchasing Shifts at the higher price tier.
Shift still had not surpassed the salary I was making as a consultant. Yet I could forecast it doing so in 2020. So I didn't set any conditions. I was comfortable working on Shift full-time until its decline.
By this point the Laravel Shifts were really refined. I had automated the upgrade for 9 Laravel versions. The code had evolved from copied scripts to core classes. This foundation made it easy to develop new Shifts quickly. So I wanted to try to tap into additional markets again.
This was mostly for diversification. I had seen multiple PHP frameworks come and go in my career. It seemed prudent not to have all Shift's revenue tied to one market. If I could reach another market as I did with Laravel, I might be able to double revenue.
PHP would be the obvious choice. Releases were becoming more frequent. There was a new major version release with PHP 8. Unfortunately, past experience left me very skeptic. I didn't believe there was any potential.
I considered JavaScript. I chatted with a few prominent members of that community. Most seemed to have the same sentiment I had about PHP. The community is split and the DIY mentality prevalent. There were just too many frameworks and too many packages with all sorts of little tools and scripts available. It would have been an uphill battle.
I wanted something like Laravel. That didn't just mean a full-stack web framework. It also meant a community that valued services. A willingness to pay for services. These are deeply ingrained into the Laravel ecosystem. From the beginning, Laravel had paid services like Forge and Laracasts. Anyone within the Laravel community learns the value of these services. I believe that makes them more open to other services within the community.
.Net, Java, and Ruby satisfied these conditions. They all had full-stack frameworks and communities where paid services were common. I had the most familiarity with Rails. I sent a quick email to DHH asking if he felt a service like Shift would be accepted within the community. He replied with some stats about the number of Rails sites in production and recognized the pain of upgrading.
Similar to Taylor's feedback, this was all I needed to get started. Like Laravel, I would start by building a few Shifts to upgrade between the recent versions of Rails. However, I hadn't used Rails since version 3. I realized I wasn't as familiar with it as I used to be. I also didn't have a presence within the community. There may be a small section of Laravel developers who were also Rails developers. I doubted this would be enough to break into the Rails market.
I decided to try and find a partner. Someone to not only help me complete the Rails Shifts, but also help with marketing. This proved a bit challenging. It reminded me of those times people asked me to build them an iOS app with some random idea they had. But now I was on the other side. It didn't feel right.
Time started to work against me. The next Laravel release was on the horizon. I was going to speak at Laracon again. I just didn't have the time to manage the new venture. I plan to revisit it. But it needs to feel right. Ideally finding a partner more organically.
I decided to diversify within the Laravel market. Upgrading was only one piece of maintaining a project. Maintenance, in general, is much broader. It includes things like writing tests, setting up CI, and code refactoring.
The current Shifts only addressed upgrading. All the Laracon talks I had given before were on these other topics. I had even written books and made courses on these topics. But I wasn't bring them back into Shift.
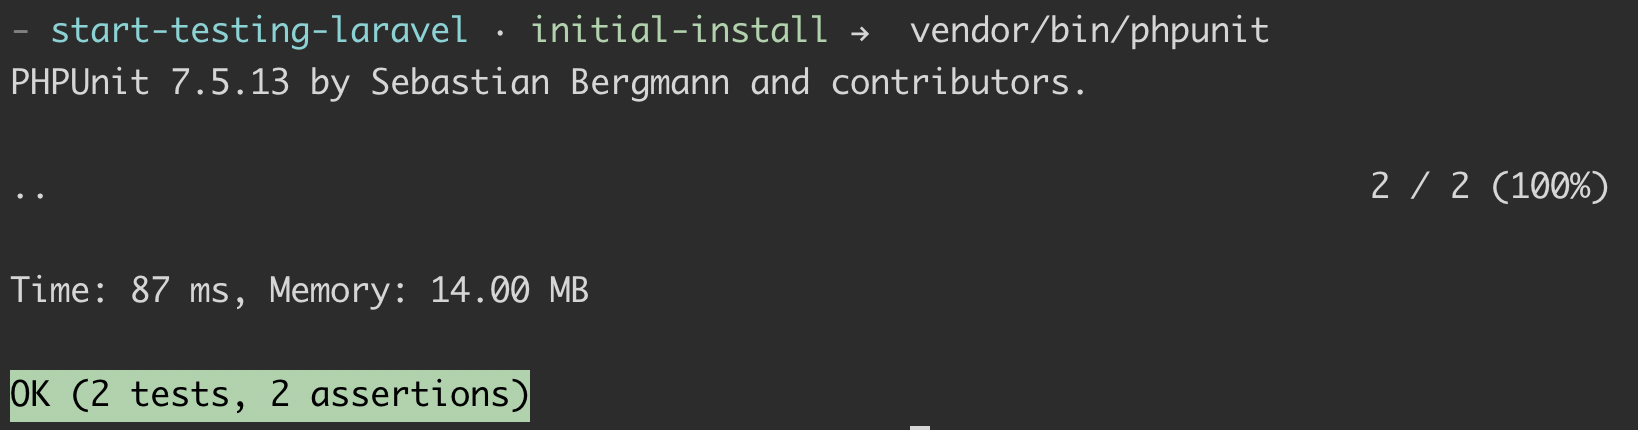
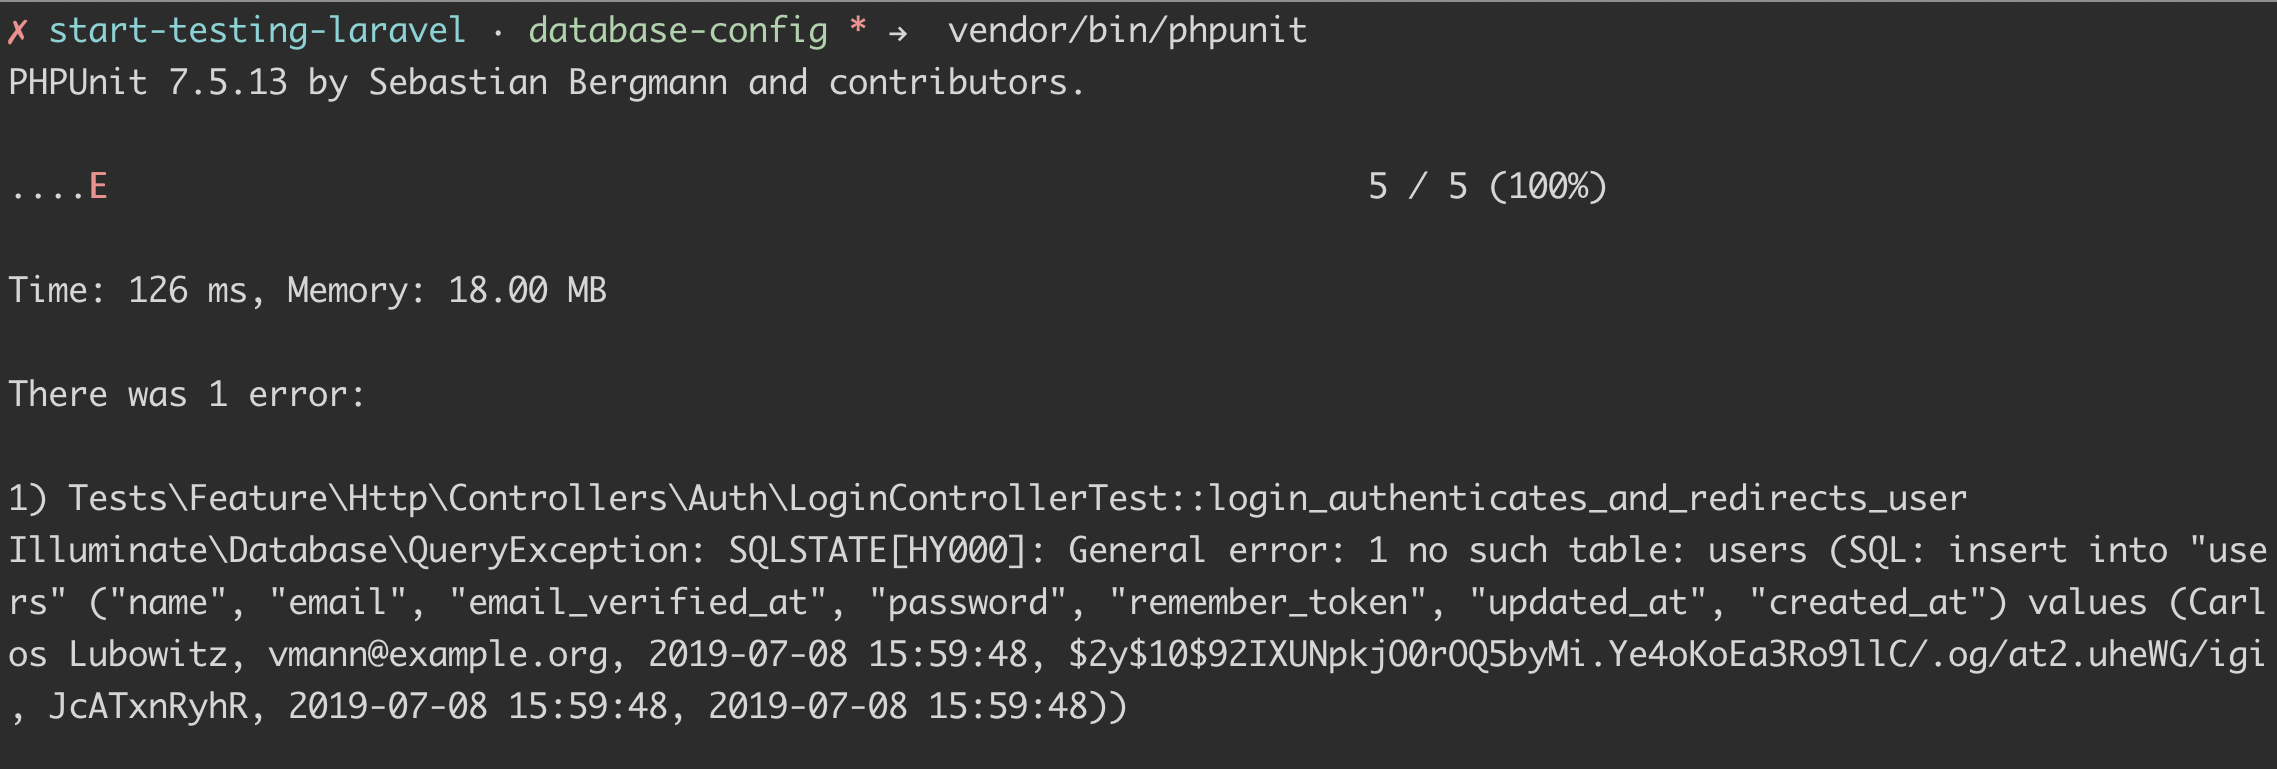
I created the Test Generator to generate tests for existing Laravel applications. This not only helped developers get started with writing tests, but also helped them to verify their upgrade. This complimented the upgrade process by giving them more confidence their application still ran as expected. All of which speeds up the maintenance process.
I also created the Shift Workbench. This took automation from the various Shifts and allowed them to be run individually as tasks. The cloud-based version released in May of 2020. With help from Jess Archer, we also released a desktop version (Electron) in July of 2021. The Workbench mainly focused on refactoring Laravel and PHP code.
Having a desktop app lowered the friction of signing into and interacting via the web UI. Instead developers could run automation directly on their local machines. This opens up all sorts of possibilities in the future. Eventually you'll have all the automation of Shift available conveniently from your desktop.
Finally, we recently created the CI Generator. This automatically generates CI for GitHub, Bitbucket, and GitLab. It scans your project to set up running your test suite and performing static analysis anytime you open a pull request. This further improves the experience when running other Shifts. Ideally leaving you with a successful build after the automated changes.
Sales from these don't necessarily move revenue as much as being in a different market. It does however diversify Shift. At least beyond strictly Laravel upgrades. Now Shift moves to maintaining Laravel projects. This helps widen the market of Laravel developers. It also further combats the seasonality around the Laravel releases.
This has proven timely as Laravel moved to an annual release cycle. In fact, there will not be a new version of Laravel released in 2021. Despite this, Shift revenue has continued to grow. Albeit not as much as previous years. But I'm optimistic for 2022.
I will continue to try to push Shift into additional markets. In fact, we did find a market which overlaps with Laravel – Tailwind. Tailwind was created by members of the Laravel community. So it's commonly used within Laravel applications. Making these Shifts appeal to much of the same market. While they don't get a lot of use currently, I do think they'll receive more use as Tailwind itself continues to grow.
Laravel is a community of giants. Taylor himself reported making over $10,000,000. Adam made $2,500,000 from his courses and created Tailwind CSS. Caleb Porzio makes $100,000/year in sponsorships and created Alpine.js. These were just the posts I've read over the years. There are more giants in the Laravel community like Jeffrey Way with Laracasts, Jack McDade with Statamic, and David Hemphill with Nova. It's really incredible.
With all these giants around you, it's easy to feel small. Shift isn't a revolutionary framework. It isn't an invaluable learning resource. It isn't a fancy app. It isn't really even a piece of software. It is a tool to help you upgrade your code. By comparison, that doesn't seem that cool.
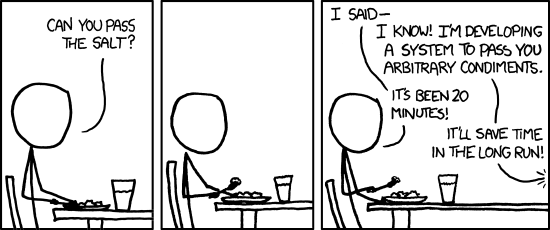
At times this made me insecure about Shift. With so many cool things to talk about, who wants to talk about upgrades. Furthermore, sometimes the Laravel upgrades are touted as only taking 15 minutes. Which seemed to diminish the need for Shift.
I often find myself asking members of the Laravel community to retweet announcements for Shift. To me, it feels like I asking for favors. I believe in merit. If something is good, people will use it. People will talk about. Asking people for retweets didn't make me feel like Shift was all that good.
Even though Shift was growing 40% year-over-year, I didn't feel like I had made something of value. I didn't feel like one of the giants around me. Despite jokes within the community, I didn't consider myself in the Laravel Elite.
By most measures I stagnated. Other peers within the community were growing Twitter followers exponentially. I barely broke 10k. Despite launching multiple educational products, speaking at Laracon, and creating Shift I didn't seem to have any popularity. On one hand, I could message Taylor or Adam and often get a reply. Yet other members of the community rarely responded. I often got ghosted when asking for advice.
I actually struggle with inclusion. It takes more for me to feel welcome or valued. Social media feeds off this. It was worse during Covid, where at times, it was my only point of contact. Normally I'd attend conferences and social events. In-person settings where I can glean some extra cues to feel included. Without this, there were days these feelings would creep in.
I joked with Jacob Bennett once by calling myself the garbageman. That's what I felt like. Someone who provided an essential service to the betterment of the community, but rarely recognized for their efforts. I appended a 🗑 on my Twitter handle to embrace the joke.
I've seen multiple projects within PHP dragged down by legacy code. WordPress is the goto example. I'd like to think Shift helps contribute to the freshness of Laravel. If so, I'm glad to be the garbageman picking up the trashy Laravel apps one-by-one.
Reaching a $1,000,000 in revenue has provided some validation towards my efforts. I did it mostly on my own. There's been no special treatment. Shift isn't listed in the Laravel docs. I don't have an inside track with the Laravel team. It's just me, grinding it out the past 6 years.
This is all part of being solopreneur. You just keep grinding. Grinding code. Grinding sales. Grinding support. Grinding internally. A constant grind. It's not easy. If it seems that way, you probably don't know the whole story or someone got real lucky.
Bringing it back to revenue, Shift could be making at lot more. I could continue to raise prices. I could grow into in a real business. These are things I thought about over the years. Even battled with at times. I don't plan on doing either of them.
I'm happy with the tiered pricing. I could increase the price of the tiers. I could easily charge 3x-5x more. In doing so, Shift might lose 20% of customers. Working out that math, Shift would still increase revenue by 3x.
I don't think I'll ever shake my "keep the cost low so everyone uses it" mentality. I do think I may drop the lowest price point. $9 for the latest version upgrade is somewhat nostalgic at this point. So I'll keep it as an introductory price. Offering it for a limited time after launch. Then raise it to the $19 price tier. Especially with Laravel's new annual release cycle.
This also reminds me of something Sebastian Schlien said about how early adopters are your most loyal customers. They are going to buy it regardless. Giving them a discount leaves money on the table. Since I'm already leaving so much money on the table by keeping Shifts prices low, I don't want to leave even more.
I could also hire someone in order to move into new markets. Hiring someone who meets the criteria above the would require offering a competitive salary. That would eat into roughly a third of Shift's current annual revenue. I do not expect an employee pays for themselves right away. An employee is a long-term investment. Eventually they add capacity and ultimately a return on their investment. I still don't look at Shift from the long view. So it's hard for me to see the value of an employee. That may be short-sighted.
Another angle would be to partner. Maybe through some kind of profit share. I'm more open to this. Yet it's not without similar challenges. Again, it would need to be competitive. Do they get a portion of the existing Shift revenue. Only joint ventures? What's the percentage? Do they vest over time? What is fair for both sides.
Ultimately, I don't want the stress. I have no desire to grow the business from the perspective of employees. I decided long ago - I am not a manager. I remember meeting with my boss at one of my first jobs. He said someday I'd have to choose between being a specialist or a manager. Even then I knew I wanted the specialist path. However, multiple tries as a Team Lead proved it. I'm just not good at managing humans. My expectations are too high. I have a strong work ethic. I'm not always comfortable transferring responsibility to someone else.
For these reasons, Shift will stay a solo venture. In fairness, Jess is on a monthly retainer. It's only for the hours she wants to spend. She's also moved into a partner role on some of the recent developments, like the Workbench desktop app. I am also contracting another developer for a few hours a month. I don't see either of them becoming employees. That's as much their choice as mine.
I also noted in the intro that I could have made more as a well-paid software engineer. $1,000,000 over 6 years is roughly $167,000 a year. That's a good salary where I live. It would take some time to achieve. Compared to revenue from Shift, a salary would made more in 2016, 2017, 2018, and 2019. 4 of the 6 years I'd been working on Shift.
In fairness, I didn't go full-time on Shift until 2019. That year, Shift made $126,000. Again, a good salary, but not more than a job. Yet in 2020, Shift made $267,000. Over a 2x increase. I expect another similar increase in 2022 with the release of Laravel 9.
At this point, Shift makes far more than I did at previous job. Maybe not more than all jobs I could have. However, this focuses only on the money. Shift affords me far more benefits than money.
In the end, I am a Company of One. As such there isn't a lot of pressure for me to optimize or even grow Shift beyond what I can manage. Of course I take opportunities to optimize the Shift codebase and provide the best service. But from a business standpoint, I'm likely not managing Shift to its fullest potential.
I'm okay with that. I'm not a greedy person. Money is a means to an end for me. It's an unfortunate convenience of the world we live in. Money allows me to take better care of my family and myself. Money makes it easier for me to do the things I want to do.
Keeping Shift small gives me more freedom and less stress. I am in control of Shift's direction. I can take on new work or not. I can work more hours or spend more time with my family. Maybe I am leaving 3x revenue on the table. To me, that's an acceptable tradeoff. It won't keep me up at night.
What matters more to me is recognition. Being seen as a value-add within the community. When I question that is when the negative thoughts creep in. It's not so much the responses or retweets themselves. It's more about the recognition they convey.
Remembering the freedom I have helps. Really it's all about achieving freedom. And while it may have been slower or lesser compared to those around me, I achieved it nonetheless.
The unfortunate truth is $1,000,000 really isn't that much anymore. I realize that's a bit ridiculous to say. Possibly unfair. $1,000,000 can be life-changing. But you have to be smart with the money.
I'm a frugal person by nature. Dare I say minimalist. I don't really buy much. You'll often find me wearing jeans and conference t-shirt. I have a late 2018 MacBook Pro. For many years I didn't have a car. When I do own a car, I buy used. About the only thing I'll splurge on is food and travel. That's how I treat myself.
I have a waterfall approach with personal finance. These are strategies I picked up from family, books, and podcasts. At a high level, I work towards the following goals:
As a software engineer I was able to earn a good salary. This allowed me to build my savings. I like to save enough to cover 6 months of expenses. This is my minimum for moving to the next goal. As I continue on to additional goals, I may build my savings to cover 1-2 years worth of expenses.
Once I build my savings, I start paying off any debts. These might be student loans or car loans. Given my frugal nature, I didn't have much debt. Really only my monthly credit card amount. Which I pay in full.
Once the debts are paid off, I try not to take on any debt again. Maybe if there's some promotion with 0% financing. Then I may do it. But I make sure to have the extra savings to pay the amount off in full before the term ends.
Next, I look to invest in real estate. In the US, this means buying a home. I was able to purchase my first home before the 2008 financial crisis. Several years ago, I sold that home to move in with Ashley. We lived together to save for a new home. I actually paid Ashley rent which she put towards her student loans. The combination allowed us to purchase a new home together in a residential area of Louisville where we had both grown up. We took out a mortgage to do this.
During my consulting contract, I focused on building savings to cover a year worth of expenses. Ashely and I also worked together to pay off our home mortgage. This is one of the reasons I decided to renew my contract instead of go full-time on Shift sooner. I couldn't lose that higher income and maintain my current financial goals. With the additional salary, extra income from Shift, and Ashley's help we were able to pay off our mortgage the following year.
Once Shift started replacing my salary in 2019, I took more of this money and put it into financial investments. I have invested in the stock market since I was 18. Any extra money I made from side work or iOS apps I'd put into stocks. I can't say I've made much money in the stock market. Mostly because I made all the common mistakes of any first time investor. While I have learned the hard way, I am more experienced now. I've seen much better returns in recent years.
Investing in the stock market is something I am comfortable with. I believe it's one of the ways to make money with money. Over a long enough timeline, the stock market can generate wealth. It's not for everyone. Ashley is actually more comfortable investing in real estate. In fact, when she replenished her savings, we invested in a rental property.
These investments are about the future. They're about taking money we have today and turning into more money tomorrow. Ideally with little or no effort. A way of putting your money to work. The investments can be whatever you're comfortable with. For example, cryptocurrency. I have a little in crypto. But overall, probably less than 10% of my investments.
The final tier I am working towards now is a retirement fund. As a solopreneur, I don't have a traditional 401(k). There is an opportunity for me to do a simplified employee pension (SEP). I personally don't prefer these retirement plans. Unless a company offers a match program, then I will invest. Generally though, despite the tax advantage, I don't like the idea of waiting until I'm old to access that money. Instead, I plan to create my own retirement investment fund using future earnings from Shift.
Ashley and I will both contribute to this fund. The goal will be to grow this fund enough to where its returns replace one of our salaries. Maybe in 10 years it might replace both our salaries. This would bridge the gap until our traditional retirement funds mature. Since we have no debt, good savings, and other investments, this could be enough to live as we do now. Although, now with Isabella, I will have to factor in the cost of raising a family. I also want to begin a separate financial plan for her.
Again, this is not financial advice. I'm sharing how I have tried to put this money to work for me. Personal finance is not something which is talked about often. But it's important. Especially in the tech industry where salaries may be higher and money needs be managed. Hopefully sharing my goals help you to make your own.
Shift will likely be the last project of my programming career. I am approaching 40. For each year that passes, it becomes less and less likely I could return to a day job. It's more likely I would move to something in a different space entirely. Maybe day trading. Maybe woodworking. Maybe I'll open a local co-working space.
Shift probably has a few years before its decline. This would probably coincide with Laravel's decline. Which is probably even farther out. If that were the case, I'd create automation to migrate a project from Laravel to whatever the next thing is. Then call it done.
Again, all speculation. In the meantime, Shift will remain my focus. I still enjoy tweaking the automation. I enjoy meeting fellow Laravel developers and helping them upgrade their successful (albeit old) Laravel applications. Most importantly, I enjoy being part of the Laravel community. I hope I have added value with Shift.
Thanks for reading and keep shifting!
]]>This was mostly to work in public. It wasn't just me. Jess Archer joined for some pairing sessions, and the audience itself helped at times through the chat.
We started on Monday and the following Monday I launched a beta version of the Pest Converter. Since launch, it's been run 37 times generating $411.
This turned out being more successful than I thought. By a few measures. So I wanted to write up a retro on the motivation and execution around building this Shift in a week.
The truth, I had the availability. Normally during this time of year I would be building the a Shift for the latest Laravel release. However, this year Laravel changed the release cycle and moved it back. At this point there will not be a release in 2021. So I've had extra time to work on various things, like the Tailwind Shifts and Workbench.
Another reason was the social aspect. Normally I go to multiple conferences a year. Either as a speaker or as an attendee. The last conference I went to was in February 2020. So while live streaming isn't necessarily the same as an in-person conference, it's the only option I have to interact with others devs in real-time. Not many attend my live streams, but I did notice an uptick for these. This came from hype on Twitter by Pest's creator (Nuno Maduro) and aggregation from LaraStreamers.
Finally it's an asset. Yet another SKU in the catalog of Shifts. The number of runs since launching may not sound like much. But consider the lifetime potential. Money was not the primary motivation. It was last. All the same consider the ROI. I spent about 5 hours streaming and maybe double that off-stream and pushing past the MVP. That gives me a rate of $30/hour. Which is 4x the minimum wage in the United States. That's all the time investment I'll have for a while. It will only improve from here.
The hype. Not only has Pest received more buzz on Twitter lately, but I've had multiple devs ask about automating the conversion of PHPUnit tests to Pest. While building a product off the requests of a few is not a very probable business strategy, I was also interested in Pest personally. I've always enjoyed the spec-based syntax and found it cleaner. With an automated way to convert my existing PHPUnit test suites, I'd be more likely to adopt Pest myself.
I've been interested in Pest from the very beginning. In fact, several years ago I built PSpec. I abandon it once I found Pho. And I abandon that due to some of its limitations with closures at the time (PHP 5). With modern PHP, I'm excited to revisit this with Nuno's fresh take.
Beyond the hype, there is real growth potential. Sure, it's a gamble. But as noted above, my time investment is small. It's pretty likely I'll make that back. So if Pest were to become a popular testing framework within PHP, the market would be massive. Even if it were just more popular within the Laravel community, that's still quite a large market. I think Pest's growth within the Laravel community is pretty likely. There was already a PR to make Pest the default testing framework for Laravel. I wouldn't be surprised to see this for Laravel 9 or Laravel 10. Who knows, the Pest Converter might even help growth. So it's positioned for success.
Being able to build and launch this in a week is a testament to Shift's foundation. After nearly 6 years of crafting the automation of over 50,000 applications, it's pretty robust. That's not to say you couldn't build this from scratch in a week. But you definitely would've spent more than 15 hours.
I also think I have the ability to stay focused on a core problem. Developers have a tendency to get sniped by the new shiny or lost in all of the edge cases. You could see this over and over again in the chat. Better ways for me to write the code or additional features for the Pest Converter. These were all good ideas, just not for the MVP.
Being able to stay focused on the simplest thing is hard. In this case, the simplest thing to do was to convert PHPUnit test methods to Pest test functions, and remove any PHPUnit test class skeleton. That was the bare minimum. That's what I focused on. Being able to stay focused like that doesn't mean you get something done faster. It doesn't even mean it's better. It just means you get something done. In the product world, that is what matters.
An MVP is also about identifying an achievable solution. Not the solution. You couldn't build Uber in a week. But you might be able to organize a few carpool group texts. Being able to take a problem and find a path to start solving the problem within a timeframe is what drives an MVP. Converting the syntax of existing tests code was an achievable problem within a week. Once that was complete, I can iterate and make improvements.
The future will tell if Pest grows into the hype. The takeaways from this article are more about the decisions and execution for building an MVP - the ability to honor a time constraint and use it to guide a simple, yet complete, solution.
In closing, I want thank Jess for pairing with me to build the Pest Converter. Nuno for answering my questions on idiomatic ways to write Pest tests. Luke Downing and Freek Van der Herten for allowing me to test this on some of their applications. And finally to all those who viewed the live streams and conversations on Twitter. Thank you.
Want to see all the live streams? Review this Twitter thread for a short description and link for each recording.
Want to convert your PHPUnit test suite to Pest? Use the Pest Converter to automatically convert your test cases and adopt the expectations API in seconds.
]]>So, let's jump right in with a review of last year's goals.
In 2020 I expanded the Shift platform with the new Shift Workbench, additional services for subscribers, and tools like can I upgrade Laravel. I achieved so much with help from Jess Archer. Especially the latter. She's been contracting on Shift projects and I hope to see that expand in 2021.
Shift again doubled its sales in 2020. Revenue finally grown higher than any previous job I had. This was a huge milestone considering the events of 2020. It also helped mitigate my concerns - that I have been leaving money on the table by quitting previous high-paying consulting jobs.
Even though I didn't strictly achieve this goal by expanding the Shift platform to other technologies, I'm still giving it a big fat check box. I will carry this goal into 2021 as I still want to support more than just Laravel.
In August 2020 I released BaseLaravel. I actually made this book free. I didn't release it for financial gains. The goal was more to expand my audience. Ideally breaking the 10k followers on Twitter (a goal I set back in 2018).
All of the educational products I release stem from Shift in one way or another. Getting Git came from the realization devs weren't as comfortable using Git as I assumed. BaseCode spreads practices I shared in my pairing sessions to a wider audience. Confident Laravel increases test coverage which ultimately helps developers verify upgrades. BaseLaravel helps developers implement modern practices and leverage the framework to keep their application code streamlined.
There was a paid package for BaseLaravel which included a bonus chapter, code refactoring videos, and group calls. The book generated roughly $20k in sales. But the free copy was downloaded over 10,000 times. So I consider it a success. And it's yet another asset in my digital portfolio.
When going full-time on Shift in 2019 I took a massive pay-cut. During that year I also made a large payment towards my mortgage and bought a car (used). I didn't really change my lifestyle much either. I still traveled and dined out, which is how I often spend my money. All of this ate into my savings.
With the lockdowns in 2020 I had barely any personal expenses. As a digital business, Shift also has very little expenses - only server costs and the rare hardware purchase. Combined with the "extra" income from BaseLaravel I was able to achieve this goal.
Unfortunately I took a rather large hit in the stock market with the crash in March. While I consider that a separate investment, the increase in savings definitely helped me feel stable during a volatile time.
This one was a scratch. In fairness, I did listen to a few audiobooks. But this was nowhere near my original goal - to read the books I have sitting on the shelf as well as new books. Audiobooks count, but I need to put forth more effort to achieve this goal. So I'll caring it over into 2021 with a slight modification.
Again, with all the events of 2020, this one wasn't going to get checked off. All of our personal travel plans were canceled. All of the conference travel plans were cancelled. We didn't do much dining out.
In addition, we found out in March we were pregnant with our first child. Due to that we were more cautious than most and didn't get out much even during the "unlocked" periods.
There were two exceptions. One was a quick trip to Arkansas to deliver a table I built for Taylor Otwell. Also a trip to Illinois for a Laracon viewing party. Both of which served not only as a tiny bit of travel, but also a social outing which relate to what I do.
Looking ahead to 2021, a few goals will carryover with some new goals as well. Overall the theme is expand.
Shift has expanded within Laravel. Yet previous goals were to expand Shift to more frameworks. So I am carrying over this goal into 2021 with a small modification.
I also want to expand Shift as a business. This means more organization. Currently I work on Shift whenever, like a side project. I want to set more regular work hours, outline quarterly roadmaps, and create sprints around those.
Expanding as a business also means potentially bringing on a team member (or partner) to help expand Shift into more services for PHP, Tailwind, and even Rails.
This is a carryover from last year's goal to read more. Again, with a modification. During the lockdown of 2020 I purchased a lifetime subscription to Rosetta Stone. With all the traveling, it's been a goal of mine to improve my Spanish, as well as learn other languages like Italian or German.
I had hopes of using the downtime in 2020, as well as a new parent (ha) to go through some lessons. Of course, I have yet to even finish setting up my account. So in 2021 I would like to get on the path of using this subscription and trying to speak one of these languages. Seems ambitious, but I could at least start practicing by chatting with other developers who natively speak one of these languages.
In 2020, woodworking grew from a personal hobby to something which generated income. Most of that was used to buy more tools. So woodworking is not something I am trying to do as my primary source of income.
With that said, woodworking is a clear passion of mine and I'm starting to develop enough of a network to be able to build products on a regular basis. In 2021, I would like to transition this from a hobby to a side project. Who knows, maybe someday I may transition woodworking into a second career.
I've been investing in the stock market since I was 20 years old. I've had some success as well as epic failures. While I plan to continue investing in the markets, I'd like to put some new money to work in other areas.
I'm not quite sure what these other areas will be. I just know I want to diversify outside of the stock market. This may be cryptocurrency, real estate, or precious metals like gold or silver.
2020 brought with it our first born Isabella Rose McCreary. I am so excited to be a parent. I love watching her grow up every single day. Queue Aerosmith, cause I don't wanna miss a thing.
So in 2021, I want to ensure I am taking breaks to play with Izzy, even for some parent programming. But also establish traditions for our family and extended family as well.
With each passing year my goals become less and less technical. In fact, there aren't any technical goals as expanding Shift is a business goal.
2021 will be the last year of my thirties. I am starting a family. I am exploring other interests. While I will always have a passion for programming and technology, I doubt it will be my main focus by the last year of my forties. It's a transitional period. I want to be ready.
]]>This is something I covered in Confident Laravel, but wanted to document it in a post. Plus, I found a few more nuances.
While I will cover these in more detail below, the following lists the order of precedence for app configuration when running tests (from highest to lowest).
server
configurationenv
configuration.env.testing
file (or .env.dusk
file).env
fileHere is the same listed, represented as code snippets (again ordered from highest to lowest precedence).
config()->set('app.env' 'ci')
<server name="APP_ENV" value="ci"/>
export APP_ENV=ci
<env name="APP_ENV" value="ci"/>
APP_ENV=ci
(within .env.testing
or .env.dusk
)APP_ENV=ci
(within .env
)This list may provide enough of an idea for you to get started. But I encourage you to continue reading, as there are some important nuances.
server
versus env
configurationThere's actually a difference between the <server>
element and the <env>
element within the PHPUnit configuration file. Those familiar with precedence of PHP superglobals variables may find this obvious. But it can be a bit of a gotcha within the context of a Laravel application. Especially since Laravel changed the default PHPUnit configuration to use <server>
elements.
As such, this was something new I found when writing this post. In fairness, this has more to do with Laravel (and it's use of dotenv) than PHPUnit. That is to say, dotenv gives precedence to server variables over environment variables.
This means the <server>
element effectively sets a PHP $_SERVER
superglobal value. The <env>
element sets an $_ENV
superglobal value. Now setting either of these overwrites what's in the .env
file. So on the surface it seems like it doesn't matter. However, when attempting to overwrite one of these values with a system environment variable, it will only overwrite <env>
elements, but not <server>
elements.
There is actually a force
attribute you may set on these elements. Unfortunately, it does not overwrite system environment variables in Laravel. Again, this is due to dotenv, not PHPUnit.
.env
filesStarting with Laravel 6.0, unit tests began extending PHPUnit's TestCase
class directly. This was done in an effort to improve performance, as well as create a stronger separation between feature and unit tests. Theoretically, unit tests do not need to boot up additional services for the application as they are meant to test code in isolation.
This is a bit of a gray area when it comes to testing applications using a framework. For example, even if I wanted to test a specific method on a model, it may require the database because of underlying Eloquent
code.
However, classes which extend PHPUnit's TestCase
do not boot the application. Therefore, they do not load any .env
files. This may lead to more configuration within phpunit.xml
. In turn, increasing the potential of exposing the nuance we learned above.
.env
filesBoth Laravel as well as Dusk tests automatically load special .env
files if they exist. Laravel looks for a .env.{environment}
file and Dusk looks for a .env.dusk.{environment}
file. If these exist, they will take precedence over the .env
.
When running Laravel tests, you do not have to set the environment. Laravel defaults to the testing
environment when you run your tests (set through the PHPUnit configuration). Of course you may overwrite this value by setting it through configuration with a higher precedence.
When running Dusk tests, you do have to set the APP_ENV
. By default, this is read from your .env
or system environment variable. This value will be used as the extension to look for a .env.dusk.{environment}
file. Otherwise, it will load the .env.dusk
file, or fallback to the .env
file.
.env
filesSince Dusk tests a running application, it expects the .env
file to exist. As such, this is what Dusk uses to determine the APP_ENV
. It then loads any additional .env.dusk
files as described above. Their precedence is:
.env.dusk.{environment}
.env.dusk
.env
Unlike when running Laravel tests, Dusk merges these configuration values. So, you may overwrite only what is necessary for the respective environment within the .env.dusk
files.
One of the things many developers miss about Dusk is that it runs separately. An instance of your application runs in the background, while a completely separate process runs the Dusk tests.
This means the configuration for the app and tests are separate. More technically, the application will run the configuration loaded from your .env
file and system environment variables. So, the precedence for running your application really looks more like this:
.env
fileNotice this does not include configuration from PHPUnit or the special .env.dusk
files.
Okay, now that I have gone through the important nuances, let me share how I now set up my own applications for testing.
I used to use the PHPUnit config as much as possible. This prevented me from having to manage multiple .env
files for different environments.
Furthermore, my app configuration was pretty minimal since I wasn't running CI or Dusk. Now that I am, I want to mirror the production environment as closely as possible.
So I changed the way I typically set things up.
First, I changed all of the <server>
elements in my PHPUnit configuration to <env>
elements. This allows any system environment variables to overwrite those values. It also keeps my local configuration minimal - just PHPUnit overwriting my local .env
.
Next, I created a single .env.ci
file. This contains the configuration for the entire application for the CI environment. Given the extension of this file, it is not used when I run tests locally.
Finally, on the CI, in my case GitHub Actions, I copy the .env.ci
file to be the default .env
file. I set system environment variables for the respective steps to overwrite any specific differences. For example, I change the DB_DRIVER
to mysql
and the APP_URL
for Dusk to the built-in Artisan web server.
I find this set up balances the best of both worlds. I maintain a minimal setup without managing multiple .env
files or complicating my local development workflow. I also leverage precedence to overwrite these values using system environment variables providing a straightforward way to configure the CI environment.
These days I tend to use some thing like TablePlus or Sequel Pro plus to interface with MySQL.
But sometimes I like to fall back on a handful of browser tools. Call me old school, but I find them easier to do simple tasks like navigate a database or run a quick query.
So if you're like me, you may still want a copy of PHPMyAdmin installed on your local development environment. This post will show you how two options for installing.
First, you could simply install PHPMyAdmin as one of your web projects. In my case, I would store it under ~/workspace/dev
.
Then I would add a virtual host for Apache. In my case, my default virtual host points to ~/workspace/dev
. This way I can access as a subfolder any of these web tools under localhost
. For example, http://localhost/phpmyadmin.
However, this requires some set up. You're also responsible for updating PHPMyAdmin over time.
Now that I'm using Docker for my local development environment on macOS, I don't really need to mess with any of this. I can just add an additional service to my stack.
The official PHPMyAdmin image includes its own running web server and the PHPMyAdmin files. All you have to do is configure some connection details.
I added the following under my services
:
1phpmyadmin: 2 image: phpmyadmin:latest 3 environment: 4 - PMA_HOST=db 5 - PMA_USER=dbuser 6 - PMA_PASSWORD=dbpass 7 - UPLOAD_LIMIT=20M 8 ports: 9 - 8080:8010 <<: *network
Pretty much all of the environment
section is optional. I like when PHPMyAdmin auto logs me in. So this configures with the same user credentials and host as I used for the mysql
service.
Since it's running on its own web server. I also set the UPLOAD_LIMIT
so I can easily import files from the browser.
I created a command which makes it easier to interact with these servers. The next quality of life improvement was getting the prompt within the Docker container to match my local environment.
Initially I had the prompts match exactly. This quickly led to some confusion as to exactly which environment I was in - local or Docker.
I could have added the name of the host. But I like a lean prompt. Instead, I simply prefixed an emoji (I know) to the prompt. In this case, a whale as a nod to Docker's official icon.
So now when I jump into the container for my LAMP server, my prompt looks something like this.
I set this by symlinking my dotfiles for the Docker image. If you followed along with my tutorial for installing Apache, MySQL, and PHP on macOS, then you may already have this included.
Otherwise you may add the following lines.
1# Link local dotfiles for consistent CLI2RUN ln -s /var/www/dotfiles/.bash_profile ~/.bash_profile3RUN ln -s /var/www/dotfiles/.bash_prompt_docker ~/.bash_prompt4RUN ln -s /var/www/dotfiles/.git_completion.bash ~/.git_completion.bash5RUN ln -s /var/www/dotfiles/.git_prompt.sh ~/.git_prompt.sh6RUN ln -s /var/www/dotfiles/.gitconfig ~/.gitconfig7RUN ln -s /var/www/dotfiles/.gitignore_global ~/.gitignore_global8RUN echo 'source ~/.bash_profile' >> ~/.bashrc
Again, this assumes you have similar dotfiles. If you don't, you're welcome to start with mine.
Note this only applies to containers built from an image including these lines. It's not something applied to all Docker containers.
To my knowledge, there isn't a way to do that universally. However, if you know a better way, please let me know.
]]>Since each time I start my local environment the container IDs change, I'm always having to run docker container ps
, copy the container ID, then pass it to docker exec
.
While I'm sure there might be a better way, I wrote a simple command to help do all this with a single command.
I call it dec
as an acronym for Docker Execute Container. I pass it a string reference of the Docker container I want to run. This string could reference any of the output from docker container ps
. I normally reference the image name.
In my case, I have a few images which run to create my local stack. One for the LAMP container running the Apache web server and PHP. One for the MySQL server. And one for running PHPMyAdmin.
With this custom dec
command, I can jump into the LAMP container by running:
1dec lamp
Or the container running MySQL by running:
1dec mysql
So much nicer than running the container ps
command and then exec -it
command.
As a bonus, I added a little check to see if the local working directory is a subdirectory of my workspace
volume mount. If so, I automatically set the working directory of the container to match. You are welcome to remove or adjust this line of your own setup.
The dec
command is included in my dotfiles. These also contain by custom Docker prompt. So you may already have copied my dotfiles.
If so, be sure to update your copy. Otherwise, you may add the following code to your ~/.bash_profile
:
1function dec() { 2 containers=`docker ps | awk '{print $1,$2,$NF}' | grep -m 1 -F $1` 3 container_id=`echo $containers | awk '{print $1}'` 4 5 if [ -n "$container_id" ]; then 6 if [[ $PWD/ = /Users/*/workspace/* ]]; then 7 docker exec -w /var/www/"${PWD#*/workspace/}" -it $container_id /bin/bash 8 else 9 docker exec -it $container_id /bin/bash10 fi11 else12 echo "No container found for query: '$1'"13 fi14}
]]>For the last 8 years I've held one of the top search results for Installing Apache, PHP, and MySQL on Mac OS X. It wasn't until installing macOS Catalina that I began to move away from the preinstalled development tools I had preached for so many years.
The primary reason was the need for a newer version of PHP. I held hope the next version of macOS might adopt a modern version of PHP. However, it looks like macOS Big Sur will not upgrade PHP. In fact, Apple has added a warning about using the preinstalled PHP version and plans to no longer include it in future versions of macOS. All of which set the internet ablaze. Which 75% of is powered by PHP.
For those reasons, I am finally making the switch to using Docker for local development with Apache, MySQL, and PHP on macOS. This post will outline the process for a basic setup using Docker.
Before moving on to the actual implementation, let me address the two questions I still receive after all these years.
Homebrew is a package manager for macOS. And when it works, it works. But when it doesn't you're going to burn a day searching the web trying to figure out some obscure error message. And you may get it working again. But it's only a matter of time until you receive another obscure error and burn another day. And when you upgrade macOS, you'll receive another error and the solutions before no longer work.
Yes yes, I know you don't have any problems. But it's happened to me enough times over multiple versions and multiple years. I've given it a chance. I don't want to waste anymore time on it.
If I'm going to spend days learning something, I'd rather learn something which brings value beyond a single purpose. Something I can use elsewhere or again, beyond my Mac. And Docker can be used for so much more than local development on macOS.
In fairness, I tried using Docker multiple times before. Similar to Homebrew I'd run into issues. But I didn't really give it a chance. In addition, Docker has made advancements since I tried over the years. Most notably having a default client for most platforms, including macOS and Windows.
The reality is, Docker is a simple client install and then a couple commands from the command line. Once using Docker, you have access to countless images to create all sorts of development environments, running things beyond Apache, MySQL, and PHP. You can set up a complete infrastructure which perfectly mimics your production environment running load balances, cache servers, queue workers, and more.
So, to address the matter simply - if I'm going to learn something I want to get the most return on my time investment. These days, I think learning a ubiquitous tool like Docker provides a far better return on my investment than learning how to wrangle a package manager on my local macOS.
Yes I know there's MAMP, Valet, and whatever other hotness. But they all run Homebrew underneath. With Docker I can take my image and provision local development environment, a production environment, a GitHub action, and so much more.
With that said, let's move on to getting a local development environment running Apache, PHP, MySQL on your Mac using Docker.
Since this is a tutorial for macOS, download the Docker Desktop for Mac.
However, if you are using another platform, such as Windows, you may still follow along with this tutorial. That's another benefit of Docker. Once you have Docker installed locally, you can run anything you want.
With Docker installed locally, we need to tell Docker what type of server we want to run. We do this with an image file. Yes, I'm taking a few liberties with those terms.
There are all sorts of images available. As you become more proficient with Docker you can find (or create) one to better suit your application needs.
The one I'm offering web server running PHP and Apache. This effectively replaces the technologies which were originally installed on macOS by default.
Here are the specs for this image:
In addition, this includes the latest version of Composer (2.0) and Git.
All this goes in a Dockerfile
. Here's the one we'll be using:
1# PHP + Apache 2FROM php:7.4-apache 3 4# Update OS and install common dev tools 5RUN apt-get update 6RUN apt-get install -y wget vim git zip unzip zlib1g-dev libzip-dev libpng-dev 7 8# Install PHP extensions needed 9RUN docker-php-ext-install -j$(nproc) mysqli pdo_mysql gd zip pcntl exif10 11# Enable common Apache modules12RUN a2enmod headers expires rewrite13 14# Install Composer15COPY --from=composer:2 /usr/bin/composer /usr/local/bin/composer16 17# Set working directory to workspace18WORKDIR /var/www
You are welcome to copy the file above. However, it would be better to download my local-docker-stack repo as it will contain all the files we'll use within this tutorial.
I like to put this in my workspace as I share this image across all my projects. But if you have a single project or specific requirement, you're welcome to put this Dockerfile
directly within your project folder.
Similar to the way we installed Apache, MySQL, and PHP on macOS, we will install MySQL separately. In this case, we'll pull in the latest official image for MySQL 8.0. Then we'll run these two side-by-side - more on that in a bit.
Now that we have an image we may turn this into a runnable server by running:
1docker build -t lamp -f images/Dockerfile-php-apache .
Before dissecting the command itself, let's talk a little bit about what it does.
Running this command will generate an executable version of our image. It builds a server if you will. Something we may run and interact with. This is what Docker calls a container.
Looking at the command we pass it the path to a Dockerfile. In this case, the images/Dockerfile-php-apache
from within local-docker-stack repo. However, you may change this to wherever you store this Dockerfile.
We also set the -t
option to gives our container a name. This makes it easier to identify when we run other Docker commands later.
Now that built our image into a container, we can run an instance of this container with the following command:
1docker run -d -p 80:80 lamp
With any luck this should spin up our web server running Apache and PHP in the background using the -d
option. We can verify this by running the following Docker command:
1docker container ps
Since we mapped web port 80
with the -p
option, we should also be able to open a browser and visit http://127.0.0.1/. You probably see an Apache error page. But hey, it's a start.
Cool. Our server is running. For the most part, you can carry on developing as normal and interact with the server via the browser.
However, at some point you'll need to interact with the server directly. So using the same command above we can get a reference to the specific running container instance. This was the ID
column from the command we just ran.
So let's run it again:
1docker container ps
It will output something like the following:
1CONTAINER ID IMAGE COMMAND CREATED STATUS PORTS NAMES296b0239fafa9 lamp "docker-php-entrypoi…" 6 seconds ago Up 5 seconds 0.0.0.0:80->80/tcp unruffled_grothendieck
We want the value from the ID
column. In this example, it's 96b0239fafa9
.
Using that we can pass that to the Docker exec command to get an interactive terminal by running:
1docker exec -it 96b0239fafa9 /bin/bash
Let's take a sec to dissect this command. It allows us to run an interactive terminal within the container instance we specified using the Bash shell.
Of course, you could build an image with whatever shell you like. But again since macOS defaults to Bash, that's what I'm using here.
Let's throw a few commands at it like php -v
to see the PHP version and composer -V
to see the Composer version. Then we'll exit the terminal with exit
or by pressing Ctrl + D.
What's nice is this environment can mirror your production environment. It ideally has the same paths, operating system, software, and versions your production server has. So Docker simulates your actual application environment versus running Apache, PHP, and MySQL locally on macOS would have.
What's not nice about this, is the same thing that's not nice about Docker. It can be slow. You may notice a file system lag when interacting with files or installing things locally. For example, a file intensive command like composer install
. Or even worse, npm install
.
For those reasons, whenever possible I may still run these commands locally. Especially npm install
as that may require system level components which are easier to install locally than on the container.
Fortunately such operations are not that common. So I've learned to live with it. Use the opportunity to take a break, stretch, or check email.
Alright, before moving on let's stop this container by running:
1docker container stop 96b0239fafa9
Since we are editing files locally, we'll want to map these files to these Docker containers. We may do so by using volumes. These share the local filesystem with the Docker filesystem.
In this case, I want to share my workspace. This is the folder where I store all my web projects. For me it's ~/workspace
. For you it can be anywhere you want. Just be sure to replace it with your path in the following references.
We'll also want to make a folder that will store the MySQL data. To do that we can run the following command.
1mkdir ~/data
Again, you are welcome to change this path just update any references accordingly.
We're going to jump ahead just a bit and map these two external volumes for Docker which we'll use in the next section.
The following commands will create a volume named workspace
mapping to /Users/jasonmccreary/workspace
and a volume named data
mapping to /Users/jasonmccreary/data
. We may then reference these volumes by name instead of always typing their paths. Again, please change the paths accordingly.
1docker volume create workspace --opt type=none --opt device=/Users/jasonmccreary/workspace --opt o=bind2docker volume create data --opt type=none --opt device=/Users/jasonmccreary/data --opt o=bind
So far we've only run our web server. We haven't run the MySQL server. We need to have our complete Apache, MySQL, PHP stack running if we're going to develop locally on macOS.
We could do this with multiple docker run
commands. Passing the -d
option to run in the background, along with multiple options such a -p
to map the ports and -v
to set up the volumes. But that would be annoying.
Instead, we can define our stack with a Docker Compose file. Essentially this file defines all the same options we would pass to docker run
, but in a single place. This not only provides us with a full picture of our stack, but also a new set of commands we may run to easily manage the entire stack.
Let's take a look at this docker-compose.yml
file:
1version: "3.7" 2 3x-defaults: 4 network: &network 5 networks: 6 - net 7 8services: 9 php:10 image: lamp11 ports:12 - 80:8013 - 443:44314 volumes:15 - workspace:/var/www16 configs:17 - source: apache-vhosts18 target: /etc/apache2/sites-available/000-default.conf19 - source: php-ini20 target: /usr/local/etc/php/conf.d/local.ini21 <<: *network22 23 db:24 image: mysql:latest25 ports:26 - 3306:330627 environment:28 - MYSQL_ROOT_PASSWORD_FILE=/run/secrets/db_pwd29 - MYSQL_USER=dbuser30 - MYSQL_PASSWORD=dbpass31 volumes:32 - data:/var/lib/mysql33 secrets:34 - db_pwd35 <<: *network36 37 38networks:39 net:40 41secrets:42 db_pwd:43 file: ./mysql/root_password.txt44 45configs:46 apache-vhosts:47 file: ./apache/vhosts.conf48 php-ini:49 file: ./php/local.ini50 51volumes:
52 workspace:53
external: true
54 data:55
external: true
This may look a bit daunting. Honestly, we don't need to know all of the details. At a high level, we see we're setting up our lamp
image and the official mysql
image to run together. They'll do so under the same network. And we're passing all those options for the ports and volumes we talked about earlier.
You'll also notice we're defining a few additional settings. For example, some configuration files for PHP and MySQL, as well as a secrets file containing the root password for MySQL and a generic database user.
Again, all of these are included in the jasonmccreary/local-docker-stack repo for you to download.
Now that we have this file, we may run a single command to start the entire stack of these services running within the same network.
First, we need to initialize Docker for our stack. To do so, we'll run the following command just once:
1docker swarm init
Now we'll run our stack with:
1docker stack deploy -c docker-compose.yml dev
This takes the path to our docker-compose.yml
file and a name of the stack. In this case, I simply named it dev
. But you can call it whatever you want.
To see both containers running, we may run the docker container ps
command from earlier. And based on its output, we may use the container ID to interact with either of the containers in the stack by passing it to docker exec
.
Even though everything's running, our server is likely not directing web traffic to the appropriate location. Similar to our local install before we need to direct web traffic to our Docker web server.
Similar to configuring Apache virtual hosts on macOS, I do this by editing my hosts
file. The only difference now is I use a .wip
extension, rather than a .local
. This sometimes conflicted with Bonjour and local macOS networking. I liked .dev
, but Google took it.
While .wip
isn't my first choice, so many extensions exist now. So .wip
won mostly being a fun acronym, three letters, and available. Again, you're welcome to choose any available extension you like.
To edit the hosts
file, run:
1sudo /etc/hosts
I'll append an entry to the end of the file:
1127.0.0.1 jasonmccreary.wip
In this case, the entry is for viewing this very blog in my local development environment. This handles directing traffic to Docker (technically localhost, but that's where Docker is listening). Now we need to set up Docker to receive and handle the traffic accordingly.
We actually configured our lamp
service to load the virtual hosts from a local apache/vhosts.conf
. This file is built by a simple shell script, also found within the apache
folder. This script concatenates all my virtual host configuration files within my workspace under ~/workspace/apache-vhosts
into a single vhosts.conf
file.
Anytime I'm working on a new web project, I create a new virtual hosts file. Then I can run this script to pack them all down into a single file which will be configured.
To stop the stack, the best option is to run the following command:
1docker stack rm dev
This is safe as it brings the services down gracefully. However, you may simply quit Docker Desktop Client as well. This could result in data loss by abruptly stopping a service. Sometimes I have noticed some network issues. But typically running this command resolves them.
To start the server, we run the same compose
command as before:
1docker stack deploy -c docker-compose.yml dev
Remember, running this command will start new containers with new IDs. So be sure to run docker container ps
to get the latest ID to pass to the other commands like docker exec
.
Otherwise, Docker will remember everything else. The volumes will mount with all your files and databases. The web server will boot with your Apache virtual hosts. And, of course, your hosts
file remains the same.
File sync issues
After upgrading to Docker 2.4 I experienced intermittent file sync issues. I resolved this by disabling "Use gRPC FUSE for file sharing" within the Preferences of the Docker Desktop Client.
I start with this tutorial because I believe it's an easy way to get started with Docker. It also most closely resembles the previous installation of PHP, MySQL, and Apache on macOS locally.
Admittedly, I've also taken some liberties with the terms that Docker gurus may not agree with. But it's a start as you get familiar with using Docker.
I encourage you to get familiar with the different commands. Learn the terms. Tweak this setup. Feel some of the pain. Once you do, you should have enough of a foundation to do even more.
You may also review the following articles below which include some additional services and minor tweaks to make your local Docker development environment even better.
dec
commandI want to thank Ralph Schindler, Chris Fidao, and Dana Luther for answering countless questions I've asked over the last year. Without their help, this tutorial would not exist.
]]>One of the drawbacks is that you inject a layer of separation between your code and Laravel. Ironically, this separation is often the motivation for using inheritance. And initially, things might seem fine.
Yet this separation creates a gap, or in programming what we call low cohesion. This gap gets filled with sparse code, or worse, overridden Laravel behavior.
Let's consider the following real-world code sample:
1namespace App; 2 3use Illuminate\Database\Eloquent\Model; 4 5class BaseModel extends Model 6{ 7 protected $guarded = []; 8 9 /**10 * @override11 */12 public function fill(array $attributes)13 {14 $totallyGuarded = $this->totallyGuarded();15 16 foreach ($this->fillableFromArray($attributes) as $key => $value) {17 $key = $this->removeTableFromKey($key);18 19 // The developers may choose to place some attributes in the "fillable" array20 // which means only those attributes may be set through mass assignment to21 // the model, and all others will just get ignored for security reasons.22 if ($this->isFillable($key) || in_array($key, $this->allowedOverrides())) {23 $this->setAttribute($key, $value);24 } elseif ($totallyGuarded) {25 throw new MassAssignmentException(sprintf(26 'Add [%s] to fillable property to allow mass assignment on [%s].',27 $key, get_class($this)28 ));29 }30 }31 32 return $this;33 }34 35 protected function allowedOverrides()36 {37 return [];38 }39}
This BaseModel
parent class contains code which sets the guarded
property, essentially making all child models unguarded.
It also overrides the core fill
method to inject even further custom behavior when setting model attributes through mass assignment.
Again, this all seems fine in the beginning. After all, why set this behavior for every model when you can set it once in a parent class? Don't repeat yourself, right?
Well, yes, but at what cost?
Everything in programming is a tradeoff. In the case of inheritance, you're trading reuse at the expense of being unused.
Initially this seems like a good trade, when reuse is high. But over time reuse lessens, and inhreitance becomes a very hard-to-spot form of dead code. In this case, code which is not used in the child class.
Taking a look at the previous example, let's focus on the fill
method. This is an example of both code which is not used and code which overrides core Laravel behavior - a lethal combination when maintaining your Laravel applications.
Distinguishing your custom code from the default fill
code becomes harder over time. Furthermore, determining how the code evolved from version to version becomes challenging. Answering these questions requires meticulously reviewing the original framework code and comparing it against your own.
You're then faced with a new set of questions like, what did this code do? Why did we change it? Do we need it? Even the original author may struggle to remember these answers.
In this case, after careful review, there was a single change in the conditional:
1if ($this->isFillable($key) || in_array($key, $this->allowedOverrides())) {2 $this->setAttribute($key, $value);3}
This custom code calls the custom allowOverrides
method. An audit of the codebase might reveal not many models use this behavior. Now the tradeoff of inheritance is no longer in your favor.
Using inheritance within Laravel violates a principle I like to call grok the framework.
It doesn't take much looking around in Laravel, specifically within model classes, to see it's much more common to add behavior with a trait than inheritance. Ready examples of these include SoftDelete
and Notifiable
.
Instead of forcing all models (even those which may not need the behavior) to extend a base class using inheritance, we can decorate only the classes which truly need this behavior with a trait.
For example, consider a Post
model with the same behavior.
1namespace App; 2 3use App\Traits\Unguarded; 4use Illuminate\Database\Eloquent\Model; 5 6class Post extends Model 7{ 8 use Unguarded; 9 10 // ...11}
This code not only aligns with Laravel more closely, but it also clearly communicates the intention of this additional functionality.
In doing so, we also alleviate the need to override core behavior. By simply decorating this and limiting the scope we know model's which use this trait require the custom fill
behavior. As such, we are more free to use alternatives than override Laravel.
In doing so, we check all the boxes.
You may be wondering, how does the Unguarded
trait work? It's not possible in PHP to override a property value from a trait. At least not without some nasty syntax in the use
statement.
Well, even though PHP can't do it (as of version 7.4), Laravel can.
This continues to emphasizes the importance of grokking the framework. Something that may not have been traditionally available, might be available through the framework. If we challenge ourselves to follow patterns within Laravel we may ultimately find a solution which is less complex, and more readable.
For this specific case, Laravel includes a bootTraits
method. This method attempts to call methods which may exist on the trait to boot and initialize them.
We can define one of these methods, in this case an initializeUnguarded
method to override the properties which unguard our model.
1namespace App\Traits; 2 3trait Unguarded 4{ 5 public function initializeUnguarded() 6 { 7 self::$unguarded = true; 8 $this->guarded = []; 9 }10}
There are often better alternatives than inheritance. Ones that more closely align you with the framework, and make your intentions more clear. They also follow more modern practices to prefer composition over inheritance.
Want more 🔥 Laravel tips? Follow me (@gonedark) on Twitter as I share ways to streamlining the code within your Laravel applications and more articles like this one.
]]>1SQLSTATE[42S02]: Base table or view not found: 1146 Table 'orders' doesn't exist
I ignored it at first as sometimes the Shift workers drop the database connection. Then I received another. And another. And another.
I went to laravelshift.com. 500
.
I tailed the logs and this error was streaming in. Given the frequency I figured MySQL locked up. So I killed the web server to stop requests coming in and allow MySQL to catch up.
I checked the server stats and everything was normal. I quickly made a database backup incase MySQL did crash. Then I restarted the web server.
Same error.
I killed the web server again and looked at database. The tables were indeed missing.
I went to restore the database from the recent backup. But, I had overwritten it in my initial assumption MySQL had locked up. This forced me to restore from the weekly backup.
Given the recent release of the Laravel 7, this is high season for Shift. So that meant a data loss of roughly 600 Shifts.
Now all these Shifts were completed. So the data loss wasn't an immediate issue. But it was a poor experience. Users like seeing recent Shifts in the dashboard, as well as being able to create invoices.
So I spent most of Wednesday evening using Stripe data and the Shift run log to rebuild as many of the orders as possible.
Thursday morning I sent out an email to users letting them know if they were missing a Shift, to reach out to support to help get it restored.
At this point it seems like there's only a few dozen orders missing.
In the end, not a terrible outage. But I learned a few things. This is my postmortem.
I made assumptions. While these were based on experience, I also got sucked into the moment.
The information was in front of me - the orders
table was missing. Yet this was one of the last things I checked.
I was focused on getting the site back up. Shift is my livelihood. If it's down, I have no income. So that was my top priority.
That's fair. But I went rogue. I started throwing commands at the problem instead of following a recovery plan. In doing so, I made the situation worse.
As I shared in my postmortem on the shifty email bug, it's important to ask why.
It was clear the initial cause was missing database tables. But why were they missing?
I had a pretty good idea that this was from creating a new Shift worker.
Part of the process of creating that worker is for it to build its own version of the Shift application using artisan migrate:fresh
.
That would cause the tables to be missing. But, it didn't completely explain why. For instance, why did migrate:fresh
run against the production database and not its own database?
That was the real question. If I didn't answer that, it would only be a matter of time until this happened again.
It took a little reflection, but I remembered I ran into an issue with environment variables when building Shift for Docker. Environment variable were being inherited. I remember it seemed odd in the moment, but then making sense from a system process perspective.
Since Shift spawns a new worker process, the worker initially receives the environment variables from the parent process. In this case, the web application.
As such, early commands have access to these environment variables. Even though I use the --env
option, variables were still being merged.
What's interesting, is that I didn't notice this for the other worker. It turns out this only happens in a fresh environment with uncached configuration.
That is if I cache the Laravel configuration with artisan config:cache
, this behavior does not occur.
I didn't want to rely on this behavior though. So the ultimate solution was to ensure that I spawned a fresh process. One that did not inheriting the environment variables from the parent process.
I could do this a few ways, but the easiest was to pass the third argument to Symfony's Process
object.
1$process = Process::fromShellCommandline(2 $command,3 null,4 Automation::ignoredLaravelEnvVariables()5);
Even though I recovered from this outage quickly and did root cause analysis, I still felt bad about the data loss.
Some might have said, "Oh well, their Shift already ran. It's fine."
That didn't feel right to me. I pride myself on support. I believe Shift has a high value. I didn't want this outage might hurt its value.
That's why I spent time writing scripts to rebuild the missing orders. I sent out an email inviting users who were still missing orders to reply.
I still wasn't able to recover everything. But I felt better taking actions to resolve the matter as best as I could.
It also turned out to be something users really appreciated. Several responded to the email with understanding and praise.
In the end, I think the transparency went a long way to actually add value and build trust.
]]>This was a pretty easy one. I do this on purpose. It allows me to start off the year with some momentum from immediately achieving a goal.
I switched from Jekyll to Jigsaw. This made the static site generator a little more familiar by using not only using PHP, but Blade templates. In addition, it came with a nice starter theme which used Tailwind.
I gave the blog a bit more love at the end of 2019 as well. I made the landing page more welcoming, limited my featured articles, and linked my videos and courses.
I definitely gave less talks in 2019. Really only speaking at conferences I personally attended or hosted in cities I wanted to visit. Of course, I try my best to speak at all the Laracons to reach my target audience. So speaking at Laracon AU checked all the boxes.
In addition to speaking, I hosted a series of online workshops on various technologies. Mostly Laravel, but others on Regular Expressions, Git, and Testing. While these didn't have a lot of attendees, they have lead to other opportunities. So I'll likely do these again in 2020.
I really nailed this one. Last year I contributed to:
In addition, I created a few open source projects of my own:
I'll call this one a scratch. I started working exclusively with Tailwind in 2019. However, the original goal was to do more with single page apps (SPAs) using Vue or React or whatever the hotness was.
The hard truth is, I just didn't need these technologies. Most of my applications behave fine with full page refreshes. So this is no longer a goal. I'll wait and learn these one of these technologies when I actually need to use them.
I started out the year making a series of videos to create this new product. But there wasn't much traction. Although there was a brief opportunity to partner with an existing platform, nothing ever materialized.
I still have some internal tools I use, but don't think these are the right ones to productize. Maybe they'll take another form in the future, but for now this is on pause, indefinitely.
This one goes back to a 2018 goal. I went full-time on my own projects in 2019 mostly because of the growth of Shift. While Shift continues to grow, I always worry it will plateau.
I love the Laravel community, and I hope it continues its growth. However, from a business perspective this is shortsighted. The Shift platform has matured enough to branch out to other technologies. So why not try?
In the past I tried to create Shifts for PHP. These we're really used. While a few remain, I discontinued the PHP version Shifts. Since PHP should have been an easy leap coming from Laravel, it was discouraging to see it fail. So I didn't carry this goal forward into 2019.
In 2020, I want to revisit this goal and try a completely new category. I considered JavaScript, but there are so many open source tools and so many different flavors it would be hard to choose the right niche.
I think sticking with a framework would be the right approach. So I plan to write a Shift for upgrading to the latest version of Rails to try a new market again.
In addition, I think Tailwind would be a good cross-over between the Laravel community and frontend technologies. I know I'd love to convert my old Bootstrap projects to Tailwind. Jess Archer also expressed an interest in a Bootstrap to Tailwind converter. So having her help developing these new platforms also mitigates my time investment.
Although BaseCode wasn't as successful from a financial perspective as I hoped, it was successful from a personal perspective. Many readers continue to reach out to me to say how the practices helped them improve the code they write. It also led to numerous talks, training, and pairing.
Writing code is an area I have a lot of experience. Over 20 years. So I'd like to write another book in a similar format with practices and real-world examples, but a little more specific to overall application development.
I made a deal with myself when going full-time on my own projects in 2019. I had to maintain my savings. Without a steady, higher salary from a day job, I've done well to honor this. As I continue to work full-time on my own projects in 2020, I want to set a financial goal to build my savings.
This is effectively a goal to grow my business without putting pressure on any one aspect. While I don't have many expenses as a digital business, this does mean generating more income. But that income could come from anywhere - writing a book, expanding Shift, wood-working projects, or stock market investments.
Achieving this goal would give me confidence that continuing into future years would be more financially viable than returning to the day job.
I read thousands of lines of code and dozens of blog posts a week. But I don't read a whole lot of books. Maybe 2 or 3 a year.
When we remodeled our house, I build-in a bookshelf across an entire wall. These are all books we own, but many of which I've never read. This feels a bit phony to me, and wasteful when I go to buy a new book.
So in 2020, I plan to pick up a few of the books I never got around to reading, and finally read them. There's no quantitative goal here. More about reestablishing the habit of reading and using the things I own.
Going full-time on my own in 2019 means I don't have coworkers or people I interact with on a daily basis. So in 2020, I want to make an effort to get out of the house at least once a week. This might be a coffee shop, library, co-working space or even do remote pairing with another developer.
You might notice most of these goals aren't technical. In fact, really only one of them is - to expand Shift. Arguably that is more of a business goal than a technical goal.
This wasn't intentional. In fact, I only really noticed it after proofreading this post. Yet, it make sense. As much as I love programming, it's not something I think I'll do forever. Each year I get a bit older and a bit farther away from the code. So I think my goals align a bit more with life than programming.
]]>Instead, middleware is tested through another part of the application. For example, the auth
middleware is tested through sending an HTTP request to a controller.
1/** @test */ 2public function edit_displays_form() 3{ 4 $user = factory(User::class)->create(); 5 6 $response = $this->actingAs($user)->get(route('user.edit')); 7 8 $response->assertStatus(200); 9 $response->assertViewIs('user.edit');10}
Laravel makes writing these types of integration tests super easy. As such, there's often not a need to test your middleware directly (a unit test).
Yet this strategy may yield one of two issues in either a lot of repetitive test code or a gap in test coverage.
Something like auth
is a simple test as we've seen using actingAs
. But what about custom middleware?
Let's consider a paywall which verifies the user has access to premium "add on" content. This is definitely something we would want to test and can do so again through an HTTP request.
1/** @test */ 2public function index_restricts_access() 3{ 4 $user = factory(User::class)->create(); 5 $product = factory(Product::class)->create([ 6 'sku' => 'Master' 7 ]); 8 $order = factory(Order::class)->create([ 9 'user_id' => $user->id,10 'product_id' => $product->id,11 ]);12 13 $response = $this->actingAs($user)->get(route('video.index'));14 15 $response->assertStatus(200);16 $response->assertViewIs('video.index');17 18 // ...19}
This work, but requires a lot of test setup. We could abstract this into a setup helper method or use a factory class. These may alleviate the duplication issue.
But the second issue still remains since most developers don't write thorough tests. They may write all this setup for one of the controller actions, but not for others. Thus creating a gap in test coverage.
We can address this issue by adopting a strategy which makes it easier to write these tests.
Our goal is to verify a controller action behaves like some other controller action. If we have tested one of the controller actions thoroughly, then we can simply assert they have the same linkage. In this case, the controller actions use the same middleware.
This can be done by verifying the underlying route for the controller action uses the expected middleware or set of middleware. I wrapped this code within an assertion named assertActionUsesMiddleware()
and add it to the Laravel test assertions package.
Now instead of writing extra test setup code or leaving a gap in your tests, you can verify complex behavior with this simple assertion:
1/** @test */2public function show_restricts_access()3{4 $this->assertActionUsesMiddleware(5 \App\Http\Controllers\VideoController::class,6 'show',7 'add-ons'8 );9}
]]>Before answering, let me say, I love Laravel! Not only have I enjoyed using Laravel for all my projects over the last 6 years. But Laravel has also allowed me to work full-time on my own projects, as well as travel the world.
So this isn't one of those fractal of bad design. No, this is a proposal of ideas for future versions of the framework.
Of course, being the creator of Shift these suggestions are motivated by maintainability.
They're also motivated by someone who has created products. Specifically products which eventually failed because they became stale.
When consulting or attending conferences, I also listen to the questions developers asking. I pay attention to the aspects of Laravel they like or dislike.
Every so often a revolutionary change is required. This provides a chance to revisit goals. One of the primary goals of Laravel is developer experience. And maintainability, freshness, and approachability all improve developer experience.
So, with all this in mind here are the top five things I would change in Laravel.
This is likely one of the few (or only) lacking feature within Laravel.
The goal of mass assignment is to protect models from being injected with unexpected values. Often from request data.
From a security perspective, mass assignment is important. From a feature perspective, it works. Where it is lacking is more from an adoption perspective.
Most developers set all model columns as fillable. Or worse yet, completely disable mass assignment by unguarding their models.
Both of which defeat the purpose of mass assignment.
I'm not sure the solution. One approach would be to reimplement the feature. Rails did so by using strong parameters.
As it stands, I would prefer to see it removed as this would force developers to take responsibility for properly validating and assigning model data.
Laravel is exceptionally helpful. Early versions of Laravel 5 seemed to add more and more helpers. Even helpers which simply wrap underlying facades.
It's hard to argue with being helpful. After all, these helpers undoubtedly improve the developer experience. Yet being overly helpful can become debilitating.
I find many developers using helpers even when the underlying objects are readily available. Effectively using these helpers simply because, well, they're helpful.
With helpers, a developer can also reach for objects they might otherwise not have access to. This blurs important boundaries. Fundamental design aspects like coupling and cohesion and MVC architecture get lost.
Recent versions of Laravel have curbed the use of helpers. For example, all Arr
and Str
helpers were removed in favor of leveraging the underlying class instead.
I would push this farther.
A start might be the removal of the authentication and request helpers. These lead to some of the worst offenses of using helpers when alternative objects and patterns are readily available.
Using these alternatives often yield less complex, more readable code. Considering the following controller action:
1public function store()2{3 $user = User::createWithCheckout();4 $order = Order::createWithUser($user);5 6 return redirect()->route('order.show', $order->id);7}
On the surface, the code seems fine. The issue arises in lower levels of the code. In this case, the model heavily takes advantage of the auth()
and request()
helper (or Facade).
1public function createWithCheckout() 2{ 3 if (Auth::check()) { 4 return auth()->user(); 5 } 6 7 return User::create([ 8 'email' => request('email'), 9 'password' => Hash::make('...')10 ]);11}
This is likely beyond their original intent. But as developers we just can't help ourselves (pun).
If we think about this, we're actually reaching multiple layers in our application stack. All the way from the model to the request. From an MVC perspective, this crosses boundaries.
The alternative respects MVC and decouples the code. Laravel injects the request
object into all controller actions. This object also has access to the authenticated user.
1public function store(Request $request)2{3 $user = User::createWithCheckout($request);4 $order = Order::createWithUser($user);5 6 return redirect()->route('order.show', $order->id);7}
We may then pass this request object to lower levels of the code. Potentially even type-hinting with a form request object to communicate the available request data.
1public function createWithCheckout(Checkout $request) 2{ 3 if ($request->user()) { 4 return $request->user(); 5 } 6 7 return User::create([ 8 'email' => $request->input('email'), 9 'password' => Hash::make('...')10 ]);11}
So while the removal of these helpers might cause short term pain, there would be long term gains in the communities' code quality.
Similar to how helpers and Facades offer more than one way to write things, Laravel offers many overlapping components.
While each of these have subtle differences which may make them better suited to various developers needs, it likely could be streamlined.
A few examples of this are Mailables versus Notifications, Events versus Listeners versus Observers, and Gates versus Policies.
The issue is the overlap causes bloat on both sides. From a developer's perspective it's unclear which to use in what scenarios. From a maintainer's perspective it's additional code to support.
Again, I don't think these should be removed. Each provide a distinct bit of functionality.
Instead, I am proposing a hard look at these components with an hard eye for consolidation.
There are a few patterns and structures within Laravel that have been around a while. We've gotten used to them. But more modern frameworks expose these.
Now I'm not advocating for an empty directory structure. I actually appreciate the structure Laravel provides out of the box.
But it could be streamlined.
Specifically there are two patterns within a Laravel application I find a bit dated. Said another way, these are relatively low-level compared to the rest of Laravel. These are the kernel and service providers.
Analytics from Shift show these files are not often changed. When they are changed, the modifications are often simple. Such as binding a singleton or registering a named middleware.
I think these could be consolidated and moved to a different, more modern pattern that Laravel already follows.
If we look inside the routes
folder there are multiple files to register HTTP routes, console commands, and broadcast channels.
Similarly, Laravel could have a middleware.php
file for registering custom middleware and container.php
file for binding classes to the container.
I would then rename the routes
folder to something like bindings
to better communicate the new intent of the files within it.
By moving these responsibilities to simple configuration files, this would remove the need for the Kernel files as well as the service providers.
So this also provides a streamlined app
folder containing just the Http
folder and User
model.
The most frequent change in Laravel are the configuration files. These change not only between releases, but also in the weekly patches.
As such it is nearly impossible to keep configuration files up-to-date. This is something I've learned first hand with Shift and have repeatedly rewritten code to making maintaining config files easier.
In the end, developers don't keep these files up-to-date or follow best practices which make them easier to maintain. So, while I'm glad to continue to help with Shift, I rather see a change in Laravel.
I think the solution is to remove the configuration files completely. Instead, document the configuration options within the Configuration section as well as reference them more contextually throughout the documentation.
Allow developers to customize these through the available ENV
files. This would cover a majority of the use cases and improve developer experience by removing the aspect of maintenance.
To offer finer grained customizations, introduce a single configuration.php
file (underneath the new bindings
folder).
Much like Laravel 4.2 or similar to configuration in Tailwind, developers could extend the core configuration as well as add their unique customizations.
This would have no impact on performance as it would still be a single array merge operation. In fact, it might even improve performance for an uncached configuration as there would be only one file to load instead of scanning the config
folder.
If you'd like to browse around a Laravel application structure adopting these proposed changes, I created a streamlined-laravel repository of a Laravel 6.5.2 application with these proposed changes.
All of the changes require modifying the framework. This includes an unknown amount of work and would definitely include breaking changes. As such, they're not something I expect to see anytime soon. Maybe Laravel 8…
In the meantime, please agree or disagree with me on Twitter, as well as propose your own changes.
]]>Recommend switching to Docker
I finally switched to using Docker for local development on macOS. While the following tutorial works for macOS Catalina, it has limitations. I recommend following my latest tutorial on installing Apache, MySQL, and PHP on macOS using Docker.
Note: This post assumes you followed installing Apache, PHP, and MySQL on Mac OS X Mojave and have since upgraded to macOS Catalina. If you did not follow the original post, you should follow installing Apache, PHP, and MySQL on macOS Catalina.
When Mac OS X upgrades it overwrites previous configuration files. However, before doing so it will make backups. For Catalina the original versions may have a suffix of mojave
or be copied to a backup folder on the Desktop. Most of the time, configuring your system after updating Mac OS X is simply a matter of comparing the new and old configurations.
This post will look at the differences in Apache, PHP, and MySQL between Mac OS X Mojave and macOS Catalina.
Mac OS X Mojave and macOS Catalina both come with Apache pre-installed. As noted above, your Apache configuration file is overwritten me when you upgrade to macOS Catalina.
There were a few differences in the configuration files. However, since both Mojave and Catalina run Apache 2.4, you could simply backup the configuration file from Catalina and overwrite it with your Mojave version.
sudo cp /etc/apache/httpd.conf /etc/apache/httpd.conf.catalinasudo mv /etc/apache/httpd.conf.mojave /etc/apache/httpd.conf
However, I encourage you to stay up-to-date. As such, you should take the time to update Catalina's Apache configuration. First, create a backup and compare the two configuration files for differences.
sudo cp /etc/apache/httpd.conf /etc/apache/httpd.conf.catalinadiff /etc/apache/httpd.conf.mojave /etc/apache/httpd.conf
Now edit the Apache configuration. Feel free to use a different editor if you are not familiar with vi.
sudo vi /etc/apache/httpd.conf
Uncomment the following line (remove #
):
LoadModule php7_module libexec/apache2/libphp7.so
In addition, uncomment or add any lines you noticed from the diff
above that may be needed. For example, I uncommented the following lines:
LoadModule deflate_module libexec/apache2/mod_deflate.soLoadModule expires_module libexec/apache2/mod_expires.soLoadModule rewrite_module libexec/apache2/mod_rewrite.so
Finally, I cleaned up some of the backups that were created during the macOS Catalina upgrade. This will help avoid confusion in the future.
sudo rm /etc/apache2/httpd.conf.mojavesudo rm -rf /etc/apache2/original/
Note: These files were not changed between versions. However, if you changed them, you should compare the files before running the commands.
Restart Apache:
apachectl restart
Mac OS X Mojave came with PHP version 7.1 pre-installed. This PHP version has reached its end of life. macOS Catalina comes with PHP 7.3 pre-installed. If you added any extensions to PHP you will need to recompile them.
Also, if you changed the core PHP INI file it will have been overwritten when upgrading to macOS Catalina. You can compare the two files by running the following command:
diff /etc/php.ini.default /etc/php.ini.default.mojave
Note: Your original file may note be named something else. You can see which PHP core files exist by running ls /etc/php.ini*
.
I would encourage you not to change the PHP INI file directly. Instead, you should overwrite PHP configurations in a custom PHP INI file. This will prevent Mac OS X upgrades from overwriting your PHP configuration in the future. To determine the right path to add your custom PHP INI, run the following command:
php -i | grep additional
Note: It appears Catalina does not include the PHP Zip extension. This is a popular extension used by many packages. This was one of the reasons I switched to using Docker.
MySQL is not pre-installed with Mac OS X. It is something you downloaded when following the original post. As such, the macOS Catalina upgrade should not have changed your MySQL configuration.
]]>Recommend switching to Docker
I finally switched to using Docker for local development on macOS. While the following tutorial works for macOS Catalina, it has limitations. I recommend following my latest tutorial on installing Apache, MySQL, and PHP on macOS using Docker.
Note: This post is for new installations. If you have installed Apache, PHP, and MySQL for Mac OS Mojave, read my post on Updating Apache, PHP, and MySQL for macOS Catalina.
I am aware of the web server software available for macOS, notably MAMP, as well as package managers like brew
. These get you started quickly. But they forego the learning experience and, as most developers report, can become difficult to manage.
macOS runs atop UNIX. Most UNIX software installs easily on macOS. In Additional, Apache and PHP come preinstalled with macOS. So to create a local web server, all you need to do is configure Apache and install MySQL.
First, open the Terminal app and switch to the root
user so you can run the commands in this post without any permission issues:
1sudo su -
1apachectl start
Verify It works! by accessing http://localhost
First, make a backup of the default Apache configuration. This is good practice and serves as a comparison against future versions of macOS.
1cd /etc/apache2/2cp httpd.conf httpd.conf.Catalina
Now edit the Apache configuration. Feel free to use a different editor if you are not familiar with vi.
1vi httpd.conf
Uncomment the following line (remove #
):
1LoadModule php7_module libexec/apache2/libphp7.so
Restart Apache:
1apachectl restart
You can verify PHP is enabled by creating a phpinfo()
page in your DocumentRoot
.
The default DocumentRoot
for macOS Catalina is /Library/WebServer/Documents
. You can verify this from your Apache configuration.
1grep DocumentRoot httpd.conf
Now create the phpinfo()
page in your DocumentRoot
:
1echo '<?php phpinfo();' > /Library/WebServer/Documents/phpinfo.php
Verify PHP by accessing http://localhost/phpinfo.php
Download and install the latest MySQL generally available release DMG for macOS. MySQL 8 is the latest version. But older versions are available if you need to support older applications.
When the install completes it will provide you with a temporary password. Copy this password before closing the installer. You will use it again in a few steps.
The README suggests creating aliases for mysql
and mysqladmin
. However there are other commands that are helpful such as mysqldump
. Instead, you can update your path to include /usr/local/mysql/bin
.
1export PATH=/usr/local/mysql/bin:$PATH
Note: You will need to open a new Terminal window or run the command above for your path to update.
Finally, you should run mysql_secure_installation
. While this isn't necessary, it's good practice to secure your database. This is also where you can change that nasty temporary password to something more manageable for local development.
You need to ensure PHP and MySQL can communicate with one another. There are several options to do so. I like the following as it doesn't require changing lots of configuration:
1mkdir /var/mysql2ln -s /tmp/mysql.sock /var/mysql/mysql.sock
The default configuration for Apache 2.4 on macOS seemed pretty lean. For example, common modules like mod_rewrite
were disabled. You may consider enabling this now to avoid forgetting they are disabled in the future.
I edited my Apache Configuration:
1vi /etc/apache2/httpd.conf
I uncommented the following lines (remove #
):
1LoadModule deflate_module libexec/apache2/mod_deflate.so2LoadModule expires_module libexec/apache2/mod_expires.so3LoadModule rewrite_module libexec/apache2/mod_rewrite.so
If you develop multiple projects and would like each to have a unique url, you can configure Apache VirtualHosts for macOS.
If you would like to install PHPMyAdmin, return to my original post on installing Apache, PHP, and MySQL on macOS.
]]>Being the author of BaseCode and creator of Shift has given me a unique insight into writing Laravel applications. I combined 20 years of writing code with supporting over 25,000 Laravel upgrades into 10 tips for crafting maintainable Laravel applications.
These may seem fundamental and as such quickly dismissed. But any lasting Laravel codebase practices at least some of these fundamental elements. Put simply, the more tips you follow the more maintainable your codebase will be.
Let's start with the most fundamental of all, stay up-to-date. Sure, this comes from the creator of Shift. But it's nonetheless valid.
Too many applications choose to remain out-of-date for various reasons. I'm here to say, LTS is a trap, forking the framework is naive, and committing the vendor
folder is a disaster waiting to happen.
These actions might seem silly to some, but as applications become out-of-date, many choose these paths over upgrading. They are one-way tickets to a completely unmaintainable codebases.
Staying current also allows you to take advantage of the latest features and services, as well as help the community grow and evolve. So, you don't have to be bleeding edge, but you do want to be leading edge.
Laravel comes with all sorts of conventions. I'll revisit more in other tips. For this one, I want to focus on coding standards.
You may not agree with all of them. I know I don't like the !
(not operator) or .
(string concat operator) spacing. But when writing Laravel, I do my best to follow these.
Many developers create their own standards. In fact, I occasionally receive support tickets claiming a Shift was unusable because it formatted their code. I realize code style is personal. As developers, we've made it our identifiable trait. But really, it's a separator. A distraction.
In the end, it's okay if you want use a custom code style, but please automate it. Ideally using PHP CS Fixer as Shift will respect any .php_cs
file within your project and use it when formatting your code.
Along these lines, don't customize the App
namespace. Taylor and Jeffrey Way rejected this pattern a while back. Even the app:name
artisan command was removed from Laravel. Despite all this, I still see projects renaming the App
namespace.
By changing this, you commit yourself to changing it in multiple locations. This adds to the maintenance overhead and creates needless friction when coding.
Consider the HTTP Kernel. Out of the box, this file contains 23 references to the App
namespace. That's 23 spots to maintain and manage.
I know it's just a search and replace, but it adds friction to common developer actions like copying and pasting code from StackOverflow, Laracasts, or the documentation.
Regardless of customizing the namespace or not, I definitely encourage using morphMap
for any polymorphic or dynamic model relationships saved to the database. Doing so will decouple your code from your database.
Similar to adopting the standards, I encourage you to keep the Laravel folder structure as close to the defaults as possible. I see applications creating their own folder structures underneath the app
folder. Often to modularize or separate the code by domain.
Within these folder is a recreation of the default folder structure. So, Controllers
, Models
, Events
. This creates more overhead which eventually competes with the default structure. It also leads to parallel inheritance hierarchies, which is an original Code Smell.
Instead, you may collapse these into the default structure. If necessary, you can organize domains within the core folders.
I know separating your domain code from the app code seems like a good idea in the beginning. It may make work out for some. Yet many developers who choose this path eventually regret it. Remember, the app is your domain, so there's no need to reorganize it elsewhere.
Another common questions related to structure is where do things go?
Again, Laravel provides many folders within its default structure to choose from. I challenge most classes could be organized within one of these folders. When something doesn't immediately fit, I suggest putting it in a Services
folder.
You'll find classes within this folder self-organize over time. Once they reach a critical mass, restructure them into their own top-level folder, like: Facades
, Clients
, Contracts
, Traits
, etc.
This may seem lazy, but it's to avoid the wrong abstraction. Something I discuss in the Rule of Three from BaseCode. The premise is future you is always smarter than you are now. So if you can defer decisions a bit, you'll find a better abstraction.
Composer makes packages super easy to use and manage. So easy we don't think about the maintenance of these packages. But any package we bring into our application is code we have to manage. Code with which our application code is coupled.
This is something we should remember before adding a package. But first, as a quick tangent, always ensure your packages are registered appropriate. Metrics from Shift show many applications incorrectly require development dependencies. That is, code which is not "required" in production. For example, the barryvdh/laravel-debugbar package.
Going back to packages, many simple packages are bloated and quick to become outdated or even abandon. Consider the once popular laracasts/Commander package. Now long since abandoned and replaced by core behavior.
Nonetheless, we can still use this package as an example. It contains 7 files to do one simple thing - execute a handler for a command. All this code can be a single trait with a single execute
method. Doing so removes the risk of future package management.
Of course this is not something to do for every package. But for simple functionality, assimilating the code into your project can improve maintainability.
Laravel provides a lot of dynamic behavior. As such, it can become confusing on where something is located. Bindings are the biggest offender.
To combat this, register all your bindings in one place. Ideally the AppServiceProvider
. When possible, use its $bindings
and $singletons
properties to make these easily scannable.
There are other bindings within Laravel which can benefit from this practices, including: Events
, Policies
, Commands
, Broadcasts
, and Routes
.
Expanding on routes a bit more, remember there are both API and web routes. Too often I see applications put everything under the web routes, even though they use the endpoint as an API.
There's a vast difference in middleware loaded for these two types of routes. For example, API endpoint using the web
middleware loads session and cookie data. This can lead not only to bad habits when crafting these endpoints, but also incompatibilities in a future if these middleware change.
It's true the configuration files are there for you to update and customize. It's also true these files are the most changed file in Laravel. There are ways to manage the Laravel config files in a maintainable way. I talk about this in more detail in a previous post on Maintaining Laravel Config Files.
Similar to formatting and structure, many applications inject their own abstractions for core components. For example, creating something like a BaseModel
. This BaseModel
creates some shared logic, such as unguarding attributes, or sometimes, completely overwriting core methods to add tiny bits of customization.
Again, doing so may decouples you from the framework. But it this case this decoupling is actually bad. All the same issues arise as if you forked Laravel itself. You no longer receive features or tweaks Laravel makes to this overwritten methods.
Instead of injecting an inheritance layer, consider using a trait instead. In this case, an Unguarded
trait.
I'll expand on this more in the next tip. For now, let's look at another example regarding overwriting core methods.
I often see developers overwrite core authentication methods. Again, doing so for simple reasons like customizing the response. If you look at the code, Laravel provides ways to do this without overwriting the entire method which allows us to be more surgical.
For example, we can simply overwrite the authenticated
method. Within it we can perform additional authentication logic or redirect the user.
Laravel provides all sorts of these callback methods and properties. For example, a Form Request has properties to change the redirect. You can add a render
or report
methods to custom exceptions to better handle errors.
You can hook into core functionality through events. Laravel fires events for all sorts of core behavior. You can register an event listener to run custom code without having to overwrite low-level details. These events are fired for all sorts of components and behaviors, such as Auth
, Jobs
, Notifications
, Commands
, even Migrations
.
Said another way, this means to use what the framework has to offer. Mimic its patterns and practices. Be a team player. Don't go rogue.
Grokking the framework takes different forms. One of these easiest ways are Blade directives. Laravel provides dozens of expressive Blade directives. Unfortunately many applications only use the standard @if
directive. But there's @isset
, @empty
, @auth
, and @guest
directives which can streamline your templates and better communicate intent.
Grokking the framework encourages us to learn the Laravel Way to write code, often making it feel more like "home", approachable and therefore maintainable.
Another example is leveraging facades. Taking that farther, real-time facades. Facades can seem heavy having to create not just the underlying class, but the accessory, register it through a provider, and maybe even create an alias.
Well not with real-time facades. We can actually use the underlying class as a facade simply by importing the class underneath the dynamic Facades
namespace. Laravel resolves the class automatically. This means we can get all the benefits of a facade, including its testability.
Laravel is an MVC framework. It's also a developer friendly framework. The combination can sometimes make it easy to do things which blur the lines between models, views, and controllers. However, it's important to remember the MVC architecture.
In general, under MVC when a request comes in the controller mediates between the model and view to respond. This means limited view logic. No cross communication between the model and the view or response.
Unfortunately, too often developers abuse facades or helpers to access requests from models or the data layer from views. Again, the framework makes this super easy. But in doing so we've coupled the model not only to a higher layer but also to the nuances of Laravel request handling or authentication.
Instead, we can honor MVC and Laravel by following very basic pattern - dependency injection. Laravel injects a request object into any controller method with a Request
type hint. We can also type hint a form request object if we have object if we want validation.
Now we can pass the request object down to these model. In doing so, we reduce the coupling to only the request object. Now you might be thinking, this is six in one hand, half dozen in the other. Maybe, but this is where using a form request can bring it all together. By also type-hinting this for the model, it serves as a contract. This communicates the bits of data we can expect within this request object.
Even if you ignore every other tip for writing maintainable Laravel applications, you can likely overcome these with a solid suite of tests.
Testing in Laravel makes testing very approachable and easy. No matter which style of tests you write, Laravel provides an option. There's HTTP Tests for quickly sending requests to your application and verifying the responses. There's Dusk to interact with your application through the browser. And everything is built on top PHPUnit, so writing unit tests is always an option.
If you're new to testing, I encourage you to watch the first lesson of Confident Laravel. It is available for free so everyone can gain confidence to start writing tests.
]]>Primarily this was done to improve the user experience. Previously users had to go download the latest versions of the config file and manually compare them to determine the changes.
By defaulting these files and doing so in an atomic commit the changes can be viewed directly as part of the pull request Shift opens. This allows users to view the differences between these files inline and easily backfill (or revert) their customizations.
Secondarily, this aligns with my recommendation to keep configuration files as default as possible.
This comes not only as the creator of Shift, but also as a developer who maintains nearly a dozen Laravel applications.
The configuration files are the most changed files between Laravel versions. This is not just in the major releases. The weekly releases contain changes to the core files. Just since Laravel 6.0 the configuration files have changed 10 times.
For these reasons, all Laravel upgrade Shifts now default the configuration files and advocate keeping these as default as possible to provide a smoother upgrade path for future versions.
Most developers don't keep these files up-to-date. Although you can likely get away with this for a while, sooner or later you'll be left scratching your head viewing a cryptic error message.
I understand the common push-back is these files are meant to be changed. That's a totally fair point. My point is more about maintainability.
Often of the changes made by Laravel or the developer are superficial. Outdated comments, changes to defaults, introduction of new environment variables.
Shift can handle the changes made by Laravel. These leaves us with the changes by the developer. And most customizations are unnecessary, or could at least be done another way.
Let's take a look at a few of the most common customizations I see and alternatives to which leave your application more maintainable.
I see a lot of applications copying or overriding configuration options instead of leveraging environment variables.
For example, a common one is establishing a test database.
1'sqlite_testing' => [2 'driver' => 'sqlite',3 'url' => env('DATABASE_URL'),4 'database' => storage_path('app/database.sqlite'),5 'prefix' => '',6 'foreign_key_constraints' => env('DB_FOREIGN_KEYS', true),7],
This adds a new configuration option which will need to be replicated in all future versions of the database.php
configuration file.
Instead of adding a new configuration option, you can leverage the existing sqlite
configuration option and set the DB_CONNECTION
and DB_DATABASE
environment variables.
Furthermore, to the point of test configuration, this could be done more cleanly within a .env.testing
file or overriding them within the phpunit.xml
configuration file.
The cascade of the phpunit.xml
configuration over environment configuration allows for specific, minimal configuration of a test environment.
When using artisan
, you may also explicitly set the environment using the --env
option.
So, when an environment variable is available, you may use it to avoid making unnecessary changes to the configuration files and gain greater flexibility in configuring your application.
Now, some developers prefer to overwrite the default values instead of having to set an environment variable for every environment. I understand this seems like an easier approach. That is, setting a value in one location instead of multiple.
However, this is a short-term tradeoff. While you are only changing this once from a configuration perspective, you are changing it multiple times as you maintain this value across future versions of the framework.
When viewed over the long-term, setting these through an environment variable actually becomes easier.
Another common use of the config files are custom values. These are either apps specific or additions to sections.
For example, application specific settings added to the app.php
configuration file, database drivers added to database.php
configuration file, or additional services added to service.php
configuration files.
All of these are logical locations to add such customizations. But these still have to be carry between each of the upgrades. For those reasons I attempt to separate these values where I can.
Looking back on these examples, let's start with the app.php
configuration file. The most common change here are registering providers and aliases. However, with package discovery, these should be minimal.
This leaves truly application specific settings. I like to put these in my own domain specific config file. Sometimes I'll call this settings.php
or use the app name.
For example, Shift has a shift.php
configuration file.
1return [ 2 3 'executable' => env('SHIFT_SCRIPT_PATH', '/opt/shift/main.php'), 4 5 'webhook_executable' => env('WEBHOOK_SCRIPT_PATH', '/opt/shift/webhook.php'), 6 7 'support_email_address' => env('SHIFT_SUPPORT_EMAIL_ADDRESS'), 8 9 'latest_sku' => env('SHIFT_LATEST_SKU'),10 11 'services' => [12 13 'github' => [14 'shift_username' => env('GITHUB_USERNAME'),15 'client_id' => env('GITHUB_CLIENT_ID'),16 'client_secret' => env('GITHUB_CLIENT_SECRET'),17 'redirect' => env('GITHUB_CALLBACK_URL'),18 ],19 20 'gitlab' => [21 'shift_user_id' => env('GITLAB_USER_ID'),22 'client_id' => env('GITLAB_APP_ID'),23 'client_secret' => env('GITLAB_SECRET'),24 'redirect' => env('GITLAB_CALLBACK_URL'),25 ],26 27 'bitbucket' => [28 'shift_username' => env('BITBUCKET_USERNAME'),29 'client_id' => env('BITBUCKET_KEY'),30 'client_secret' => env('BITBUCKET_SECRET'),31 'redirect' => env('BITBUCKET_CALLBACK_URL'),32 ],33 34 ]35];
Within this custom configuration file, I set not only app specific configuration values, but also options you might expect to see within something like services.php
.
This may seem foreign. But this file is loaded just like any other configuration file. As such, I can reference these values using the config()
from anywhere in my application. For example, config('shift.services.gitlab.redirect')
.
Using a separate config file also means I don't have to worry about maintaining these values within one of the core config files. Again, these files are ever changing and there's no guarantee even core configuration options will remain. For example, the Stripe service configuration was removed from the services.php
configuration file in Laravel 6.
So always remember you are free to relocate configuration options to a custom configuration file to improve the maintainability of your application.
For some integrated services like database
or logging
drivers, you may not have this option. You will need make customizations to the specific core configuration file.
All of these recommendations are aimed at improving the developer experience as it relates to maintaining your Laravel application.
As always, I will continue to improve Shift to spot customizations and attempt to backfill them.
Yet, making these small adjustments to your development process now will help you craft a more maintainable Laravel application for the future.
]]>What is your favorite Git command?
I am a sucker for
git add -p
. This adds changes in "patch mode" which is a built-in command line program. It iterates over each of my changes and asks me if I want to stage them?This command forces me to slow down and review my changes. Too often as developers we rush this part thinking the work is done. I can't tell you how many times I've run
git add .
in a hurry to later realize I committed "scratch" files or debug statements.
Why do you prefer using Git from the command line?
As developers, we're already using the command line for so many other things. Why not for Git as well?
In addition, Git has a very small command set. One that is pretty easy to learn as a developer and will improve your development workflow by using it directly.
How can we use stage
command?
stage
is a built-in alias foradd
.
How I can save the changes in a branch and checkout to other branch?
So you may use
git stash
to temporarily store your changes or make a "WIP" commit. The goal is to have a clean working index.Personally, I prefer working with commits rather than
stash
. I find them easier to reference and potentially share.
When should I use git stash
?
I like to use
stash
for quickly getting the "working index" clean.
How do I show Git man pages?
Use the
--help
option for any command. Example,git stash --help
.
What is "git flow"?
git flow is a branching strategy using multiple "long-lived" branches which mirror the software development lifecycle. Changes are merged between these branches as work is needed.
What is "GitHub Flow"?
Basically GitHub Flow is a branded name for a
master
/feature branch workflow. GitHub has formalized this into a process using their toolset show in this visual tutorial.
Which branching strategy do you prefer?
I've worked on hundreds of Git projects and I will say most reach for "git flow". Only a a handful of these projects ever needed that strategy. Often because it was versioned software.
The
master
/feature branching strategy is much easier to manage, especially when you're just starting out. And it's very easy to switch to "git flow" if needed.
What was the git open
command you used?
It's a separate command and available as an npm package.
How can you reset a branch when there are files that were added in other branch but still appear as untracked or modified in your working branch?
This is often the result of switch branches when the "working index" is unclean.
There's no built in way to correct this with Git. I normally avoid this by ensuring my prompt has a "status" indicator and running commands like
git status
anytime I change a branch.These habits give me an opportunity to catch this early so I can either
stash
orcommit
those changes working on a new branch.
How can I rename a branch ?
git branch -m current-branch-name new-branch-name
How I can use cherry-pick
?
git cherry-pick [reference]
. Remember this is a reapplying command, so it will change the commit SHA.
If I make a revert from a branch and (for example HEAD~3
), is it possible to go back to HEAD
again (like a recovery of your last updates?
In this scenario, I would immediately undo the
revert
commit (which is theHEAD
commit) by runninggit reset --hard HEAD~1
.
When use git pull
and git fetch
?
git pull
will download the commits to your current branch. Remember,git pull
is really the combination of thefetch
andmerge
commands.
git fetch
will retrieve the latest references from a remote.A good analogy is with a podcast player or email client. You might retrieve the latest podcasts or emails (fetch), but you haven't actually downloaded the podcast or email attachments locally yet (pull).
Why sometimes we need use --force
to push the changes of a rebase?
rebase
is a command which may reapply commits which changes their SHA1 hash. If so, the local commit history will no longer align with its remote branch.When this happens you will get a rejected
push
. Only when rejected should you consider usinggit push --force
.Doing so will overwrite the remote commit history with your local commit history. So always slow down and think about why you need to use
--force
.
Can you use a branch to merge multiple branches and then send this branch to master?
Absolutely. It's common under most of the Git workflows for branches to accumulate changes from multiple other branches. Ultimately these branches are "promoted" into the main branch.
Should I do a rebase from a very old branch?
Only if you have to.
Depending on your workflow, it may be possible to merge a stale branch into your main branch.
If you need to bring a branch up-to-date, I prefer
rebase
. It provides a cleaner history of only your changes instead of commits from other branches or merges.However, while always possible, using
rebase
may be a painful process since each of your commits are reapplied. This may lead to multiple conflicts. If so, I normally--abort
therebase
and usemerge
instead to resolve all the conflicts once.
When using rebase -i
, what's the difference between squash
and fixup
?
Both
squash
andfixup
combine two commits.squash
pauses the rebase process and allows you to adjust their commit message.fixup
automatically uses the message from the first commit.
Often when I rebase
my feature branch with master
, for each commit I need resolve conflicts?
Yes. Since the changes from each commit is reapplied during
rebase
, you have to resolve any conflicts as they happen.This means a commit conflicts early in the process, or if you resolve it incorrectly, it's likely many of the following commits will conflict as well.
To limit this, I often use
rebase -i
to first condense my commit history so it is easier to work with.If there are still conflicts across many commits, I may use
merge
instead.
Is necessary update my branch with master before merge it with master?
Depending on your workflow, it may be possible to merge a stale branch into your main branch.
If your workflow uses "fast-forward" only merges, then it will be necessary to update your branch before merging.
Do you recommend use GitKraken?
I am an advocate for using Git from the command line. I find this keeps me in full control of managing changes, as using commands to improve my development process.
Of course, certain visual actions like managing branches and viewing file differences will always be better in a GUI. Personally, I find viewing such things in the browser during the merge process to be enough.
Could you do an --amend
of a commit when it already was pushed?
Yes. However, you would not want to amend a commit after it is merged into another branch since
--amend
changes the commit.
When I know I will work on something for a while, should I open a pull request for each change or a complete pull request for all the work?
You normally want to open a pull request for all the work.
However, if you are working on something for a long time. It might be beneficial to merge smaller changes along the way. Doing so will prevent dependencies on your branch or staleness.
This will depend on the type of changes you are making.
Is it good practice make a release
branch before merge a branch to master
?
This depends heavily on your deployment process. Creating a
release
branch can be beneficial to group together work from multiple branches and test them as a whole before merging them into your main branch.Since the source branches remain separate and unmerged, you will have more flexibility in the final merge.
How to take just some commits from master
? Let's say I don't want to take the last commit but do a rebase.
Assuming
master
is your main branch, you don't want to selectively pull commits from its history. This will cause conflicts later.You will want to
merge
orrebase
your branch will all the changes from master.For pulling select commits from a branch other than your main branch, you can use
git cherry-pick
.
Are there some special themes that I can set up on my terminal?
I cover configuring and customizing your terminal in Getting Git.
Which option is best instead of use the command git push --force
?
There really isn't an alternative to
git push --force
.With that said, if you properly update your branch with
merge
orrebase
you should not need to usegit push --force
.Only when you have run commands which change your local commit history from the history you previously shared should
git push --force
be required.
When I select drop
during git rebase -
, is the code related to that commit deleted?
Yes!
To revive this code, you will need to find a state prior to the
rebase
from thereflog
.
How can we track automatically a remote branch?
Normally branch tracking is set up automatically by Git when you
checkout
or create a branch.If not, you can update this the next time you push with:
git push -u remote-name branch-name
.Or you can set it explicitly with:
git branch --set-upstream-to=remote-name/branch-name
Is a best practice rebase
a branch before updating it?
I believe so, simply for the reason organizing or collapsing your commits with
git rebase -i
first gives you more context during the update process.
Is there a way to split a commit into more commits (something inverse to fixup
/squash
)?
You could use the
exec
command during therebase -i
process to attempt to modify the working index and split up changes.You can also use
git reset
to undo recent commits and place their changes in the working index to then separate their changes into new commits.
Is there a way to go or see a commit that was fixed up?
Not the previous commits. You can using
git show
to see the changes within the new commit?
What does rebase --skip
?
This tells
rebase
to not apply the current changes during the rebase process.
How can I remove remote branches?
You can remove a remote branch by pushing "nothing" with:
git push origin :branch-name-to-remove
or using the-d
option with:git push -d origin some-other-branch-2
.To remove local reference to remote branches, you can run:
git remote prune origin
.
What's the difference between checkout
and reset
?
Both of these commands can be used to undo changes.
checkout
is arguably more robust as it allows you to not only undo current changes, but also undo a set of changes by retrieving an older version of a file.
reset
, by default, works more with changing the state of changes within the working index. As such, it really only deals with the current changes.I prefer
reset
. The wording makes more sense for the action, which is often to change the state or discard current changes. I tend to reservecheckout
for switching branches and the rare occasion of restoring an old version of a file.
What commands should I avoid using in normal workflow?
Anything that could be destructive to your history, for example:
git push origin master -f
(NEVER)git revert
(on a feature branch)git cherry-pick
(changes frommaster
)Under a normal workflow, I try to avoid using
git merge
directly as this is often built into the process through pull requests.
If I have a branch (B) that points to other branch (A) and I have another branch (C) which needs code from (A) and (B) and master which process must follow to have (C) updated?
Interesting. This depends on a few things…
Are
A
andB
something that can be merged intomaster
? If so, you could mergeA
andB
intomaster
, and then updateC
with the latest changes frommaster
.If not, you may be able to simply merge
B
intoC
since it contains the changes fromA
already.In the extreme case, you could merge
A
,B
, andmaster
intoC
. However, it's likely the order of merging would matter to avoid conflicts.
What are some of the aliases you use?
I don't alias Git commands often. Especially not core commands. I find doing so creates confusion, especially as a trainer.
With that said, I do have a few aliases for common commands or commands I use with a lot of options:
1alias.unstage reset HEAD --2alias.append commit --amend --no-edit3alias.wip commit -m "WIP"4alias.logo log --oneline5alias.lola log --graph --oneline --decorate --all
What are some lesser known Git commands?
git bisect
is a life-saver for finding an existing bug in the code. While I've only used it a few times, it has been impressively precise and saved hours of looking for a needle in a haystack.
git archive
is another nice one for packaging up a set of changes. This can be helpful for sharing work with a third-party or mico-deployments.
git reflog
is probably known, but worth mentioning as it provides a nice way to "undo" commands when things go wrong.
Can you recommend some books for learning more about Git?
Sure. I recommend reading at least the first 3 chapters of Pro Git. I have done so a few times over the years and always learn something.
Of course, I shamelessly recommend Getting Git. My video course covering the basic and advanced usage of all Git commands from the command line.
What if I have more questions?
Awesome. Send them to me on Twitter.
As such I wanted to share a written version to at least outline the intricacies of these practices working together.
I'll be honest, TDD isn't something I practice often. There was a time when I wouldn't write a single line of code without writing a test first.
However, I have come to realize that sometimes spikes or even no tests are acceptable.
Said another way I take on the risk. I give up some confidence in the code as the investment of writing tests don't pass a cost benefit analysis. Things like views, certain browser interactions, or even smaller features.
In these videos I wanted to add Purchasing Power Parity to my video courses. Since this directly affects revenue I definitely wanted it tested. So I once again reached for TDD.
From a high-level, here were the steps and reasoning behind testing this feature with a focus on the interlinking between TDD, outside-in, and YAGNI.
TDD states, I can't write any code until I first have a failing test. So I know that I need to start with a test. But where do I start in the code?
I could start anywhere. I could start with the model. I could start with the controller. I could start with validating the request. I could start with the service to geocode the IP address. I could start with the translation from country to pricing factor.
This is where the practice of outside-in testing comes to help narrow the choices. Outside-in promotes starting with a test at a higher-level (outside) of the application and working our way to a lower-level (inside) the application.
As such this immediately rules out most of the low-level items listed above like the model, translation, and validation.
This really leaves us with the geocoding service or the controller.
Of the two, the controller is the most outside piece. Or looking at it another way, the geocoding service is not going to be used until after a request comes throught the controller.
Now that I know where I want to start testing, I can begin to think about what the controller is going to do.
It's important to remember the controller is the highest-level of code. As such I want to keep the code at a high-level. This is something I talk about in the Big Blocks practice from BaseCode.
So I'll write a few tests to drive out this functionality:
Now depending on if I am marking these underlying services or not some of these tests will fail. Either way, I know the code is incomplete and as such need to continue deeper inside the application to finish driving out this feature.
In this case, I typically work from the top down. So I would start with the geocoding service, then work my way to the country/discount mapping.
The geocoding service simply wraps a call to a geocoding API. I want to test a response for when it succeeds and when it fails. These tests might even be more integration style and actually hit the service to verify the response.
Now that I've completed this inside code, I move back up to the controller to drive another path. In this case, the process for mapping the country returned by the geocoding service to a potential purchasing power discount.
Now I have infinite choices on the design and as such another area where developers get stuck. So I reach for YAGNI to help guide this next set of code.
Again, it helps to think about the problem at a high-level. Basically, I need to know if there is a coupon for a country.
Given that, I don't need a fancy translation object, service, or even a different model.
Instead, I can treat this as another retrieval operation the existing Coupon
model. Something along the lines of: findByCountry
.
This simply accepts the country as an argument and will return a coupon if there is one and null
otherwise.
This encapsulates the code enough to make the test easy. But it also prevent me from adding unnecessary complexity by introducing new patterns or objects to the code.
Now I can drive deeper inside the application to the Coupon
model and start writing tests to determine if a coupon exists for the country.
I reached the final piece of the code necessary to complete the feature. Often I find if I have followed these practices correctly, this is the primary action of the code. In this case, is there Purchasing Power.
What's also interesting is these approaches have also made this easier. Or at least the perception this once previously amorphous feature broke the focus into simple, fundamental pieces.
Again I have the opportunity to implement this translation in an infinite number of ways. I may reach for a database solution by adding columns to the coupons
table. But YAGNI argues using a database for a small list key value pairs is over engineering. This is up to you to decide.
I decided to use a simple data object to encapsulate this mapping. From there, the test was pretty straightforward. In fact, I used a PHPUnit data provider to efficiently test every mapping returned the expected coupon.
Upon adding this final piece the entire test suite ran successfully. I practiced TDD to drive out the entire feature. I used the outside-in approach to write code deeper within the application, and YAGNI to keep the code at each layer simple. This left me with a well-tested and developed set of code and ultimately confident it behaves as expected.
Need to test your Laravel applications? Check out the Tests Generator Shift to quickly generate tests for an existing codebase and the Confident Laravel video course for a step-by-step guide from no tests to a confidently tested Laravel application.
]]>It's easy to think about these old applications with a negative connotation. However, it's often the case these applications are quite successful. If not, they would have been decommissioned or rewritten.
Nay, these applications are very much alive, fulfilling their users' needs. So much so, its developers have not been able to perform an upgrade.
Almost as long as the Automated Shifts have been around, I have offered Human Shifts. Through these I have successfully upgraded over 200 Laravel applications to the latest version. Many times despite previous failed attempts.
This post serves mainly as the sales pitch for those inquiring about Human Shifts. It also shares my opinion on why upgrading old Laravel applications is not something your team should do.
The main reason Laravel applications are not upgraded is due to lack of resources. Either you can't justify the priority compared to incoming requests or you can't dedicate a developer to the project.
At some point though, you will need to upgrade. Often for performance or security reasons due to running an older version of Laravel. Sometimes there may be a new feature of the framework that is just too large to reinvent.
As silly as that latter might seem, many old Laravel applications fork packages, or even the framework, to mimic new features opposed to upgrading.
That's really what this boils down to. Everything is a tradeoff. Ultimately, the upgrade is never chosen. But this becomes circular reasoning.
You don't have time to upgrade because you've never taken the time to upgrade.
Ceasing all new work and dedicating the entire team to paying off years worth of technical debt is simply not possible. It's the grand rewrite in the sky and it doesn't work.
I on the other hand do work. I can be added as external capacity. I can focus strictly on the upgrade. Your team can continue working. When the upgrade is verified, I can even help merge the work back together.
Another hard truth of the upgrade is your team won't learn anything. There's nothing about the upgrade process that matters for day-to-day development.
Most of the nuances between the various Laravel versions is throw-away knowledge once you are on the latest version.
Sure, there's a few educational tidbits. But these are likely something your team already knows either from working on other new Laravel projects or staying current.
As the creator of Shift this knowledge is not wasted on me. Shift requires me to know every detail of the upgrade process between every version.
I have reviewed the upgrade path between 4.2 and 6.0 and all the versions in between. I have personally handled every Shift support email. I have reviewed analytics on over 17,000 Laravel applications.
I never liked the term expert. There's always more to learn. But you'd be hard-pressed to find anyone more knowledgeable with the Laravel upgrade process.
This capacity and knowledge combine to make me more efficient. I'll be more focused and faster than your team.
Too often developers use the upgrade process as an opportunity to rewrite pieces of the application. This is why most upgrades fail.
Let me focus on upgrading the application to a modern version. Your team can then focus on rewriting or refactoring after the upgrade is done.
I'm also faster. I have several scripts to help modernize old applications. Scripts to namespace
classes, convert deprecated methods, rewrite code using abandon packages popular in old versions of Laravel.
I have upgraded standard Laravel 4.2 applications to Laravel 5.8 within 3 hours. I upgraded super complex, highly customized applications using dozens of packages in under 20 hours. So the turn-around time on most of these upgrades is less than a week. Think about that, you could be running the latest version of Laravel by next Monday.
In the end, if you intend to upgrade your old Laravel application consider the Human Shifts. If you're running a recent version, good. Stay current.
]]>However, testing this is a different story. Writing these tests not only takes time, but enters the quagmire of how test this flow.
Some might perform a low level unit test to confirm payment details. Some might write an integration test for the form submissions.
I think these provide a foundation. But, for the most important piece of the application I like to also write a browser test to verify the entire checkout flow.
In this post I'll share the transcript and video from Confident Laravel. Where I take the Confident Laravel application codebase from no tests to confidently tested.
This particular segment uses Laravel Dusk to test the checkout flow. This test combined with an HTTP Test for the OrderController
and a low level unit test for the PaymentGateway
leave me feeling completely confident the the most important piece of the Confident Laravel application is behaving as expected.
First I'll add the Laravel Dusk package as a development dependency: composer require --dev laravel/dusk
Then I'll install Dusk with its artisan command: php artisan dusk:install
And I'll use the dusk:make
command to generate a PurchasePackageTest
.
Taking a look at the test file we see this extends the DuskTestCase
and has provided an example test case to get started.
To follow Laravel conventions, I'll modify this to use the @test
annotation and update the name to it_can_purchase_the_starter_package_and_create_account
.
Now this test is rather complicated, so I'm not going to muddle through figuring out how to write each of the interaction steps.
Instead I'm going to do what any experienced developer would do and defer to a Google search. That's right when in doubt, Google it out.
Now I did vet these posts beforehand and this second result has an example of using Laravel Dusk and Stripe Checkout.
So let's copy their code as a foundation and we'll review each line in order to modify it for our use case.
We see that it visits the purchase page, so I'll change this to the root URL instead.
Now, it uses the default "Pay with Card" text, whereas the Confident Laravel application uses the text "Buy Now" with a price. So I'll need to clean this up.
It also presses the button. but Confident Laravel uses a link. So I'll need to change this to clickLink()
.
I could use a CSS selector. But as I mentioned before I want to leave some flexible in my tests. I don't want this test to fail just because I change the HTML markup. So using the link text gives us a bit more flexibility.
Now, you might be thinking, It's using the text just as brittle? Maybe. But it comes with the added benefit of indirectly testing the package price.
Again, it's a tradeoff to consider when testing your own application.
Now for the tricky part. We have to determine how to interact with Stipe using Dusk. This is one of the reason I Google'd the solution. Otherwise, I would need to get in the inspector to determine a lot of these details.
Let's take a quick look at this first one and then I'll move more quickly through the rest. Looking at the inspector, we see Stripe indeed loads an iframe
for its checkout form, which has the name stripe_checkout_app
.
The code waits for the iFrame to load before interacting with it. Once it's loaded, it uses Dusk to target the next set of actions within the iFrame, instead of the page.
From there we can make a quick assertion to verify the correct iFrame was loaded. In this case, verify the package name matches the name in Stripe Checkout.
This brings us to another Testing Tip.
Never hesitate to perform a sanity check.
While this assertion isn't necessary, it does confirm the linkage between Stripe Checkout and the selected package. While it should work, I don't want to assume and risk a false positive test result. This sanity check ensures the code is behaving as expected up to this point.
Knowing it's the right Stripe Checkout, we'll fill out Stripe's payment form using one of their test cards.
First, I'll generate an email address with Faker. This gives me some of that test variance I like.
The credit card number is one of Stripe's Visa test cards. But I'll remove the spaces to avoid any oddities.
Next is the card expiration date. While this is in in the future now, I don't want this test to start failing in January of 2022. So I'll add a little dynamic date math to ensure we always have a future date.
This brings us to another Testing Tip:
When testing points in time, always be in control.
The CVC code is fine and at this point we can submit the checkout form.
Then we'll wait for Stripe to complete its interaction.
When writing a Dusk test, it's a good idea to spot check the interaction. So I'm manually repeat these steps to ensure we're on the right track.
I'll enter the checkout form details as the test would. Then we would be ready to press the button. At which point we'll wait for the Stripe iframe
to close.
At which point we're redirected to the /edit/user
page.
This is the final part to add to the test case. We can do this with assertPathIs()
.
Now I think we're ready to run this Dusk test.
Unfortunately it fails with a rather misleading error. Let's look at those handy screenshots to see what it did.
Looks like it's hitting the default Apache web server page.
This is because I haven't configured the application URL. I'll change this to my local development environment and run the test again.
It still fails, but this time with a different error. Looks like the assertion failed.
Let's look at the screenshot. It appears Stripe hasn't fully finished. Looks like it's closing, but the page hasn't reloaded.
This is pretty common when writing Dusk tests. They'll often be some timing issues.
I'll prepend a waitForReload()
call and run the tests again.
This time it passes.
Let's run it once more just to confirm we didn't get lucky with the timing.
And it still passes. Good.
Let's see this in action by disabling the headless
browser configuration.
Look at it go. That's pretty awesome.
Now, these tests run pretty slow compared to some of our other tests. Taking almost 17 seconds. The reality is this is not a test I'll run very often. It's simply nice to have if I ever questioned the Stripe integration.
It's also important to note Dusk tests do not run as part of the PHPUnit test suite. So there's separation between these tests by default. Yet another benefit using a Dusk test.
Enjoy this video? Watch 31 more just like it in the Confident Laravel video course for a step-by-step guide to testing your Laravel applications.
]]>But this gamble never pays off. It's only a matter of time until something in the code breaks.
Whether this is an actual bug found by users or I find myself it's embarrassing.
Without tests, I also introduce bugs. This happens enough times and eventually I become afraid to change the code. I code scared.
It's inevitable. At some point all code becomes foreign. That point when the code no longer fits in your brain. You no longer remember the finer bits of detail.
After that point, your outlook changes. You curse the code. You think, "WTF is this?" even if you were the original author. All this builds resentment and you start to justify rewriting the code.
We jump to a rewrite over a refactor. Often because a rewrite gives us the chance to know the code again. Which in turn gives us confidence and ultimately we continue to avoid writing tests.
But this is a false confidence. It's confidence in our memory, not the code. And it doesn't last.
Testing is the only way I really feel confident about the code. Testing gives me confidence not only that the code does what I expect now, but confidence the code will continue to do so in the future.
Again I don't test everything. But if I have an application which crosses a demand threshold, I at least test the critical parts.
I want to take a look at existing piece of code without test.
I'll start by writing tests to gain confidence the code behaves as expected. Then I'll use that confidence to refactor the code.
Let's take a look some real world code from Shift. This controller action provides the ability to rerun a previously failed Shift.
1public function rerun(RerunShiftRequest $request, Order $order) 2{ 3 $this->verifyOrderBelongsToUser($order); 4 5 if (!$order->canRerun()) { 6 return redirect()->back()->with('error', ['template' => 'partials.errors.can_not_rerun', 'data' => ['order_id' => $order->id]]); 7 } 8 9 $repository = Repository::createFromName($request->input('repository'));10 $connection = Connection::findOrFail($request->input('connection_id'));11 12 try {13 if ($connection->isGitLab()) {14 GitLabClient::addCollaborator($connection->access_token, $repository);15 }16 } catch (\Gitlab\Exception\RuntimeException $exception) {17 Log::error(Connection::GITLAB . ' failed to connect to: ' . $request->input('repository') . ' with code: ' . $exception->getCode());18 return redirect()->back()->withInput($request->input());19 }20 21 $order->update([22 'connection_id' => $request->input('connection_id'),23 'repository' => $request->input('repository'),24 'source_branch' => $request->input('source_branch'),25 'rerun_at' => now(),26 ]);27 28 PerformShift::dispatch($order);29 30 return redirect()->to('/account');31}
While not a mission critical part of the application, it provides value by making the user self sufficient and prevents a support request.
This is about 30 lines of code and contains multiple paths.
First, I like to test the happy path. This is the path where the code behaves without error or exception.
In this case, it's where the appropriate data was passed in and the Shift was put back on the queue.
To get started, I'll create an HTTP test and write a test case which sends the proper data and ultimattely assert it was dispatched to the queue.
That test case becomes:
1/** @test */ 2public function rerun_updates_order_and_adds_shift_queue() 3{ 4 $connection = factory(Connection::class)->create([ 5 'service' => Connection::GITHUB 6 ]); 7 $order = factory(Order::class)->state('held')->create([ 8 'connection_id' => $connection->id 9 ]);10 11 $now = Carbon::parse($this->faker->dateTime);12 $repository = 'shift/test-repository';13 $branch = $this->faker->word;14 15 $queue = Queue::fake();16 Carbon::setTestNow($now);17 18 19 $response = $this->actingAs($order->user)->post(route('order.rerun', $order), [20 'connection_id' => $connection->id,21 'repository' => $repository,22 'source_branch' => $branch,23 ]);24 25 26 $response->assertRedirect('/account');27 28 $queue->assertPushed(PerformShift::class, function (PerformShift $job) use ($order) {29 return $job->order->is($order);30 });31 32 $order->refresh();33 34 $this->assertEquals($connection->id, $order->connection_id);35 $this->assertEquals($repository, $order->repository);36 $this->assertEquals($branch, $order->source_branch);37 $this->assertEquals($now, $order->rerun_at);38}
Next I want to test the additional paths.
There are a few exceptional, or sad paths. The one I want to focus on is when the GitLabClientException
is thrown.
When this exception is thrown, an error response is returned which redirects back to the rerun form with the appropriate data.
That test case becomes:
1/** @test */ 2public function rerun_redirect_and_does_not_rerun_for_a_non_rerunnable_shift() 3{ 4 $order = factory(Order::class)->state('ran_twice')->create(); 5 6 $repository = 'shift/test-repository'; 7 $branch = $this->faker->word; 8 9 $queue = Queue::fake();10 11 12 $response = $this->from('/rerun')->actingAs($order->user)->post(route('order.rerun', $order), [13 'connection_id' => $order->connection_id,14 'repository' => $repository,15 'source_branch' => $branch,16 ]);17 18 19 $response->assertRedirect('/rerun');20 $response->assertSessionHas('error', [21 'template' => 'partials.errors.can_not_rerun',22 'data' => ['order_id' => $order->id]23 ]24 );25 26 $queue->assertNothingPushed();27}
There's additional sad path for when:
I'm not going to worry so much about the incorrect data being sent.
Validation can take a while to test properly and doesn't provide much additional confidence. Often, I'll use an alternative approach for testing validation in Laravel.
I also won't focus on the user not owning the Shift. While this is a small security measure, I'll save that for another time.
The path which is custom to this feature is eligibility to rerun logic. So I want to test this.
In order to do so I will manipulate the Order
data to met the condition for canRerun
.
This test case becomes:
1/** @test */ 2public function rerun_does_not_rerun_and_redirects_back_when_there_is_a_gitlab_client_exception() 3{ 4 $connection = factory(Connection::class)->create([ 5 'service' => Connection::GITLAB 6 ]); 7 $order = factory(Order::class)->state('held')->create([ 8 'connection_id' => $connection->id 9 ]);10 11 $repository = 'shift/test-repository';12 $branch = $this->faker->word;13 14 $gitlab_client = $this->mock(GitLabClient::class);15 $gitlab_client->shouldReceive('addCollaborator')16 ->with($connection->access_token, Mockery::type(Repository::class))17 ->andThrow(GitLabClientException::class);18 19 $queue = Queue::fake();20 21 22 $response = $this->from('/rerun')->actingAs($order->user)->post(route('order.rerun', $order), [23 'connection_id' => $connection->id,24 'repository' => $repository,25 'source_branch' => $branch,26 ]);27 28 29 $response->assertRedirect('/rerun');30 $response->assertSessionHas('_old_input', [31 'connection_id' => $connection->id,32 'repository' => $repository,33 'source_branch' => $branch,34 ]);35 36 $queue->assertNothingPushed();37}
Now I have tests which give me confidences this code is behaving as expected.
Armed with the confidence of these tests, I now have the ability to truly refactor the existing code.
First, I don't like the try
/catch
block. I've never been an exceptional programmer 😅. try
/catch
blocks appear dense to me. Furthermore, Laravel offers a better way.
Starting in Laravel 5.5, the framework will automatically call the render()
or report()
method defined on a custom exception.
As such, I can move the code for generating the response to the GitLabClientException
and allow the framework to catch the exception and return the response.
1namespace App\Exceptions; 2 3use App\Models\Connection; 4use Illuminate\Support\Facades\Log; 5 6class GitLabClientException extends \Exception 7{ 8 public function render($request) 9 {10 Log::error(Connection::GITLAB . ' failed to connect to: ' . $request->input('repository') . ' with code: ' . $this->getCode());11 return redirect()->back()->withInput($request->input());12 }13}
Now with the framework handling the exception, I have not only reduced the lines of code, but made it less complex and more readable.
1- try {2 if ($connection->isGitLab()) {3 resolve(GitLabClient::class)->addCollaborator($connection->access_token, $repository);4 }5- } catch (GitLabClientException $exception) {6- Log::error(Connection::GITLAB . ' failed to connect to: ' . $request->input('repository') . ' with code: ' . $exception->getCode());7- return redirect()->back()->withInput($request->input());8- }
To confirm everything behaves as expected, I simply run the tests to see everything passes.
In 272 milliseconds, tests afford me the confidence I have successfully refactored the code. Something I might have been reluctant to do without tests, or introduced bugs during the refactor.
Refactoring is defined by Martin Fowler as:
a change made to the internal structure of software to make it easier to understand and cheaper to modify without changing its observable behavior.
Many developers set out to refactor code, but really change code.
Having tests help verify the behavior was not changed. This in turn provides confidence you are truly refactoring the code.
I don't want to do anything to lose this confidence.
As such when refactoring or adding tests, I make it a point to only alter one set of code at a time.
When starting to test an existing implementation I only wrote code for the tests. Once I has the tests, I only altered the implementation code then confirmed it with the tests.
Together the tests and the code create a balance. The tests confirm the code and the code confirms the tests. It's a harmonious equation, where only one side should be changed at a time.
Need to test your Laravel applications? Check out the Tests Generator Shift to quickly generate tests for an existing codebase and the Confident Laravel video course for a step-by-step guide from no tests to a confidently tested Laravel application.
]]>It was influenced by my talk from last year's Laracon - Laravel by the Numbers - and my talk at Laracon Online - 10 practices for writing less complex, more readable code.
I received a lot of valuable feedback from these talks. So I combined them by using analytics from Shift to identify underutilized features of Laravel and demonstrate them with code.
As Laravel is an MVC framework, I'll start with model features and progress to views and controllers.
Laravel provides a way to force a particular data type for model attributes. You may do so with the $casts
property.
By default the created_at
an updated_at
attributes are cast to Carbon objects.
We can cast additional attributes as well.
For example, take a Setting
model which belongs to a User
. I may want to cast the foreign key to an integer
. Maybe there's also a bit flag called active
I want to cast to a boolean
.
1class Setting extends Model2{3 protected $casts = [4 'user_id' => 'integer',5 'active' => 'boolean',6 ];7}
Seeing this in action with a simple script, upon retrieving the data it is cast to the defined data types. But, more importantly, when we assign values to these attributes they are also cast.
1$setting = Setting::first(); 2 3dump($setting->user_id); // 1 4
dump($setting->active); // false
5 6$setting->user_id = request()->input('user_id'); 7
$setting->active = 1; 8 9
dump($setting->user_id); // 5, not "5"10dump($setting->active); // true, not 1
This is nice because when using request data (which is a string
by default) casting avoids any type issues which may arise.
You can also use more complex cast types like array
or collection
. This will automatically deserialize a JSON encoded string into a PHP array or Laravel collection.
We can also cast data for more complex scenarios by creating the accessor and mutator methods for the attribute. These are getters and setters with a naming convention of the attribute name with a suffix of Attribute and prefixed with either get
or set
.
The accessor method accepts the original data and returns the data type we want. The mutator accepts this data type and sets the underlying value to the original format.
Let's see this in action with a quick snippet for casting a pipe-delimited string into an array.
1class Setting extends Model 2{ 3 public function getDataAttribute($value) 4 { 5 return explode('|', $value); 6 } 7 8 public function setDataAttribute($value) 9 {10 $this->attributes['data'] = implode('|', $value);11 }12}
Now keep in mind due to the magic nature of these methods you may not be able to perform actions on them as we would with these PHP data types.
For example, if I were to try to use the array concatenation operator it actually would not update the underlying attribute.
1$setting = Setting::first();2 3dump($setting->data); // [1, 2, 3]4 5$setting->data += [4];6 7dump($setting->data); // still [4, 5, 6]8 9$setting->save(); // 4|5|6
While the documentation doesn't explicitly discuss this, you can see it avoided in the JSON examples by setting a temporary variable and then reassigning this to attribute.
Many applications directly map the relationship between two models by setting the foreign key to the key of another model.
1$setting->user_id = $user->id;
However, there is a bit more of an expressive way to define these relationships and allow the framework to do the mapping for you.
For belongs to relationships you can do this with the associate
and disassociate
methods:
1// map2$setting->user()->associate($user);3 4// unmap5$setting->user()->disassociate($user);
For many-to-many relationships you can do this with the attach
and detach
methods:
1// map2$user->settings()->attach($setting);3 4// unmap5$user->settings()->detach($setting);
For many-to-many relationships there are also toggle
and sync
methods. These help you manage the associations in bulk and avoids writing nasty logic.
Also related to many-to-many relationships is Pivot data.
For many-to-many relationships there is an intermediate table (or pivot table). A common requirement is to leverage this table to store additional information.
For example, consider a User and Team many-to-many relationship. A user can be on many teams, and a team can have many users.
However, we may want an additional bit of data to mark the user as approved to be on a team. Where is this data stored?
Well, we can store this on the pivot table. And in the relationship, we can reference this pivot data.
So for the User
model, we want to restrict the relationship to only the teams where the user has been approved
.
1class User extends Authenticatable2{3 public function teams()4 {5 return $this->belongsToMany(Team::class)6 ->wherePivot('approved', 1);7 }8}
On the other side of this relationship we may want to get the additional information for the members of that team.
This data might be used for a dashboard display with the approved
status as well as timestamps of when they joined the team.
I can grab this additional data using the withPivot
and withTimestamps
methods. But I can leverage the using
method to specify a class to represent this data. You can think of this like a cast.
1class Team extends Model 2{ 3 public function members() 4 { 5 return $this->belongsToMany(User::class) 6 ->using(Membership::class) 7 ->withPivot(['id', 'approved']) 8 ->withTimestamps(); 9 }10}
Taking a look at this Membership
class it's actually a superset of the Model
class called Pivot
.
It has similar properties where we set the table
. In this case, I'll follow the convention of the two model names in alphabetical order.
I've also enabled the incrementing state for this pivot table since it has an incrementing, primary key column.
And I've also defined the relationships for the user
and team
to also load this data as well.
1class Membership extends Pivot 2{ 3 protected $table = 'team_user'; 4 5 public $incrementing = true;
6 7 protected $with = ['user', 'team']; 8 9 public function user()10 {11 return $this->belongsTo(User::class);12 }13 14 public function team()15 {16 return $this->belongsTo(Team::class);17 }18}
Leveraging pivot methods allows me to create a pretty complex relationship using the basic relationships of belongsTo
and belongsToMany
.
Many applications still use the basic Blade directives. For example, only the @if
directive. Blade offers more expressive directives which can help you streamline your templates.
1@if(isset($records)) 2@isset($records) // expressive alternative 3 4@if(empty($records)) 5@empty($records) // expressive alternative 6 7@if(Auth::check()) 8@auth // expressive alternative 9 10 11@if(!Auth::check())12@guest // expressive alternative
In addition, there are two blade directives for method spoofing and CSRF form fields.
So instead of hard coding HTML and having to remember the proper names and values, you can use these directives instead:
1@method('PUT')2 3@csrf
Finally if you're doing any kind of iteration tracking with @foreach
directives, take a look at the loop variable.
This is a built-in option available within the foreach
block and has properties like count
, iteration
, first
, last
, even
, odd
and more which help satisfy all your iteration logic needs.
Finally, a performance gotcha with view composers. While these are a great way to share data, you might lazily share the the data with all views using the *
wildcard view.
1View::composer('*', function ($view) {2 $settings = Setting::where('user_id', request()->user()->id)->get()3
$view->with('settings', $settings);4});
When you do this with a closure, the containing logic will be executed for every view your template uses. This includes a layouts, partials, components, etc.
So if your template uses 7 other views this will be executed 7 times.
Instead, try to isolate sharing the data with the particular view which uses it, or share it with the highest level view (for example the layout). You can also adopt the singleton pattern to overcome this if you truly need to target many views.
I commonly see try
/catch
blocks within controllers. I have never been very fond of try
/catch
blocks. They have a dense and noisy syntax.
1try {2 if ($connection->isGitLab()) {3 GitLabClient::addCollaborator($connection->access_token, $repository);4 }5} catch (GitLabClientException $exception) {6 Log::error(Connection::GITLAB . ' failed to connect to: ' . $request->input('repository') . ' with code: ' . $exception->getCode());7
return redirect()->back()->withInput($request->input());8}
We can remove the need for this by leveraging the framework and custom exceptions. Instead you can define a render()
method on this custom exception and Laravel will automatically call it.
This means you can move the exception response code within this method. Then allow the code to bubble up the exception and let the framework handle it was still performing the same behavior.
Similar to managing responses, formatting responses is something frequently performed in applications. Especially API applications.
Shift analytics confirm packages like Fractal are among the most popular. However, Laravel provides some built-in ways to do so.
For example, you may create a Resource object. Within this class you map and format your model attributes for output as well as specify any header values you might want on the response.
You pass this resource object your model and can return it directly to Laravel. It also supports collections of models if you'd like to format those responses differently.
Something else common in applications which creates a headache when upgrading is overwriting core behavior.
I mentioned this in Laravel by the Numbers, but there are ways to hook in the various behavior Laravel provides.
For example, if you have additional authentication behavior you want to perform or to change the response, instead of overriding the sendLoginResponse()
method provided by the AuthenticatesUser
trait, Laravel provides a hook through the authenticated()
method.
1protected function sendLoginResponse(Request $request)2{3 $request->session()->regenerate();4 5 $this->clearLoginAttempts($request);6 7 return $this->authenticated($request, $this->guard()->user())8 ?: redirect()->intended($this->redirectPath());9}
Not only is the authenticated()
method called, but if it returns anything other than null
, it will be used for the response instead of redirecting the user.
Always look for these types or hooks or events instead of overwriting core code.
Finally for applications using authentication, you will likely have authorization logic as well. Unfortunately this logic often gets littered across the layers of your application.
For example, I have a video controller which contains logic to ensure the user can watch that particular video.
1class VideosController extends Controller 2{ 3 public function show(Request $request, Video $video) 4 { 5 $user = $request->user(); 6 7 $this->ensureUserCanViewVideo($user, $video); 8 9 $user->last_viewed_video_id = $id;10 $user->save();11 12 return view('videos.show', compact('video'));13 }14 15 private function ensureUserCanViewVideo($user, $video)16 {17 if ($video->lesson->isFree() || $video->lesson->product_id <= $user->order->product_id) {18 return;19 }20 21 abort(403);22 }23}
This codes checks if the lesson is free or the user has purchased a package which includes this lesson. Otherwise the application aborts with a 403
.
Now this isn't the only place in the application which performs this type of authorization check. This is done in middleware and views.
Laravel provides a way to encapsulate authorization logic using Gates and Policies.
Gates are the generic checks and policies map nicely to the CRUD operations of a model.
I'll demonstrate using a gate. It uses a callback which returns true
if they are authorized to perform a particular action and false
otherwise.
I can also name this gate for simple reference as well as pass it additional data it might need to perform the authorization check.
1Gate::define('watch-video', function ($user, \App\Lesson $lesson) {2 return $lesson->isFree() || $lesson->product_id <= optional($user->order)->product_id;3});
Now anywhere I performed this check before, I can replace using the Gate
facade and the authorization I defined. And, of course, there are also Blade directives I can use in my views.
Since Laravel encapsulates this for me, I can remove the need for my own additional encapsulation and do this directly as a guard clause within the show
action.
1class VideosController extends Controller 2{ 3 public function show(Request $request, Video $video) 4 { 5 abort_unless(Gate::allows('watch-video', $video), 403); 6 7 $user = $request->user(); 8 $user->last_viewed_video_id = $video->id; 9 $user->save();10 11 return view('videos.show', compact('video'));12 }13}
If you want to learn more about guard clauses and reducing big blocks I talk about these and other practices in the BaseCode Field Guide.
One final bit dealing with authorization is the ability to create signed URL in Laravel. These URLs to have data within them and are signed using an HMAC to avoid them being tampered with.
These can also be short-lived by setting an expiration time.
Laravel not only automatically can generate these temporary URLs signed URLs, but also manages verifying them and provides middleware to attach them to URLs.
So for example, I use these signed URLs to allow members to join teams I mentioned earlier.
1class TeamController extends Controller { 2 public function __construct() { 3 $this->middleware('signed')->only('show'); 4 } 5 6 public function edit(Request $request) { 7 $team = Team::firstOrCreate([ 8 'user_id' => $request->user()->id 9 ]);10 11 $signed_url = URL::temporarySignedRoute('team.show', now()->addHours(24), [$team->id]);12 13 return view('team.edit', compact('team', 'signed_url'));14 }15}
Had an extra minute left on my talk, so I crammed in a bonus sample.
One of my favorite expressive features of Laravel are the fluent response and route methods.
So let's see these in action by looking a snippet with some before and after code samples.
1// before 2Route::get('/', ['uses' => 'HomeController@index', 'middleware' => ['auth'], 'as' => 'home']); 3Route::resource('user', 'UserController', ['only' => ['index']]); 4 5// after 6Route::get('/', 'HomeController@index')->middleware('auth')->name('home'); 7Route::resource('user', 'UserController')->only('index'); 8 9 10// before11response(null, 204);12response('', 200, ['X-Header' => 'whatever'])13 14// after15response()->noContent();16response()->withHeaders(['X-Header' => 'whatever']);
Want to make these changes in your code? Several of the Laravel features mentioned here including the Blade directives, fluent method chaining, and form requests are all conversions automated by the Laravel Fixer Shift.
]]>In this post, I want to address time. ⏱
I'm someone who values time over anything else. From my perspective, time is the only thing I'll never have more of. It annoys me when something takes more time than I think or longer than I want.
Lately I've been adding tests for not only my own applications, but also pairing with others to write test for their existing applications.
This is a slow process. Before getting started with testing there's a lot of set up.
You need to:
While individually these are simple tasks, together they create a real drag.
The truth is many Laravel applications don't have tests for a reason. Maybe you don't have buy-in from the boss. Maybe no one else on your team cares about testing. Maybe you're learning.
Whatever the reason, something has prevented you from testing. Now you're finally ready to get started, and you're faced with the tedious task of spending hours setting things up.
The real kicker is, after all this setup you still haven't written a test. There's nothing to immediately show for all your time and effort.
It sucks! I know we all want to test our Laravel applications. But time is a real barrier. So let's lower it.
Of course Laravel offers artisan
commands to create some testing components.
You can create an HTTP Test with:
1php artisan make:test Some/Http/ExampleTest
And you can create a unit test with:
1php artisan make:test --unit ExampleTest
If you're using Laravel Dusk, you can create a Dusk test with:
1php artisan dusk:make ExampleTest
Each of these commands generates the respective test class with an example test case.
To generate test data for your models, you can create factories with:
1php artisan make:factory SomeModelFactory
To get a little more out of this command, set the --model
to specify which model the factory creates.
1php artisan make:factory --model=SomeModel SomeModelFactory
These commands generate the file, any necessary folder structure, and what I call the class stub. It's really just skeleton code. There's a lot you need to fill in before being able to use it.
I typically start testing existing Laravel applications with HTTP Tests. I got tired of running the make:test
commands for all my controllers. So here's a handy one-liner which generates tests for any controller within an application.
1find app/Http/Controllers -type f -name '*Controller.php' -exec sh -c 'php artisan make:test $(dirname "${1:4}")/$(basename "$1" .php)Test' sh {} \;
That script helps, but it only scratches the surface. And only works for tests. And only generates stubs.
The bigger time drain is writing model factories. You have to remember the columns, set the proper fake data, wire up the necessary relationships. There goes the morning, if not whole day.
I know I got tired of this and went searching. I found a package by Marcel Pociot. It didn't work out of the box, but I spent time reviving it so I would never write another model factory again.
Like artisan make:factory
, this Laravel Test Factory Generator makes the factories for all the models in your application. But it does so much more.
It connects to your local database to determine the columns to create the data definition. Based on the column name and data type, it determines the Faker data to use.
But wait, there's more!
It also looks at the model class to determine the Eloquent relationships and properly creates related model data. So when you're testing, the database has all the necessary records for this model.
So given the following schema:
1Schema::create('lessons', function (Blueprint $table) {2 $table->bigIncrements('id');3 $table->string('name');4 $table->integer('ordinal');5 $table->unsignedBigInteger('course_id');6 $table->timestamps();7});
This package would generate the following factory:
1/* @var $factory \Illuminate\Database\Eloquent\Factory */ 2 3use Faker\Generator as Faker; 4 5$factory->define(App\Lesson::class, function (Faker $faker) { 6 return [ 7 'name' => $faker->name, 8 'ordinal' => $faker->randomNumber(), 9 'course_id' => function () {10 return factory(App\Course::class)->create()->id;11 },12 ];13});
Whether you have 42 existing models or a few new models this package is a tremendous time saver. Run its artisan
command at any point to generate any missing factories for your application with:
1php artisan generate:model-factory
All these tools are great. But it's still not enough fast enough.
Setup is not where I want to spend my time. I want to write tests! So I started building a Test Generator Shift. Its goal is not only generate the components above, but analyze your codebase to provide a real starting point.
Using route definitions and Controller method signatures, Shift will generate test cases with factories setup, the HTTP request built, and initial assertions. It also adds actionable comments to help you identify additional test paths and setup.
I completed alpha testing earlier this week. From this simple route:
1Route::get('promotions/{code}', 'CouponController@show');
The Test Generator Shift created the following HTTP Test:
1<?php 2 3namespace Tests\Http\Controllers; 4 5use Tests\TestCase; 6use Illuminate\Foundation\Testing\RefreshDatabase; 7 8class CouponControllerTest extends TestCase 9{10 use RefreshDatabase;1112 /** @test */13 public function show_returns_an_ok_response()14 {15 $this->markTestIncomplete('This test case was generated by Shift and needs review.');1617 $coupon = factory(\App\Coupon::class)->create();1819 $this->get('promotions/' . $coupon->code);2021 $response->assertOk();2223 // TODO: perform additional assertions...24 }25}
I'll do beta testing after Laracon US. I plan to release this Shift early August to give you enough time to start adding tests to your Laravel applications before the release of Laravel 5.9.
This is the next level. And I'm so excited to help provide even more confidence around the process of maintaining your Laravel applications. 👍🏻
Need to test your Laravel applications? Check out the Tests Generator Shift to quickly generate tests for an existing codebase and the Confident Laravel video course for a step-by-step guide from no tests to a confidently tested Laravel application.
]]>This is a postmortem. Be warned it's a peek into the mind of a developer mixed with movie references and emojis to light the dark.
While only a few of the user replies were pushy, it was still pretty embarrassing. I pride myself on providing the best service. And here I am spamming my users. How did this happen?
The email users received was a follow-up email. It's sent to users who ran some of the newer Shifts to check how it went and get their feedback so I can improve the Shift.
It goes out weekdays at 3:00 am and to my knowledge had been running fine for the past two years. The code had not been changed since October 2018. But like the sleepy town of Dante's Peak there was something building under the surface, waiting to erupt and I ignored the signs. 🌋
This morning I'm dealing with the aftermath though. I immediately posted a tweet to help build awareness I was looking into it. This slowed the incoming replies.
I also disabled email entirely in all environments by sending everything to the logs using MAIL_DRIVER=log
. This may seem like a knee-jerk reaction, but I wasn't sure where the problem originated. At least nothing else would go out until I diagnosed the problem.
With this patch I switched into investigation mode. I jumped over to Mailgun to see if there were any clues within their logs. I also wanted a better understanding of the damage.
So with a hard swallow I clicked Logs. 🙈
The graph says it all. And while ridiculous, for a brief second I was glad to see it wasn't in the tens of thousands and exceeded my plan limits.
This was still pretty bad. I looked through the logs more closely to try and determine if there was a pattern. I mean did all users get a follow-up email?
It just didn't make sense. This job runs every night. As such the queue should never be this large. I mean 3,625 Shifts would need to be run in a 48 hour period. Inconceivable!
The code is pretty basic. An Eloquent query to collect recent order and send out any follow-up email:
1$orders = Order::where('status', Order::STATUS_FULFILLED) 2 ->where('followup_sent', 0) 3 ->where('created_at', '<', Carbon::yesterday()) 4 ->get(); 5 6foreach ($orders as $order) { 7 if ($this->shouldReceiveReviewEmail($order)) { 8 Mail::to($order->user->email)->send(new ReviewShift($order)); 9 } elseif ($this->needsToRunNextShift($order)) {10 Mail::to($order->user->email)->send(new NextShift($order->product->nextShift()));11 }12 13 $order->followup_sent = 1;14 $order->save();15}
So what was up?
The only change I made was resetting a user's account who couldn't log in with GitHub. But that was a database change, to an old account.
So what! 🤷♂️
From experience, the issue normally stems from the most recent change - however unlikely it might seem. But it didn't make sense. I wasn't looking at the problem. What's the problem?
I kept thinking what did I do. Not the problem itself. I need to go back to the 5 Whys.
I was only on my second Why. I downloaded a backup of the production database. I ran the same query as the job runs and sure enough found 3,625 records. These went as far back as October. Hmmm, October 2018 was when the code last changed. 💡
I compared the code changes. It was a simple column name change. That couldn't be it. And that would also mean these follow-up emails weren't sending for 9 months. No way man!
At this point I was losing focus. It was the 4th of July. So with email disabled and no more replies coming in, I resolved myself to revisiting it later. 🎆
Experience has also taught me sometimes this is best. I could have burned the entire holiday trying to figure it out and gotten nowhere. Instead, maybe I could walk away now and still enjoy the day while keeping it in the back of my mind.
It was 11:19 pm. I'm laying in bed about to doze off when the NZT hit me. My brain illuminated and it all came together. An email address was null
. 🤯
The problem with the user account was because their email address was missing. They must have been queued up to receive a follow-up email. But because their email address was empty it caused an error. This prevented the follow up email task from completing. Night after night after night. I am the smartest man alive!
But could this really be? I received a notification from Sentry a while back about "accessing email
property on null
". But wouldn't I have received those every weekday morning though.
I went back to the query. Sure enough, the top result was for the corrected user. This means it was the first record in the Eloquent collection and had been blocking the job from completing for months.
I verified against production data no other accounts were missing email. While the application code clearly doesn't expect null
, I quickly added an abort(409);
for any attempt to create a user account with a null
email address. I'll likely drive this out through tests later in the week.
So there it was. I had my 5 Whys:
null
email address.I reckon some developers would have just disabled email and moved on. But I had to know why. I wanted to provide great service. Even if it was hard. Which brings me to one of my favorite movie quotes:
]]>It's supposed to be hard. If it wasn't hard, everyone would do it. The hard is what makes it great.
This is not a new concept. Michael Feathers declares any code base without tests to be legacy in Working Effectively with Legacy Code.
As someone who spent two years on an eXtreme programming team practicing TDD every day, testing not only gave me confidence in my code, but leveled-up my programming skills.
Despite this continual push towards testing, it's rare to find a Laravel application with tests. From analytics I shared in Laravel by the Numbers less than a quarter of Laravel applications have tests.
The irony is I've never come across a developer who doesn't want to write tests.
So why aren't we testing our Laravel applications?
Over the last few months I've asked developers and clients why they don't write tests for their existing Laravel applications. The answer almost always comes back to time.
Writing tests does take time. I'm not going to claim otherwise. To create the tests, data fixtures, and mocks takes time. It's also a tedious task without immediate results.
Yet, even when given the time, we still don't write tests. This is a bit of a paradox. If we know the benefits of testing and have time to do so, then why don't we write tests?
This brings me to the next common response, we don't know where to start testing.
This comes in two forms. The first form is quite literally we don't know which test to write first. The second form is more not knowing how to write the first test.
Adam Wathan expresses this exact pain point as his motivation for Test Driven Laravel. And it's a pain point for writing tests for existing Laravel applications as well.
I focus on lowering the time barrier to testing in a separate post. Today, I want to focus on getting started with testing your Laravel applications.
Since this guide is nearly 5,000 words, I added a table of contents for easier navigation, continued reading, and reference.
I used to tell people in my testing workshops to start with testing one of the most important pieces of their application. Didn't matter how they tested it. Could be an integration test, unit test, browser test, whatever. Just write some kind of automated test.
I knew it would be a lot of work. But I felt testing a critical piece of the application would help co-worker or manager buy-in.
Unfortunately, this approach requires overcoming both the time and skill barriers to testing. Not only would it take longer to set up these types of tests, but attempting to test the most complex part of your application would require expert level knowledge of testing.
I realize now this was a mistake. The way to get started with testing is the same way you get started with anything - small, incremental steps.
Since version 5.2, Laravel has focused heavily on testing. Now Laravel makes configuration easy, includes test cases and assertions out of the box, and offers built-in ways to mock core components.
When it comes to the question of how to start to testing your Laravel applications, the answer is, hands down, HTTP Tests.
With HTTP Tests, it's simple to create any type of request to GET
, POST
, PUT
, etc. You can send request data, set an authenticated user, and set session and header data using a fluent API.
The returned response object has assertion methods to test common behavior. You can verify the HTTP status, the returned view, the view, session, or header data set, or a redirection occurred.
HTTP Tests are the easiest way for you to send a request to your application and make assertions about the response. In addition, this high-level test provides broad coverage as it touches many layers of your application including middleware, controllers, models, services, and views.
HTTP Tests give you the most return on your time investment.
So HTTP Tests answers the first half of question, there's also the question of where to start.
To the point of small, incremental steps, you should start by writing an HTTP tests that sends a request which returns a simple response.
I know to people who have written tests this may seem silly. It is a little bit. But the value of this test is not necessarily in the coverage it provides, but the momentum it provides.
If you try to test the most complex piece of your application first, you will not have the momentum to do so. And you will give up on testing.
I don't want that to happen. Testing for me has been the single biggest improvement I made as a developer. I'll admit I don't test everything. I don't seek 100% code coverage. My primary goal when testing is feeling confident my application behaves correctly.
To demonstrate getting started with testing, I will test the Laravel authentication component using HTTP Tests. This may not be something you test very thoroughly in your Laravel applications. Maybe even at all.
But for the purposes of this guide it's the perfect thing to test. All of the necessary code can be generated. This allows us to focus on the writing the tests without having to worry about varying implementation details.
The authentication components also use many layers within Laravel. It has multiple request types. It has redirection. It has data validation. It has interaction with the database. It has user authentication.
These will allow us to incrementally learn more about testing Laravel applications. From here you can apply these practices to your own applications.
So while the auth components may not be something which brings you a lot of value in relation to testing. It does provide a lot of value in learning how to test.
To get started, I'll install a brand new Laravel (5.8) application using the Laravel installer:
1laravel new start-testing-laravel
I'll switch into the Laravel project directory and run make:auth
to generate all the authentication components:
1cd start-testing-laravel/2php artisan make:auth
From these two commands, this Laravel application has all the code for managing users, including user registration, login, logout, forgot password, and authentication.
I don't have to write any code. Which is great, since I want to focus on writing tests.
Out of the box, Laravel includes a preconfigured test environment and example tests. Underneath it uses the PHPUnit testing framework.
To run these tests, I can call the phpunit
test runner installed by composer:
1vendor/bin/phpunit
I see these sample tests pass and everything is green.
Laravel stores tests under the tests
folder. Under the tests
folder, Laravel has two subfolders: Feature
and Unit
.
These terms carry with them implications about the tests. Unfortunately, this is exactly the kind of quagmire you can get stuck in when starting to test. I'm intentionally going to skirt the issue. For today, tests are tests. The only distinction I will make is placing Laravel's HTTP Tests under the Feature
subfolder as this is how the example tests are organized.
Organizing Your Tests
On the topic of subfolders, I encourage organizing your tests to mirror the app
folder. So if you are testing the app/Http/Controllers/UserController.php
, you should create the test as tests/Feature/Http/Controllers/UserControllerTest.php
. Mirroring the folder structures avoids confusion on where (or if) a test exists.
For the first test, I want to start with something very small. The goal is to gain momentum with testing. I don't want to have to do a lot of configuration, setup, or learn about mocking objects.
Start by testing something simple. This will vary based on your application. An example within the current application might be testing the main page or the login page.
I'll choose writing a test for the login page and build from there. I can generate a new test class with the make:test
command:
1php artisan make:test Http/Controllers/Auth/LoginControllerTest
Let's quickly review this command. First, the path mirrors that of my app
folder. Second, the suffix of Test
. Any PHP file within the Feature
or Unit
folders with the Test
suffix will automatically be run by PHPUnit. While this is configurable, it's a common convention and one Laravel follows out of the box.
This command generates the following class:
1<?php 2 3namespace Tests\Feature\Http\Controllers\Auth; 4 5use Tests\TestCase; 6use Illuminate\Foundation\Testing\WithFaker; 7use Illuminate\Foundation\Testing\RefreshDatabase; 8 9class LoginControllerTest extends TestCase10{11 /**12 * A basic feature test example.13 *14 * @return void15 */16 public function testExample()17 {18 $response = $this->get('/');1920 $response->assertStatus(200);21 }22}
There's a few important things to note. First, this class extends the TestCase
class. This is located in the tests
folder and where you may add code to share across your test suite. It in turn extends Laravel's TestCase
class which provides helper methods and assertions you may use during testing.
Second, it created a test case. By convention, any public
function prefixed with test
within a TestCase
class will be run by PHPUnit. You may also use an @test
annotation to mark a test case. I find using this annotation with a snake case name to be more common when writing tests for Laravel applications.
I will follow this convention and adjust the test name to relay what our test is attempting to verify.
1- /**2- * A basic feature test example.3- *4- * @return void5- */6+ /** @test */7- public function testExample()8+ public function login_displays_the_login_form()
This name may seem redundant. But as your test suite grows it will help provide that extra bit of context needed when fixing a failing test.
Now that I created the test case, I need to actually write the test. It's important to focus on the behavior this test aims to verify. In this case, I want to ensure when I request /login
it display the login form.
I can then translate this high level goal into a more technical language. Again, don't worry about writing the test. Focus on what you know. You know the code.
So in code, this means:
When I send a
GET
request to thelogin
route,
Then it should return theauth.login
view.
Armed with this technical language (Gherkin), I only need to fill in the blanks. I already see from the generated HTTP Test how to make a request. I will need to change the route. I also see I can make assertions on the response. By browsing the TestResponse class, I see all available assertions and find assertViewIs
.
I'll make these changes to the test case:
1/** @test */2public function login_displays_the_login_form()3{4 $response = $this->get(route('login'));5 6 $response->assertStatus(200);7 $response->assertViewIs('auth.login');8}
I'll run the tests again, but this time limit it to the LoginControllerTest
by passing the path to the test class:
1vendor/bin/phpunit tests/Feature/Http/Controllers/Auth/LoginControllerTest.php
The test passes and everything is green.
Now I know this test may not seem that valuable. That's okay. The value is not about the confidence the test provides. The value is in the confidence it provides about testing. You wrote your first Laravel test. Allow that little dopamine to take hold and use it to write the next test.
Now that we have our first test, let's tackle something a bit more complex. We're not ready to test integrations yet. But maybe we can test some other kind of behavior related to making basic requests.
Sticking with the login form, let's actually make a request which submits the form data and attempts to log in. Since we're not yet ready to integrate with the database, we can test the login responded with a login error.
Let's translate this goal once more into technical language:
When I make a
POST
request to thelogin
URI,
Given I have sent invalid credentials,
Then I am redirected back to the login page,
And I receive a validation error.
First, I'll write the initial test case:
1/** @test */2public function login_displays_validation_errors()3{4 // ...5}
Next, I'll fill in the test case to send the request and assert the response behaved as expected.
I sent GET
request before. To send a POST
request we simply call post()
instead. Looking at the post()
method signature we see it accepts additional arguments, with the second being the request data.
1post(string $uri, array $data = [], array $headers = []);
I can change code for assertStatus
to 302
to verify the redirection.
Now I need to assert the validation errors. I know Laravel puts validation errors in the session. Taking another look at the response assertions we find assertSessionHasErrors()
. I can use this to verify the session contains validation errors for certain form fields.
Putting this all together, the test case becomes:
1/** @test */2public function login_displays_validation_errors()3{4 $response = $this->post('/login', []);5 6 $response->assertStatus(302);7 $response->assertSessionHasErrors('email');8}
Different Redirection Behavior
You may be inclined to write an assertion to verify the response was redirect to the login
route using assertRedirect(route('login'))
. While this is the expected behavior, this assertion would fail. This is because Laravel uses back()
for its redirection. Since these requests are sent without a referrer, they will always be redirected back to the root url. If you want to set the referrer, you may chain the from()
method before your request.
You might feel the validation test we wrote is a bit incomplete. I didn't pass any data. I didn't assert the exact validation message. I didn't write test cases for other combinations of invalid data.
When getting started with testing you may be inclined to write test cases for every code path. That's fine. Especially if it helps you gain momentum. But ultimately testing is about confidence, not coverage.
I rarely test every possible path through the code. I only test enough paths to give me confidence the code is behaving as expected. After this, testing additional code paths don't provide much more confidence.
This single test case gives me enough confidence sending invalid data to login
behaves as expected. Especially since Laravel only returns a validation error for the email
field. This is a security measure to not expose information that could be used as an attack vector, such as a valid email, but an invalid password. So any combination of invalid data would perform the same assertions.
Of course, this is a tradeoff. If there is a unique code path, by all means test it. If you later find a bug in the code, add a test case for it. But don't worry about writing every test for every code path all at once.
Testing Validation Alternatives
If you are using Form Requests, I wrote about an alternative way to test validation which maximized coverage while minimizing the number of tests you need to write.
I'm ready to test logging into the application. But in order to do so I need to have a user in the database which matches the credentials sent to /login
.
This brings us to the next incremental step in testing our Laravel applications. Since Laravel is an MVC framework it's very likely our code uses Models and, more broadly, Eloquent.
So how do we test Eloquent? The answer is we don't. Instead, we put data in the database and allow Laravel to behave as it would normally.
That may sound rather intimidating, but Laravel makes this easy to setup with a few simple steps.
First, I can create a factory for our model. This allows us to generate a model and pre-fill its data quickly. These factories are located underneath the database/factories
folder.
Laravel comes with a UserFactory
out of the box:
1<?php 2 3/** @var \Illuminate\Database\Eloquent\Factory $factory */ 4 5use App\User; 6use Illuminate\Support\Str; 7use Faker\Generator as Faker; 8 9$factory->define(User::class, function (Faker $faker) {10 return [11 'name' => $faker->name,12 'email' => $faker->unique()->safeEmail,13 'email_verified_at' => now(),14 'password' => '$2y$10$92IXUNpkjO0rOQ5byMi.Ye4oKoEa3Ro9llC/.og/at2.uheWG/igi', // password15 'remember_token' => Str::random(10),16 ];17});
Once this is defined, we can use the factory()
helper within any of our test cases to create a model and persist it to the database.
I'll write the initial test case for a successful request to login by creating a valid user.
1/** @test */2public function login_authenticates_and_redirects_user()3{4 $user = factory(User::class)->create();5 6 // ...7}
I need to do a few more things to configure this tests to use the database.
First, I will configure it to use an SQLite in-memory database. I find this to be more performant and avoids conflicting with my development database. Using SQLite is not required. Similar to your application database, you may configure your tests to use any database you prefer.
In the end, set these in your project's phpunit.xml
file.
1<php> 2 <server name="APP_ENV" value="testing"/> 3 <server name="BCRYPT_ROUNDS" value="4"/> 4 <server name="CACHE_DRIVER" value="array"/> 5 <server name="MAIL_DRIVER" value="array"/> 6 <server name="QUEUE_CONNECTION" value="sync"/> 7 <server name="SESSION_DRIVER" value="array"/> 8+ <server name="DB_CONNECTION" value="sqlite"/> 9+ <server name="DB_DATABASE" value=":memory:"/>10</php>
I also need to tell this test to use the database. Otherwise, when I go to run the test will receive several database errors similar to this:
This is because although I configured the database, it hasn't been created. All I need to do is add the RefreshDatabase
trait to my test class.
1class LoginControllerTest extends TestCase2{3+ use RefreshDatabase;
This trait will run the application's database migrations and between each test case refresh the database to its original state.
So for any test case I only have to create the data necessary to yield the expected behavior.
Going back to the login test case, it ends up looking pretty similar to the validation test case. I use a new assertion to verify the authenticated user is the same as the user we created by the factory()
. This is provided by Laravel's TestCase
.
1/** @test */ 2public function login_authenticates_and_redirects_user() 3{ 4 $user = factory(User::class)->create(); 5 6 $response = $this->post(route('login'), [ 7 'email' => $user->email, 8 'password' => 'password' 9 ]);10 11 $response->assertRedirect(route('home'));12 $this->assertAuthenticatedAs($user);13}
Creating data for our application to use is one side of the coin. The other side is asserting our application created data.
To emphasize this let's write a test case for user registration. I'll focus on the happy path. That is the path where the code behaves without error. For user registration, that is creating a new user with the registration data.
I can apply what we know so far to start writing most of this test case by sending a POST
request to registration with valid data and confirming redirection to the home
route.
1/** @test */ 2public function register_creates_and_authenticates_a_user() 3{ 4 $response = $this->post('register', [ 5 'name' => 'JMac', 6 'email' => 'jmac@example.com', 7 'password' => 'password', 8 'password_confirmation' => 'password', 9 ]);10 11 $response->assertRedirect(route('home'));12 13 // ...14}
While this test would pass, it doesn't completely verify the expected behavior. There are two more aspects we haven't covered.
First, an assertion to verify the user was created in the database with the request data. To do this we can use another one of Laravel's TestCase
assertions: assertDatabaseHas
. The method accepts a few parameters.
1assertDatabaseHas(string $table, array $data, string $connection = null)
For this test case, I want to check the users
table contains a record matching the name
and email
sent as the request data.
To do so, I'll add the following assertion.
1$this->assertDatabaseHas('users', [2 'name' => 'JMac',3 'email' => 'jmac@example.com'4]);
To start, I hardcoded values to send to the register request. But given the opportunity I like to vary my test data.
Laravel has a development dependency for the Faker package. Faker has a rich API for generating all sorts of common data.
I can decorate any test class with a faker
property by adding the WithFaker
trait provided by Laravel.
1class LoginControllerTest extends TestCase2{3- use RefreshDatabase;4+ use RefreshDatabase, WithFaker;
Now I can update the test case to vary the request data using Faker.
1/** @test */ 2public function register_creates_and_authenticates_a_user() 3{ 4 $name = $this->faker->name; 5 $email = $this->faker->safeEmail; 6 $password = $this->faker->password(8); 7 8 $response = $this->post('register', [ 9 'name' => $name,10 'email' => $email,11 'password' => $password,12 'password_confirmation' => $password,13 ]);14 15 $response->assertRedirect(route('home'));16 17 $this->assertDatabaseHas('users', [18 'name' => $name,19 'email' => $email20 ]);21}
Don't Go Overboard
You may be tempted to do this all the time. However, varying data is not a requirement. I have done so here to demonstrate using Faker rather than a practice which should always be used. Take the time to fake data when it boosts confidence. Otherwise, hardcoded values are fine.
While the test case passes I still haven't tested the user was authenticated. It happens implicit by the redirection to the homepage, but it should be explicit. Again, I want to feel confident the test case confirms the expected behavior.
I could use another TestCase
assertion to verify the user is authenticated with $this->assertAuthenticated()
. This is okay. What would be better is to assert the authenticated user is the same user created during registration.
I don't have a reference to the user that was created. Only the data. But, I can retrieve it using Eloquent within the test case.
In doing so, I can then add the same assertion I used in my login test case. This completes the test case and gives me full confidence registration is behaving as expected.
Retrieving the user also confirms the user was indeed saved and removes the need for using $this->assertDatabaseHas()
. Adding this assertion and refactoring yields:
1/** @test */ 2public function register_creates_and_authenticates_a_user() 3{ 4 $name = $this->faker->name; 5 $email = $this->faker->safeEmail; 6 $password = $this->faker->password(8); 7 8 $response = $this->post('register', [ 9 'name' => $name,10 'email' => $email,11 'password' => $password,12 'password_confirmation' => $password,13 ]);14 15 $response->assertRedirect(route('home'));16 17 $user = User::where('email', $email)->where('name', $name)->first();18 $this->assertNotNull($user);19 20 $this->assertAuthenticatedAs($user);21}
Sanity Checks
You may have noticed the assertNotNull()
. This is what some call a sanity check. It's a simple assertion which verifies any setup within the test case behaves as expected. After all, tests are code too, and prone to mistakes.
Using what we've learned so far will get your pretty far in testing your Laravel applications. But there's one last bit of setup which you will need to know - being able to set the authenticated user for a request.
To do so, simply prefix your request chain with the actingAs()
method and pass it the authenticated user.
I'll demonstrate this with a simple test case for the home
route which is behind the auth
middleware.
1<?php 2namespace Tests\Feature\Http\Controllers; 3use App\User; 4use Illuminate\Foundation\Testing\RefreshDatabase; 5use Tests\TestCase; 6class HomeControllerTest extends TestCase 7{ 8 use RefreshDatabase; 9 /** @test */10 public function index_returns_a_view()11 {12 $user = factory(User::class)->create();1314 $response = $this->actingAs($user)->get(route('home'));1516 $response->assertStatus(200);17 }18}
While testing this behavior within your Laravel application may not be something you always do, it's a great way to get started with testing Laravel. If this was your first time testing Laravel, I encourage you to practice what you learned here by writing some of the missing test cases.
These include:
/registration
data/home
without an authenticated userThe Laravel application, all of the test cases, as well as the additional test cases are available on GitHub. The commit history contains atomic commits for each step of this post. Feel free to use it as a reference to follow along or browse the final code.
Need to test your Laravel applications? Check out the Tests Generator Shift to quickly generate tests for an existing codebase and the Confident Laravel video course for a step-by-step guide from no tests to a confidently tested Laravel application.
]]>Consider testing a simple controller action which accepts a name
and email
, validates this data, and uses it to subscribe to a newsletter.
1public function store(Request $request) 2{ 3 $request->validate([ 4 'name' => 'required', 5 'email' => 'required|email' 6 ]); 7 8 \Newsletter::subscribe( 9 $request->input('email'),10 ['name' => $request->input('name')]11 );12 13 return response()->noContent();14}
To test the happy path of this action I create some valid data with Faker, send the POST
request, and assert the 204
response. I also spy on the Newsletter
facade to assert it was called correctly.
1/** @test */ 2public function store_subscribes_to_newsletter() 3{ 4 $newsletter = \Newsletter::spy(); 5 6 $name = $this->faker->name; 7 $email = $this->faker->safeEmail; 8 9 $response = $this->post('/newsletter-subscription', [10 'name' => $name,11 'email' => $email,12 ]);13 14 $response->assertStatus(204);15 16 $newsletter->shouldHaveReceived('subscribe', [$email, ['name' => $name]]);17}
Now this only tests the happy path. Unfortunately I can't write just one test for the failure path. For complete coverage, I have to write a test for every validation rule.
This means to fully test the validation for this action would require 4 tests:
name
is required.email
is required.email
is a valid email format.That's a lot of tests to write for just 2 fields. And the number of tests required increases proportionally as the number of fields and rules increases. So 5 validation rules requires 5 test case, 10 requires 10, and so on.
Now even though these tests are easy to write in Laravel, they take time. Time is one of testings biggest adversaries. It's one reason why most developers don't write test.
To balance this, I want the most confidence in the least amount of tests. Although writing N + 1 tests gives me full coverage, it's a lot of tests. Moreover, the tests don't provide much value. Sure they confirm validation fails, but relative to other parts of the application that's not very important. All the more reason I don't want to spend a lot of time writing these tests.
Our current implementation uses request validation within the controller. Laravel offers another form of validation using Form Requests. Now Form Requests have many benefits. The one I care about is separation.
Separating the validation from the controller affords me alternative approaches for testing validation. Particularly around testing the failure paths. Ideally this approach means instead of writing tests for each of the rules, I only need to write two tests - ever!
The first test case asserts the action uses the appropriate form request. In doing so, it ensures everything is wired together as required by Laravel to perform the validation.
1/** @test */2public function store_validates_using_a_form_request()3{4 $this->assertActionUsesFormRequest(5 NewsletterSubscriptionController::class,6 'store',7 StoreNewsletterSubscription::class8 );9}
The second test is for the StoreNewsletterSubscription
class to ensure all validation rules are set appropriately.
1class StoreNewsletterSubscriptionTest extends TestCase 2{ 3 /** @var StoreNewsletterSubscription */ 4 private $subject; 5 6 protected function setUp(): void 7 { 8 parent::setUp(); 9 10 $this->subject = new StoreNewsletterSubscription();11 }12 13 public function testRules()14 {15 $this->assertEquals([16 'name' => 'required',17 'email' => 'required|email'18 ],19 $this->subject->rules()20 );21 }22 23 public function testAuthorize()24 {25 $this->assertTrue($this->subject->authorize());26 }27}
Notice this is a unit test. It simply calls the predefined methods on the Form Request and verifies they return the expected values. When a new rule is added, I don't have to setup another test which sends a request with bad data and assert the response. I just update the array in testRules
. It's dead simple.
This test is admittedly simple given the simplicity of the controller action. For more complex validation rules, additional tests might be required.
A common example is a ruleset which changes based on logic. This would require testing each logical path. Even still, this is fewer tests than before and easier to write.
Another example might be custom validation rules. This would require more specific assertions than using assertEquals
on the returned array. A solution would be to assert the rules for individual fields. This allows the registration of the custom validation rule to be verified which could then be captured and tested separately.
It's important to point out that these testing approaches are not mutually exclusive. Again, this is about gaining the most confidence in the least amount of tests. As such, if writing a unit test for a complex validation rule took more time, then write an HTTP test for it instead.
Some developers will be quick to point out the loss of flexibility or isolation of these tests. They would be right. This testing approach comes with tradeoffs. First, the requirement of using a Form Request. Second, when the implementation is changed, the test must be changed.
This latter one often concerns developers. However, it's important to remember in the context of validation changing rules or fields will always require changing the tests. Both testing approaches have rigidity. So this concern becomes which is easier to change.
The real tradeoff is using a Form Request. The choice between validation within controllers versus using a Form Request seems to be polarized within the Laravel community. I have offered the code and testing benefits of using a Form Request, but this may not align with your philosophy.
In the end, the takeaway is not whether to use Form Requests or not. It's about writing tests which immediately provide confidence the code behaves as expected. If I can do that with a single test, I accept these tradeoffs. When it's no longer acceptable, I take the opportunity to refactor.
Want to try this testing approach? I packaged up a trait containing the assertActionUsesFormRequest
so you can easily add it to your Laravel tests.
Over the years, there have been times I wanted to charge more for my own products and services. For example, I could have charged more for PocketBracket. This app was successful by most metrics, but not necessarily revenue.
It's very difficult for something as competitive as the App Store to charge more. You are competing against FREE applications and clones offering the same functionality. So although most apps in the App Store are worth more than price, it is difficult to charge more.
One season we did try to raise the price to $1.99. While revenue was roughly the same, there weren't as many users. At the end of the day having more users using and sharing the app was more valuable than revenue.
I adopted the same philosophy with Shift. When I first launched Shift in December 2015 I only charged $3. That same shift today cost $21. On the surface, that is a 600% price increase. Most would argue for the value Shift brings I could (and should) charge more. And I have, to an extent.
When new versions of Shift are released, I raise the prices for older versions 10%. It's not much in dollars, but I view it as a little incentive to stay current. One could consider it simply inflation. I actually don't charge more as the price for the latest Shift version has remained the same.
Shift battle with a similar issue. While there isn't an explicit FREE competitor, there is an implicit one. Developers can upgrade their applications by hand. This, depending on the application, has a varying levels of involvement. I wouldn't consider this FREE, but they do since they're not spending physical money on the upgrade. Just their time. Which is a different story.
To remain competitive, and balance growing revenue with growing the user base, I have kept Shift prices low. Now though, with 15,000 Laravel applications upgraded, I feel I have proven the value of the service enough to charge more.
Shift will be raising its prices next Wednesday, May 1st. I normally increase prices slightly twice a year during the Laravel release cycle. But this will be a one-off.
The original goal of Shift was to make the upgrade process easier for developers. After 15,000 Laravel application upgrades, I feel that goal has been accomplished. This will always be a core goal of Shift, but now it is time for a new goal.
The new goal for Shift is a bit broader — help modernize your applications. While an aspect of the original goal, it brings a few additional focuses to the forefront. Namely running the latest version and leveraging framework features and common practices.
These are evident in the recent and popular Laravel Linter and Laravel Fixer. Also the new subscription services which allow you to constantly keep your applications upgraded.
To align with this new goal the prices for Shifts prior to the recent Laravel LTS version (5.5) will increase. This has always been done as an incentive to keep applications on a supported Laravel version. Currently that is only Laravel 5.5 and Laravel 5.8.
I do expect the next version of Laravel to be an LTS version. Or, ideally, LTS may be abandon. It's no secret I believe LTS is a trap.
Of course this pricing increase is only a few dollars. Furthermore, I have seen a decrease in Shifts prior to Laravel 5.3. I noted this in my Laravel by the Numbers talk at Laracon 2018. So this increase is unlikely to affect many users.
All the same, we'll see if this price increase helps reach Shift's new goal with the secondary benefit of generating more revenue to feed this growing service.
]]>This is a not an easy task, but a critical step. Too often developers overlook this step. However, it's important to emphasize that before you even start architecting or writing code for your product you need to do some initial marketing.
In the first article, I talked about how I planned to build a blog and start writing weekly content to cross post on Medium and community forums in an effort to build an audience.
Now admittedly I didn't do much over the holidays, but I want to stay disciplined about making these posts and videos each step of the way.
Since last time I probably spent roughly 10 hours on the project. Here's the breakdown:
Before I go through each of these steps in more detail, it's important to again point out that this isn't much time. Everything is MVP right now. And right now MVP means minimal effort.
Furthermore, I still haven't built any of the product. Although I wish I had because I mismanaged a few trades during December's downturn. No, right now all my effort is going into building the audience. I'm not down in my office cave hacking away at this huge application for weeks followed by some big bang launch.
I'm going to continue to reiterate this because it's one of the most important things about building products. In fact it parallels nicely with investing in general. Time is money. I don't want to spend a bunch of time building Optionality when it may not generate a return on investment because there is no market.
With that said, let's review each of the three things I did since last time.
First, I finished setting up Jigsaw. Jigsaw actually had a starter template which I was able to use. In fact, I don't know why I didn't see this the first time. Then I went back and watched the first video to verify they indeed updated the docs.
I spent a little time tweaking it, which really meant I jumped out to Google Fonts to give me some a super simple, text-based masthead. Otherwise it's using the starter template. Again minimal effort.
I did spend roughly 30 minutes adding a Read Time feature. I justified this as I felt it helped improve the reading experience. Investment articles tend to be long, so I want to encourage potential readers they can get through these posts quickly. This also acts as a measure for me to keep them similar in length.
A majority of time was spent drafting articles. I found it best to write two articles at a time as this allows me to get a week ahead. Everyone underestimates how much time goes into writing an article. You have to narrow a topic, write a draft, proofread, fact check, add images, tweak for SEO, cross post. It's a process.
Admittedly these first two were probably a bit slower as I was finding the right tone and structure. Although my programmer brain wants to dismiss these nuances, they are critical. These kinds of details help build an audience and ultimately build trust that Optionality will be a useful product.
Finally, I spent about an hour deploying the site. For right now I'm piggybacking some space on one of my existing web servers. While I'm optimistic for the future, optionality.app currently gets little traffic. Again, minimal effort. No need to purchase hosting, spin up servers, etc. If I didn't have server space just sitting, I likely would have looked at Netlify or Amazon S3 before setting up my own server.
On a similar technical note, sometimes as developers we also get caught up in the tools and services. This can be a pretty nasty time drain. Never underestimate the power of a command like rsync
. It's been around since the early days of UNIX and it still crushes the use case of synchronizing remote files.
That's pretty much it this time. Soon I plan to start working on a fuller landing page with a newsletter sign-up. But as outlined in the first video, I need to get a bit closer to my goals before moving on to the next step.
Want more? Subscribe to the video series on YouTube and send me your question or feedback on Twitter.
]]>This would be a simple facelift to modernize the template with a focus on copy, as well as a conversion of the static site generator. I decided to refactor my blog to Jigsaw. So this serves as not only my first article to christen the conversion, but also a review of the process.
My blog has been around for over a decade. I can't tell you how many times it's been converted. It originally started as static HTML, then WordPress, then Jekyll, then GitHub Pages, then Ghost, then back to Jekyll. And now, of course, Jigsaw.
Historically I used this as an opportunity to try new tech stacks. Nowadays, this is rather impractical for a few reasons.
In the end, for me, Jigsaw balanced my time by being convenient to work with (PHP + Blade + Markdown) while still giving me some light learning opportunities (TailwindCSS + Vue.js).
Although front matter is pretty straightforward, I created a lot custom keys over the years while transitioning between all the static generators. So I wrote a quick script to condense these down (and reformat) to the minimal amount of: title
, description
, date
, categories
, and a few SEO keys.
Here's a Gist of the conversion script I wrote.
Another motivation for this redesign was to finally switch to jasonmccreary.me. I purchased this domain a while back, but had not made it primary. Since I was going to change the link structure for each of my posts anyway, I took the opportunity to do both.
The key thing was ensuring my URLs redirected so I didn't lose my search engine rankings. I made sure to switch the proper settings in Google Search Console and Google Analytics, as well as generating 301
redirects for each post. There was also some tweaks to the Jigsaw config and template to ensure generated URLs consistently included the trailing slash.
Here's a gist of these scripts to convert the Jekyll posts dated filenames to the dasherized Jigsaw post filenames and generate the 301
redirects.
For the most part Jigsaw was a straight conversion. The only thing that took a minute was configuring the categories. The documentation was a bit light on how these are set up (possible open source contribution…). Again since I was familiar with PHP and Blade, it wasn't too hard to dig around the code and figure it out.
Initially, it wasn't automatically generating the category pages (or collections). Ultimately, there is an source/_categories
folder within the start template where I needed to create markdown files for each of my categories.
That wasn't quite it though. The categories
closure in config.php
also needed some tweaks. Especially since my category names were titles and contained spaces. I had two options, I could add code to generate the lowercase, dasherized URLs in the template or I could do so at build time.
Inline with my goal to keep the writing experience easy, I preferred to generate these properly at build time. So I changed the config to lowercase and dasherize the categories names from the front matter and properly group the posts. Here's the specific code as well as a Gist of the complete config.php
.
1'posts' => function ($page, $allPosts) {2 return $allPosts->filter(function ($post) use ($page) {3 $category = str_replace('-', ' ', title_case($page->getFilename()));4 return $post->categories ? in_array($category, $post->categories, true) : false;5 });6}
Jigsaw also has fancy helper methods. This is pretty nice as it was a pain to customize such things and Jekyll - often requiring overriding or monkey patching in Ruby. With Jigsaw I simply add a closure in config.php
and can reference it through the $page
object just like I do the front matter.
This made it super easy to create something I wanted to add to my articles for a while - Read Time. It's a nice little UX hack to see an estimate of the time it will take you to read an article. I derived the formula from some of these calculations. Here's the specific code and also in the Gist of the complete config.php
. I simply call $post->readTime()
within my templates.
1'readTime' => function($page) {2 return intval(round(str_word_count(strip_tags($page->getContent())) / 200));3}
All in all it took about 4 hours for the conversion. 2 hours were massaging the front matter, and another hour was battling the category configuration. So, in fairness, it really only took about an hour to set up Jigsaw using the starter template and begin customizing.
I plan to revisit the design, especially after reading Refactoring UI and incorporate pages for my various products and services. I like doing a little bit each time I write an article. I'll write a post and spend 15 minutes making other tweaks. So well I wouldn't call it done, I will check the box for my first 2019 goal of 2019 two redesign my blog.
Have more questions about Jigsaw? Ask me on Twitter. I'm glad to answer and considering packaging up some of my customizations or contributing them to the starter template.
]]>I published the early release of BaseCode on July 13, and the full edition on September 12. That's not entirely true, the final Exit chapter was published December 3.
I had code samples, resources, and the practices in my head well before writing BaseCode. Even with all this ready, it still took longer than I expected. For me writing wasn't the hard part, it was putting it together: proofreading, formatting.
Another delay we're all the add-ons. It would've been better to have more complete for the initial release. When I released BaseCode I sold different kits. This put a lot of pressure on me to finish quickly. Not necessarily from others, but myself.
BaseCode didn't do as well financially as I expected. I still believe BaseCode fills a gap for intermediate developers. So there is an audience. But marketing is another beast. I did better this time with a newsletter and tweets. Where I missed the mark was the release. Particularly around having influencers help me reach a larger audience in a focused, timely effort. Part of this was intentional though. I know others were willing to help, but I wanted to see how much I could do on my own. Ultimately sales for these types of products just have that initial pop, but there can also be a long tail. I expect BaseCode will bring in sales over the next few years and might eventually reach it's financial goal.
I didn't complete this one. The reason I chose Python was for data processing. My intentions were to use it for an investments analytics tool I never got around to building. Otherwise I had no need for using Python day-to-day and hence why I didn't reach this goal.
Python is something I may still learn someday, but it's going to have to come out of necessity. There's really no reason for me to force spending time learning it in the face of my other goals.
I did add more shifts in 2018, I have to be honest that I didn't technically expand the services in the way I wanted. This is still in progress, but it won't make the cut for 2018 and will carryover as a partial goal to 2019.
In particular, I wanted to add a subscription to allow users to run shifts as part of their continuous integration tools. This requires subscription billing, additional Shift, web hooks, API keys, capacity. So it is something that will would have been difficult to complete entirely in 2018 regardless. It may even be something that carries on longer than 2019.
In 2018 I spoke at 13 conferences. 13! I crushed this goal. There won't be another year like this. While I enjoyed every conference, it was too much. In 2019, I will be more selective about which conferences I submit too, what topics I submit, and ultimately accept - ideally only speaking at conferences which directly relate to my products and services or a desirable location.
Just like learning Python, I failed this one pretty epically as well. In 2018 I didn't even increase my Twitter followers more than 2017. Currently I'm barely halfway to 10k with 4,800 followers.
Reaching this goal requires a constant presence and well-crafted content. Although I always try to do the latter, the former is where I failed. This is something I will continue to focus on, but likely without the pressure of being a goal. I'll leave it as something that will hopefully happen organically.
It's been several years since I've redesigned my blog. It's looking pretty outdated. This has led me to posting content on other sites like Dev.to and Medium instead of first posting here. I also plan to switch the domain to jasonmccreary.me which I picked up during a Black Friday sale.
Admittedly, this is a pretty easy goal. But it's good to start with some quick wins to get the momentum going for the year. I've found when I try to start the year with a large goal, I spend all my effort on it.
As I mentioned before, I plan to speak at conferences less. But speaking is something I still enjoy and want to continue. I think I'm good at spotting gaps in knowledge. It's usually not the latest fancy code or trends, but often more fundamental topics which need attention. These get overlooked, but in reality are the things we use every day and will carry us farther.
In 2017 I ran a few online workshops. Most were free, some were paid. I plan to hold a few in 2019.
Although I primarily contribute to the community through education, I want to contribute through code as well in 2019. The obvious candidate is to contribute more to Laravel. I have a few areas of the framework I'd like to give some attention. So I plan to learn more about the current code and see where I might be able to make a few contributes.
I've been a firm believer in separation of frontend and backend - particularly through APIs. I think this is and established trend and one that will continue. In 2019, I plan to go "API first" on any new project and potentially refactor some existing projects as well. This doesn't not necessarily mean single page app, but I have an opportunity to learn more technologies such as Vue, React, etc.
The underlying intention of learning Python was to build an investment analytics tool. That tool has pivoted into Optionality. Building Optionality has been an intentionally slow, nuanced MVP process. However, this is a tool I plan to use personally. While I plan to honor the MVP approach and share my progress, it is something I will nonetheless build. If nothing else, to scratch my own itch. Just like a quick win, I believe you need a pet project as well.
]]>So in this first post, I want to start at the very beginning. It's important because I rarely start with writing code. As developers, when we think of an idea we get lost in the technical details. We start pre-architecting, scaling out servers, and picking the latest tech stack to build it all.
While this is, of course, fun to think about, you can't jump right into writing code. Too often people, not just developers, but people in general, teams, companies jump straight into building. This is a mistake.
The reality is all you have is an idea. It's really nothing. At best a few ions isolated in your brain. You have to bring the idea into the world bit by bit, proving and shaping along the way.
For example, with Getting Git, I led conference training before I recorded the video course. If I hadn't given this at multiple conferences to full audiences, I wouldn't have made the course. In fact, I originally planned to record a second course, but am waiting based on the response from the first before continuing with the idea.
With my book, BaseCode, I spoke at conferences, but also did a series of tweets to narrow down the topics. These tweets were a way to prove the idea and, relatively speaking, got a large number of likes and retweets.
Form there I created a mailing list. I think it was Justin Jackson that said if you don't get 500 subscribers you probably don't have a good idea. Others like Nathan Barry and Adam Wathan constantly talk about the importance of a landing page to build your audience. This was key for BaseCode and definitely led to a more successful product than Getting Git.
Now this new SaaS will be even more challenging because it's a different industry. For almost as long as I've been programming, I've been investing in the stock market. In the past few years, I've advanced into options trading. What I've noticed is a lack of tools around portfolio tracking and analysis.
Brokers offer this at a very basic level, but their tools focus more on trading. As a member of a few investment communities it seems most people use some kind of spreadsheet - which is a terrible, manual experience.
So I identified this gap. But again, this isn't proof if I build it they will come. I've really only proven a need. To that point, the best ideas start by filling a personal need. If it's not something I would use, it's unlikely others will use it. You have to be willing to eat your own dog food. If not, your heart won't be into building it and you're more likely to give up.
Now, before I run to my office cave to build this, I want to prove the market more. In order to do that, I need to grow my audience. I created a separate Twitter handle. Because of the cross over, I immediately got about 100 followers. These were developers who also share my passion for investing. However, I need to grow my true investor audience.
I started by writing weekly threaded tweets. Unfortunately it's not growing my followers because, well, this is a new account and no one knows who the hell I am. My new plan is to take these threaded tweets and add some graphs and images to turn them into articles I can publish on Optionality. I will then cross-post on Medium, within investing communities, etc.
Remember, I don't have an audience. So I'm not even at a place where I can start to validate my idea with potential users. I'm not even at Square 1, I'm at Square 0. I have to try and grow the audience first. This needs to happen before deep-diving into writing code or architecting this portfolio tracker platform. That doesn't mean we won't write any code. But it's not the app code as you might think. In fact the first thing I need to code is a blog to hold these articles.
I'm going to do this with Jigsaw. It's a static site generator. Nothing fancy, just converts markdown to HTML and places it within a site template. No reason to install some heavy software or hand-code my own blog. I always want to do the simplest thing. Everything is an MVP.
Arguably the simplest thing would be to post on Medium under one of the investment tags. But, I need to start building a search engine presence. Optimistically, when I do build this product, I want people to be directed to Optionality, not Medium. So while using Medium directly and linking back to Twitter would be simpler, there's value in centralizing the content with little extra cost.
Another point is I could have used Jekyll or GitHub Pages. Underneath, Jekyll is Ruby and Jigsaw is PHP (with hints of Laravel). While I am familiar with Jekyll, I am more with PHP and Laravel in general.
This is an important point because far too often developers try to pair a new idea with a new technology. This adds unnecessary complexity, ultimately lowering your probability of success. Not only are you learning your idea, you're also learning the technology.
In the end, I balance the MVP approach while being mindful each iteration keeps me on the path towards my ultimate goal. It's not necessarily for each iteration to get you there faster or completely, but it should keep you on the path.
Now before I launch this step, I want to be clear with two more things. First, my timeline. Timelines are very important. They force accountability and reinforce the MVP approach. You can't have forever to reach your goal. Second, I need to outline measurable objectives of my goal. What am I trying to do and how can I verify it's working.
For Square 0, my goal is to grow my audience. I'm going to give myself 4 weeks to do so. I plan to achieve this goal by the following measurable objectives:
I will say, some of these are a stretch. But I have to start somewhere and hold myself accountable to measurement. So we'll see in 4 weeks if these goals are met and I should continue on with building my product.
]]>Recommend switching to Docker
I finally switched to using Docker for local development on macOS. While the following tutorial works for macOS Mojave, it will not for future versions of macOS. I recommend following my latest tutorial on installing Apache, MySQL, and PHP on macOS using Docker.
Note: This post assumes you followed installing Apache, PHP, and MySQL on Mac OS X Sierra and have since upgraded to macOS Mojave. If you did not follow the original post, you should follow installing Apache, PHP, and MySQL on macOS Mojave.
When Mac OS X upgrades it overwrites previous configuration files. However, before doing so it will make backups. The backup files often have a suffix of previous
or pre-update
. Most of the time, configuring your system after updating Mac OS X is simply a matter of comparing the new and old configurations.
This post will look at the differences in Apache, PHP, and MySQL between Mac OS X Sierra and macOS Mojave.
Mac OS X Sierra and macOS Mojave both come with Apache pre-installed. As noted above, your Apache configuration file is overwritten me when you upgrade to macOS Mojave.
There were a few differences in the configuration files. However, since both Sierra and Mojave run Apache 2.4, you could simply backup the configuration file from Mojave and overwrite it with your Sierra version.
sudo cp /etc/apache/httpd.conf /etc/apache/httpd.conf.mojavesudo mv /etc/apache/httpd.conf.pre-update /etc/apache/httpd.conf
However, I encourage you to stay up-to-date. As such, you should take the time to update Mojave's Apache configuration. First, create a backup and compare the two configuration files for differences.
sudo cp /etc/apache/httpd.conf /etc/apache/httpd.conf.mojavediff /etc/apache/httpd.conf.pre-update /etc/apache/httpd.conf
Now edit the Apache configuration. Feel free to use a different editor if you are not familiar with vi.
sudo vi /etc/apache/httpd.conf
Uncomment the following line (remove #
):
LoadModule php7_module libexec/apache2/libphp7.so
In addition, uncomment or add any lines you noticed from the diff
above that may be needed. For example, I uncommented the following lines:
LoadModule deflate_module libexec/apache2/mod_deflate.soLoadModule expires_module libexec/apache2/mod_expires.soLoadModule rewrite_module libexec/apache2/mod_rewrite.so
Finally, I cleaned up some of the backups that were created during the macOS Mojave upgrade. This will help avoid confusion in the future.
sudo rm /etc/apache2/httpd.conf.pre-updatesudo rm /etc/apache2/extra/*~previoussudo rm -rf /etc/apache2/original/
Note: These files were not changed between versions. However, if you changed them, you should compare the files before running the commands.
Restart Apache:
apachectl restart
Mac OS X Sierra came with PHP version 5.6 pre-installed. This PHP version has reached its end of life. macOS Mojave comes with PHP 7.1 pre-installed. If you added any extensions to PHP you will need to recompile them.
Also, if you changed the core PHP INI file it will have been overwritten when upgrading to macOS Mojave. You can compare the two files by running the following command:
diff /etc/php.ini.default /etc/php.ini.default.pre-update
Note: Your file may note be named /etc/php.ini.default.pre-update
. You can see which PHP core files exist by running ls /etc/php.ini*
.
I would encourage you not to change the PHP INI file directly. Instead, you should overwrite PHP configurations in a custom PHP INI file. This will prevent Mac OS X upgrades from overwriting your PHP configuration in the future. To determine the right path to add your custom PHP INI, run the following command:
php -i | grep additional
MySQL is not pre-installed with Mac OS X. It is something you downloaded when following the original post. As such, the macOS Mojave upgrade should not have changed your MySQL configuration.
You're good to go.
]]>Recommend switching to Docker
I finally switched to using Docker for local development on macOS. While the following tutorial works for macOS Mojave, it will not for future versions of macOS. I recommend following my latest tutorial on installing Apache, MySQL, and PHP on macOS using Docker.
Note: This post is for new installations. If you have installed Apache, PHP, and MySQL for Mac OS Sierra, read my post on Updating Apache, PHP, and MySQL for macOS Mojave.
I am aware of the web server software available for macOS, notably MAMP, as well as package managers like brew
. These get you started quickly. But they forego the learning experience and, as most developers report, can become difficult to manage.
The thing is macOS runs atop UNIX. So most UNIX software installs easily on macOS. Furthermore, Apache and PHP come preinstalled with macOS. To create a local web server, all you need to do is configure Apache and install MySQL.
First, open the Terminal app and switch to the root
user so you can run the commands in this post without any permission issues:
1sudo su -
1apachectl start
Verify It works! by accessing http://localhost
First, make a backup of the default Apache configuration. This is good practice and serves as a comparison against future versions of macOS.
1cd /etc/apache2/2cp httpd.conf httpd.conf.mojave
Now edit the Apache configuration. Feel free to use a different editor if you are not familiar with vi.
1vi httpd.conf
Uncomment the following line (remove #
):
1LoadModule php7_module libexec/apache2/libphp7.so
Restart Apache:
1apachectl restart
You can verify PHP is enabled by creating a phpinfo()
page in your DocumentRoot
.
The default DocumentRoot
for macOS Mojave is /Library/WebServer/Documents
. You can verify this from your Apache configuration.
1grep DocumentRoot httpd.conf
Now create the phpinfo()
page in your DocumentRoot
:
1echo '<?php phpinfo();' > /Library/WebServer/Documents/phpinfo.php
Verify PHP by accessing http://localhost/phpinfo.php
Download and install the latest MySQL generally available release DMG for macOS. While MySQL 8 is the latest version, many of my projects still use MySQL 5.7. So I still prefer installing the older version.
When the install completes it will provide you with a temporary password. Copy this password before closing the installer. You will use it again in a few steps.
The README suggests creating aliases for mysql
and mysqladmin
. However there are other commands that are helpful such as mysqldump
. Instead, you can update your path to include /usr/local/mysql/bin
.
1export PATH=/usr/local/mysql/bin:$PATH
Note: You will need to open a new Terminal window or run the command above for your path to update.
Finally, you should run mysql_secure_installation
. While this isn't necessary, it's good practice to secure your database. This is also where you can change that nasty temporary password to something more manageable for local development.
You need to ensure PHP and MySQL can communicate with one another. There are several options to do so. I like the following as it doesn't require changing lots of configuration:
1mkdir /var/mysql2ln -s /tmp/mysql.sock /var/mysql/mysql.sock
The default configuration for Apache 2.4 on macOS seemed pretty lean. For example, common modules like mod_rewrite
were disabled. You may consider enabling this now to avoid forgetting they are disabled in the future.
I edited my Apache Configuration:
1vi /etc/apache2/httpd.conf
I uncommented the following lines (remove #
):
1LoadModule deflate_module libexec/apache2/mod_deflate.so2LoadModule expires_module libexec/apache2/mod_expires.so3LoadModule rewrite_module libexec/apache2/mod_rewrite.so
If you develop multiple projects and would like each to have a unique url, you can configure Apache VirtualHosts for macOS.
If you would like to install PHPMyAdmin, return to my original post on installing Apache, PHP, and MySQL on macOS.
]]>From these experiences, combined with the books I've read, it's become apparent to me what matters most in code: readability.
On the surface, readability may seem subjective. Something which may vary between languages, codebases, and teams. But when you look underneath, there are core elements within all code which make it readable.
Many programmers are too close to the computer. If the code runs, nothing else matters. Although a common defense it removes all of the human elements from what we do.
Over the last several months I've worked to distill these elements into 10 practices for writing code with a focus on improving readability and decreasing complexity. I've written about these in detail and applied them to real-world code snippets in BaseCode.
Many will unfortunately dismiss these as too trivial. Too fundamental. But I assure you, every bit of bad code I've encountered has failed to apply these practices. And every bit of good code you find one, if not many, of these practices.
So much energy is wasted on formatting. Tabs versus spaces. Allman versus K&R. You'll reach a point where you realize formatting is not what matters in programming. Adopt a standard format, apply it to the codebase, and automate it. Then you can refocus that energy on actually writing code.
All those commented blocks, unused variables, and unreachable code are rot. They effectively say to the reader, "I don't care about this code". So a cycle of decay begins. Over time this dead code will kill your codebase. It's classic Broken Windows Theory. You must seek and destroy dead code. While it doesn't need to be your primary focus, always be a Boy Scout.
The foundation of nearly all code is logic. We write code to make decisions, iterations, and calculations. This often results in branches or loops which create deeply nested blocks of code. While this may be easy to track for a computer, it can be a lot of mental overhead for a human. As such, the code appears complex and unreadable. Unravel nested code by using guard clauses, early returns, or aspects of functional programming.
Despite the current era of Object Oriented Programming, we still have Primitive Obsession. We find this in long parameter lists, data clumps, and custom array/dictionary structures. These can be refactored into objects. Doing so not only formalizes the structure of the data, but provides a home of all that repeat logic which accompanies the primitive data.
While I don't adhere to hard numbers, code blocks can reach a critical length. When you determine you have a big block of code, there's an opportunity to recognize, regroup, and refactor the code. This simple process allows you to determine the context and abstraction level of the code block so you can properly identify the responsibilities and refactor the code into a more readable and less complex block.
Sure, naming things is hard. But only because we make it hard. There's a little trick which works well with many things in programming, including naming - deferral. Don't ever get stuck naming something. Just keep coding. Name a variable a sentence if you must. Just keep coding. I guarantee by the time you complete the feature or work a better name will have presented itself.
This single practice was the original game changer for me. It's what put me on the path of focusing on readability. Despite my efforts to explain, there's always at least one person who hates me for it. They have that one example where a comment was absolutely necessary. Sure, when the Hubble telescope telemetry system has to interface with a legacy adapter by return 687
for unknown readings then that may need to be communicated with a comment. But for pretty much everything else, you should challenge yourself to rewrite the code so it doesn't need a comment.
We return the oddest values for things. Especially for boundaries cases. Values like -1
, or 687
, or null
. In turn, a lot of code is written to handle these values. In fact, the creator of null
calls it The Billion Dollar Mistake. You should aim to return a more reasonable value. Ideally something that allows the calling code to carry on even in the event of a negative path. If there are truly exceptional cases, there are better ways to communicate them than null
.
Think of a mathematical series of numbers. I provide you with the number 2
and ask, "What's next?" Maybe it's 3
or 4
, but maybe it's 1
or 2.1
. In reality you have no idea. So, I provide another number in the series 2, 4
and ask, "What's next?" Maybe it's 6
or 8
or 16
. Again, despite our increased confidence we don't really know. Now I provide another number in the series 2, 4, 16
and ask, "What's next?" Now with three data points our programmer brains see the squared series and determine the next number to be 256
. That's the Rule of Three.
The example demonstrates without distracting us with code that we shouldn't predetermine an abstraction or design right away. The Rule of Three counteracts our need to fight duplication by deferring until we have more data to make an informed decision. In the words of Sandi Metz, "duplication is far cheaper than the wrong abstraction."
Now for the final practice and one which gives any bit of code that lasting touch of near poetic readability - symmetry. This is pulled straight from Kent Beck's Implementation Patterns which simply states:
Symmetry in code is where the same idea is expressed the same way everywhere it appears.
This is easier said than done. Symmetry embodies the creative side of writing. It's underlies many of the other practice: naming, structure, objects, patterns. It may vary language to language, codebase to codebase, and team to team. As such, you could spend the term of your natural life pursuing it. Yet, once you start applying symmetry to your code, a purer form appears and the code takes shape quickly.
These were a high-level view of the practices within _BaseCode. I encourage you check out the resources linked in this post, watch screencasts applying these practices, or read about them in full detail applied to real-world code snippets in BaseCode._
]]>Initially, I wanted to do a continuation on this topic. But there were some other talks on related topics. So I thought, "what can I talk about that's unique to me".
The answer was Laravel Shift. As the creator of Shift I have a unique insight into Laravel apps.
I'm super sensitive about sounding salesy. I don't want to talk about Shift itself. I want to talk about the data derived from Shift.
At the time of this writing, Shift has upgraded over 8,500 Laravel apps. Every time a Shift runs a log file is created. Initially, these log files were for debugging. A way for me to not only offer support, but log events that let me know how I might improve the services.
For full transparency, here's an example of one of the log files. Other than the Shift number, the data is completely anonymous. No code copied. No API tokens. Just simple log messages.
1*** Shift version: 0281cff03fee62f250253f1e485dc7a790209866 2*** Cloning app... 3 4>>> Shift 5.2 Event: app did not contain references to SelfHandling 5>>> Shift 5.2 Event: could not upgrade middleware Data: ["app\/Http\/Middleware\/Authenticate.php","app\/Http\/Middleware\/EncryptCookies.php","app\/Http\/Middleware\/RedirectIfAuthenticated.php"] 6>>> Shift 5.2 Event: could not upgrade app/Providers/RouteServiceProvider.php 7>>> Shift 5.2 Event: could not patch app/Providers/RouteServiceProvider.php 8>>> Shift 5.2 Event: could not find User model path 9>>> Shift 5.2 Event: found additional uses of Event names10>>> Shift 5.2 Event: matched core file: phpunit.xml with version: 5.1.1111>>> Shift 5.2 Event: matched core file: tests/TestCase.php with version: 5.1.3312>>> Shift 5.2 Event: matched core file: database/migrations/2014_10_12_100000_create_password_resets_table.php with version: 5.1.3313>>> Shift 5.2 Event: matched core file: public/.htaccess with version: 5.1.3314>>> Shift 5.2 Event: matched core file: config/broadcasting.php with version: 5.1.1115>>> Shift 5.2 Event: matched core file: config/cache.php with version: 5.1.3316>>> Shift 5.2 Event: matched core file: config/compile.php with version: 5.1.3317>>> Shift 5.2 Event: matched core file: config/database.php with version: 5.1.1118>>> Shift 5.2 Event: matched core file: config/filesystems.php with version: 5.1.3319>>> Shift 5.2 Event: matched core file: config/queue.php with version: 5.1.1120>>> Shift 5.2 Event: matched core file: config/view.php with version: 5.1.3321>>> Shift 5.2 Event: could not upgrade config files Data: {"1":"config\/auth.php","2":"config\/mail.php","3":"config\/services.php","4":"config\/session.php"}22>>> Shift 5.2 Event: could not upgrade package.json23>>> Shift 5.2 Event: app contained phpspec/phpspec requirement of ~2.124>>> Shift 5.2 Event: found customized namespace2526*** Shift ran in: 212.209509
Now this doesn't seem like much. But we can derive a lot of information from these simple messages. What files were upgraded. What features were used. What packages were used.
I mined these log files and want to share a dozen metrics and insights. I'm not a data guy. I've done my best to create some simple metrics and draw some conclusions from them in an effort to help developers craft conventional, upgradable Laravel apps.
Laravel 5.3 is the most popular version. A lot of apps get stuck on Laravel 5.3 because of PHP version requirements, conversion to Dusk, and changes in auth components.
However, we have to remember, Shift is an upgrade service. So while this indicates Laravel 5.3 is popular in the wild, it equally indicates apps are being upgrade. As such, Laravel 5.5 is likely the most popular version.
Here are the top 15 packages used in Laravel applications. Note: This sample size is smaller and limited to apps running Laravel 5.5 or higher. Core packages included by Laravel are excluded.
guzzlehttp/guzzle
predis/predis
laravelcollective/html
league/flysystem-aws-s3-v3
intervention/image
maatwebsite/excel
spatie/laravel-backup
laravel/horizon
bugsnag/bugsnag-laravel
laravel/socialite
laravel/passport
sentry/sentry-laravel
spatie/laravel-permission
laravel/scout
league/csv
Also, popular development packages:
barryvdh/laravel-debugbar
barryvdh/laravel-ide-helper
laravel/dusk
laravel/browser-kit-testing
Config files are the most changed files. While this makes sense, it also makes an app less upgradable. Often there are other ways to make these changes and keep the config files defaulted.
Be sure you're leveraging environment variables. Many apps overwrite the default value instead of setting the ENV
value. For example, consider the config/mail.php
:
1'from' => [2 'address' => env('MAIL_FROM_ADDRESS', 'shift@laravelshift.com'),3 'name' => env('MAIL_FROM_NAME', 'Laravel _Shift_'),4],
Instead, set the environment variables and preserve the default values so the config file remains unchanged:
1'from' => [2 'address' => env('MAIL_FROM_ADDRESS', 'hello@example.com'),3 'name' => env('MAIL_FROM_NAME', 'Example'),4],
Create your own config file.. When there are a log of configuration options, consider creating a new config file. I often name these config/system.php
, config/settings.php
, or something domain specific like config/shift.php
. This prevents lots of changes being made to various config files and organizes them to one file.
Leave the default App namespace.. While only 9% of apps change the namespace, this should be zero. Taylor Otwell, Jeffrey Way, and others have recommend for a while now leaving it default. From an upgrade perspective, this is just one more difference you have to remember to change.
If you've customized you namespace, you can change it back by running:
1artisan app:name App
Note: This will not change the records in the database for polymorphic relationships. You will need to write a query to change these.
Here are the top, non-core folders (and files) found under the app
folder.
app/Models
app/Services
app/Helpers
app/Traits
app/Rules
app/Repositories
app/helpers.php
A little more detail. app/Models
was a controversial change from Laravel 4 to Laravel 5. Seems 1 in 3 application still namespace models under app/Models
. On average, this folder exists when there are more double-digit models (11 on average). This is likely for organization as not to clutter the app
folder with files.
app/Services
and app/Helpers
are the next most common folders. These are likely catch-all folders which contain classes of varying responsibilities. Definitely an opportunity for better naming and organization.
The app/helpers.php
file is a common addition to Laravel app. But it doesn't have a designated home. It is often put in the app
folder. However as an un-namespaced file it's not autoloaded with the other files within app. I find bootstrap
folder to be a more accurate location for its purposes - load functions necessary for the app.
23% of apps inject inheritance. Often apps will inject a layer into the inheritance hierarchy. Most commonly a BaseController
or BaseModel
class. While inheritance is a pillar of object oriented programming, it is not always the right solution.
Instead of forcing a design, I like grok the framework. Whether it's the language or framework, I try to adapt to my surroundings. In the case of Laravel, there's no need to inject a BaseController
as the framework inherits from a Controller
you may customize.
As for models or other classes, Laravel uses traits more than inheritance to decorate classes with additional functionality. Traits may be a better fit for your code as well as more closely align it with the framework.
57% of apps abuse Facades.. Facades are already a controversial topic within the Laravel community. A majority of apps abuse facades adding fuel to the fire. The biggest offense occur within controllers and middleware abusing the Request
and Auth
facades.
Consider the following code for a controller action:
1public function store() 2{ 3 $data = Request::only('product_id', 'token'); 4 5 if (Auth::check()) { 6 $data['email'] = Auth::user()->email; 7 } 8 9 // ...10}
It uses the Request
facade to access request data and the Auth
facade for the authenticated user. However, both controllers and middleware have a request object injected. Instead of using two facades we can get everything through this object. This not only prevents facade abuse, but helps lower coupling which is good for design and testing.
1public function store(Request $request) 2{ 3 $data = $request->only('product_id', 'token'); 4 5 if ($request->user()) { 6 $data['email'] = $request->user()->email; 7 } 8 9 // ...10}
24% of apps have queries in views. This goes against the MVC paradigm. Views should not be interacting directly with Models. I know Eloquent makes it so easy. But use your Controllers to broker the data and help bring this down to zero.
42% of apps access environment variables directly. Laravel 5.4 offers configuration caching for a performance boast. This can be achieved by running artisan config:cache
. However, in order to take advantage of this feature, you can not use the env
helper within your code, only within config files. Instead, you must access the variable through the config
helper.
77% of apps have non-cruddy controller actions. Adam Wathan gave an excellent talk at Laracon 2017 called Cruddy by Design. Essentially, we want to limit our controllers to the 7 resourceful actions. Anything else is an opportunity to create additional controllers. Unfortunately, a majority of apps don't follow this advise.
89% of apps do validation with controllers. While the latest versions of Laravel make validation super easy, this code grows quickly. As such, it can make controller actions pretty long. As an alternative, consider leveraging a Form Request Object.
71% of apps aren't using available directives. Laravel has many native blade directives. In fact, not all of them are in the documentation, much less the Blade section. So unless you troll all the tips on Twitter, you'll likely miss out.
The least used, but most helpful directives are: @auth
, @guest
, @json
, @method
, and @csrf
. Of course, you can use PHP inside of Blade templates or create your own directives. But as noted before, I like to grok the framework as much as possible. So my goal is to only use Blade directives within my templates, no PHP tags.
I'll close with some additional stats and a few observations on them. Note: This sample size is smaller and limited to apps running Laravel 5.5 or higher. Stats were generated using laravel-stats.
1+-------------------+-------+---------+---------------+------------+ 2| Name | Usage | Classes | Methods/Class | LoC/Method | 3+-------------------+-------+---------+---------------+------------+ 4| Commands | 66% | 6.37 | 2.42 | 9.68 | 5| Controllers | 67% | 20.91 | 4.10 | 6.28 | 6| Events | 29% | 5.63 | 1.64 | 7.69 | 7| Jobs | 31% | 4.11 | 2.36 | 11.84 | 8| Listeners | 39% | 5.35 | 1.89 | 5.16 | 9| Mails | 39% | 6.72 | 2.06 | 6.71 |10| Middleware | 100% | 4.22 | 0.12 | 4.93 |11| Models | 99% | 17.80 | 3.75 | 3.79 |12| Notifications | 39% | 4.57 | 3.80 | 3.71 |13| Policies | 19% | 5.09 | 3.96 | 2.88 |14| Requests | 58% | 11.04 | 2.07 | 2.52 |15| Resources | 7% | 14.75 | 0.94 | 4.95 |16| Rules | 17% | 2.40 | 3.07 | 2.86 |17| Service Providers | 100% | 6.28 | 1.97 | 4.61 |18| PHPUnit Tests | 100% | 9.96 | 2.02 | 6.63 |19| Dusk Tests | 18% | 5 | 3.00 | 6.67 |20| Browserkit Tests | 3% | 13 | 4.16 | 6.05 |21+-------------------+-------+---------+---------------+------------+22| Total | | 144.54 | 2.18 | 5.72 |23+-------------------+-------+---------+---------------+------------+
I hope these metrics and insights provide ways to improve your Laravel apps as well as promote maintainability. For a limited time, you can run the Laravel Analyzer for free. I plan to release more observations as the sample size grows.
]]>return
statement. Indentation must be 4 spaces. Such rules are too rigid.
In the real world code is much more fluid. Adhering to these hard rules distracts us from what really matters - readability. If my focus is strictly on the number of lines or return
statements, I prevent myself from writing more readable code simply because it is a few lines "too long" or has more than one return
statement.
Many of these hard rules attempt to address nested code. Nested code is hard to follow. Physically there's more visual scanning with the eyes. Mentally, each level of nesting requires more overhead to track functionality. All of these exhaust a reader.
Nested code is mostly the result of conditionals. Since conditionals are the basis for all programming logic, we can't very well remove them. We must recognize their effect on readers and take steps to minimize this impact.
To improve readability, we want to bring the code back to the top level. By nature, loops and conditionals have a nested structure. There's no way to avoid nesting within these blocks. However, we can avoid nesting beyond this structure.
Let's take a look at a few examples of nested code and practices for improving their readability.
You may not believe me, but I've seen the following code more than once:
1public function handle($request, Closure $next) 2{ 3 if (env('APP_ENV') == 'development') { 4 // do nothing... 5 } else { 6 if ($request->getScheme() != 'https') { 7 URL::forceScheme('https'); 8 return redirect('https://www.example.com/' . $request->getPath()); 9 }10 }11 12 return $next($request);13}
That's right, an empty if
block. I've also seen the opposite - an empty else
block. There is no rule that an if
must be paired with an else
- at least not in any of the programming languages I've used in the past 20 years. Empty blocks are dead code, remove them.
Nested code blocks often return a value. When these are boolean values, there's an opportunity to condense the code block and return the condition directly.
Consider the nested code within the isEmpty
method of a Set
class:
1public function isEmpty() {2 if ($this->size === 0) {3 return true;4 } else {5 return false;6 }7}
While this method block is only 4 lines of code, it contains multiple sub-blocks. Even for such a small number of lines this is hard to read, making the code appear more complex than it really is.
By identifying the conditional return of raw boolean values we have the rare opportunity to completely remove the nested code by directly returning the condition.
1public function isEmpty() {2 return $this->size === 0;3}
Given the context of this aptly named method combined with a now one line block, we decreased its perceived complexity. Although this line may appear dense, it is nonetheless more readable than the original.
Note: Condensing conditionals can work for more data types than raw booleans. For example, you can return the condition as an integer with a simple type cast. However this rapidly increases the complexity. Many programmers try to combat this by using a ternary. But a ternary condenses the code without decreasing the complexity, making the code less readable. In these cases, a guard clause is a better alternative.
Nested code is often the result of logical progression. As programmers we write out each condition until we reach a level where it's safe to perform the action.
While this flow may be ideal for execution, it's not ideal for reading. For each nested level the reader has to maintain a growing mental model.
Consider the following implementation of the add
method of a Set
class:
1public function add($item) {2 if ($item !== null) {3 if (!$this->contains($item)) {4 $this->items[] = $item;5 }6 }7}
Logically the progression: if the item is not null
and if the Set
does not contain the item, then add it.
The problem is not only the perceived complexity of such a simple action, but that the primary action of this code is buried at the deepest level.
Ideally the primary action of a block of code is at the top level. We can refactor the conditional to a guard clause to unravel the nested code and expose the primary action.
A guard clause simply protects our method from exceptional paths. Although they commonly appear at the top of a code block, they can appear anywhere. We can convert any nested conditional into a guard clause by applying De Morgan's Laws and relinquishing control. In code, this means we negate the conditional and introduce a return
statement.
By applying this to the add
method our implementation becomes:
1public function add($item) {2 if ($item === null || $this->contains($item)) {3 return;4 }5 6 $this->items[] = $item;7}
In doing so we have not only drawn out the primary action, but emphasized the exceptional paths for our method. It is now less complex for future readers to follow. It's also easier to test as the exceptional paths are clearly drawn out.
A switch
statement is a very verbose code structure. switch
inherently has 4 keywords and 3 levels. It's a lot to read even if the contained blocks of code are only a few lines. While this is acceptable in certain cases, it's not in others.
There are a few cases where using if
statements instead of a switch
statement may produce more readable code.
case
blocks the inherent structure of the switch
statement produces more lines than the equivalent if
statements.case
blocks contain nested code the complexity increases and readability decreases to a critical level. Using guard clauses or adopting the practices within Big Blocks can improve the code.switch
. This doesn't apply to languages (Swift, Go, etc) that support more complex case
comparisons.switch
statements are best when a 1:1 ratio exists between case
statements and the lines of code within their blocks. Whether these lines are assignments, return
statements, or method invocations the readability remains nearly the same provided the ratio is roughly 1:1.
1switch ($command) { 2 case 'action': 3 startRecording(); 4 break; 5 case 'cut': 6 stopRecording(); 7 break; 8 case 'lights': 9 adjustLighting();10 break;11}
Note: In such cases where switch
statements are streamlined, many programmers use a map, database table, or polymorphism instead. All of which are indeed additional alternatives. Just remember every solution has trade-offs (complexity). A switch
statement is often "good enough" for most code.
Another common form of nested code are loops. Loops by nature are complex. As programmers, we're cursed to be off by one and miss incremental logic. Again, we're humans not computers. So we're unlikely to win the battle against loops. They will always challenge us. The only way to combat this complexity is readability.
I won't get into which data structures and algorithms may help improve your code. That is much too specialized. In general though, most loops deal with accumulation or invocation. If you find your codebase contains lots of loops, see if higher order functions like filter
/map
/reduce
can be used. While this may not improve readability for all readers, it will improve your individual skillset.
Want more tips? This practice is taken from BaseCode - a field guide containing 10 real-world practices to help you improve the code you write every day.
]]>Here are my goals for 2018:
I'd like to go through them. Not just to explain the goals, but the motivation behind them. In doing so, they may help you set a few goals of your own.
I never planned on writing a book. Despite writing hundreds of blog posts, dozens of magazine articles, and several talks I never thought I had enough material to fill a whole book. I love sharing my experiences. It's the motivation for all the writing I do.
Back in November I started sharing code cleanup tips on Twitter. Each week, I'd share a tip to cleanup your code. Each week, the tweets received more retweets and more likes. Some well into the hundreds. It's funny as the whole thing started as a bit of a challenge. I was bored in a meeting and asked developers to send a code snippet they wanted cleaned up.
Even with all these positive responses and ensuing discussion, I still never thought I had material to write a book. After all, how do you take a bunch of tweets and turn them into a book. I mean you don't. What you can turn them into is a field guide - a short book with pragmatic practices to improve the code you write every day.
With my birthday at the end of the month, I realized that I've been programming for 20 years. It was this realization that was actually the deciding factor. In the developer world, that's a lifetime of experiences working with dozens of development teams, developing hundreds of projects, and writing thousands of lines of code. Combining my experience with my tweets to provide backstory and motivation for writing cleaner code in the real world felt like enough. So I am writing BaseCode - a field guide to lasting code.
Learning a new language a year was actually suggested to me as a good routine by a TA in college.
However, development has changed. Especially web development. When I first started knowing HTML was enough. Then it was HTML, CSS, and JavaScript. Now it's so much more. You have to learn languages, frameworks, APIs, and all the tools in between.
Technically speaking, the last language I learned was Swift. That was a few years ago. So I'm overdue. This year, I chose Python. There's no requirement for me to learn Python. At least not for my career. I chose it because it seems to have a place in data analytics.
Investing is my second passion. I'm always looking for ways to combine my two passions of programming and investing. What better way than to analyze my trading habits with a few Python scripts. Who knows, maybe I'll end up with an algorithm that outperforms the market and I'll start an investment firm. That's pretty unlikely, but at least I know Python.
Two years ago I created Laravel Shift. It provides automated and human services for upgrading Laravel, Lumen, and PHP projects between major versions.
Shift has been a great side project. But I'm at a critical point where it needs work to get to the next level. Otherwise, it will likely stagnate, rot, and die. An all too common tale and one that I've lived before with another side project.
I don't want to see that happen to Shift. The goal this year will be to focus the core platform by cutting some of the services that don't generate revenue and instead put that effort into expanding to new markets - either other sub communities within PHP or even other languages like JavaScript or Ruby.
Over the past few years I've been fortunate to make the transition from a conference attendee to a conference speaker. As I mentioned before, I love sharing my experiences. Seeing an audience engage, share, and grow during one of my talks has been incredibly rewarding.
This year I hope to increase the number of conference engagements. I'm well on the way to achieving my goal as my talks have already been accepted to 3 conferences. I expect to reach this goal, so I created a sub goal - I'd like to be a keynote speaker or speak at a new conference. Maybe one that is not even tech related.
This goal is pretty straightforward. However, the motivations are not. It's a means to an end. That end, for me, is reach. I'm not talking about being popular. Again, it's about sharing my experiences in an effort to teach. Every teacher needs an audience.
Reaching 10,000 followers on Twitter accomplishes two things. First, it's positive feedback that people find value in what I am sharing. Second, it allows me to reach an audience more directly. Let me elaborate on this a bit.
Unless you're inherently famous or virally fortunate, you have to grow your audience. You have to write blog posts, speak at conferences, and make things. Then you have to share all that carefully and meticulously. You have to ask people to share your stuff. It's an awkward, relentless push. All that might get you a few thousand followers.
Maybe at 10k followers it might be a little easier to my experiences with a large enough core audience to make an impact.
I hope these insights into my own goals help you create some of your own. Tech is constantly in motion. Keeping up is the minimum requirement. Goals are a great way to ensure you're not just keeping up, but accelerating.
]]>There are indeed differences. I often borrow the definitions from Martin Fowlers TestDouble post (who borrows from Gerard Meszaros)
InMemoryTestDatabase
is a good example).When you're new to testing, all of this is clear as mud. Often compounded by the fact that these terms are used inconsistently across different testing frameworks.
The differences boil down to slight variations in implementation and usage. For example, the difference between a fake and a stub may simply be the fake has an underlying class. Or the difference between a spy and mock is that a spy also records invocations.
In my opinion, these differences are inconsequential. Often, they only matter when the testing framework makes this differentiation. Unfortunately, Mockery (the mock object framework I demo in my workshop) makes this differentiation.
In Mockery stubs, mocks, and spies are all the same thing. Although it attempts to differentiate between spies and mocks, you still can make verifications on mocks. They only real difference is in their default behavior. A Mockery mock requires you to stub every method used during the test. Whereas a spy does not. If you call a method on a spy in Mockery, it will simply return null
.
In Mockery, there is also the ability to create a partial mock which behaves more like a fake, as it will call through to the implemented (original) method if you do not stub it.
Again, clear as mud.
I like the generic term by Gerard Meszaros - test double. RSpec actually follows this by simply using double()
to create an object that stands in for another object in your system.
That's simple enough. When testing, I don't really care about the differences between test objects. I only care that I can easily create and use a test object.
In the end, although there are indeed differences between test objects, I don't want to be hindered by them while testing. It comes down to developer happiness. Don't make me think!
Using Mockery? I created a simple helper function for Mockery called double()
to abstract all these nuances back to the general use of test doubles and make testing easier.
In Part 2, I want to go a little deeper and cover grouping. When I say grouping, I'm really talking about the Object Oriented Programming paradigm of encapsulation. Whether we group the code into a function or a class is often not important. What is important is did we improve the readability of the code.
To measure our change, we should ask:
Did we improve readability?
Admittedly a bit subjective, but you push yourself to stay objective. I've been pair programming for the last two years. Developers tend to agree on fundamental readability. Where we differ at the edges. These nuances can lead to some pretty great discussion.
What to group is often easy to identify. We can all point out the code we don't like. We said how to group the code is not important. The question that remains is when to group code. When do I clean up the code by grouping?
Let's look at three motivations for grouping code.
Any bit of code which requires additional context is ripe for grouping. I prefer when my code is not written in a way that requires me to know the business logic. No matter how simple the implementation, I'll never understand. By grouping this code, we provide an additional layer of abstraction. A way to shield ourselves and future developers from the inherit complexity of the system.
Consider our previous code sample:
1function canView($scope, $owner_id) 2{ 3 if ($scope === 'public') { 4 return true; 5 } 6 7 if (Auth::user()->hasRole('admin')) { 8 return true; 9 }10 11 if ($scope === 'private' && Auth::user()->id === $owner_id) {12 return true;13 }14 15 return false;16}
While the logic is straightforward, we improve communication by extracting it into contextually named helper methods.
1function canView($scope, $owner_id) 2{ 3 if ($scope === 'public') { 4 return true; 5 } 6 7 if (isAdmin()) { 8 return true; 9 }10 11 if ($scope === 'private' && isOwner()) {12 return true;13 }14 15 return false;16}
Methods like isAdmin()
and isOwner
relay business logic making it easy to understand. Once understood I can apply it easily to other areas of the codebase. In the end, we didn't just improve communication, we also taught the developer about the code.
It's important to point out that I didn't group all of the code. There is a mental cost for every grouping. Each needs to provide enough value to cover its cost. In this case, I didn't group logic into a hasScope()
function as it not only didn't improve communication, but the method signature is just as verbose as the expression.
Another principle in programming is low coupling. Coupling is not bad. In fact, it's good when data or code truly belongs together. We can identify areas for coupling by spotting logical connections or by a similar rate of change.
Consider the following code sample:
1function plot($x, $y, $z) 2{ 3 // ... 4} 5 6function transfer($amount, $currency) 7{ 8 // ... 9}10 11function substring($string, $start, $length)12{13 // ...14}
Only the function signatures here as I want to focus on the parameters. You may not see the grouping opportunity right away. No worries, it's because we all suffer from primitive obsession. Nothing wrong with using primitives. But our propensity to only use them may prevent us from grouping this data into an object.
1function plot(Point $point) 2{ 3 // ... 4} 5 6function transfer(Money $money) 7{ 8 // ... 9}10 11function substring($string, Range $range)12{13 // ...14}
By encapsulating the data within an object, we not only improve the coupling but also provide a place for additional logic. We can move any inline logic related to this data to the object. Take a minute to read Martin Fowler's Range object for a more in-depth example.
Last but not least is simply organization. Don't be afraid to split similar code into its own function or class. So long as it carries its own weight, it will likely improve the codebase.
Spotting these is more high level than spotting data coupling. Here we take more of a visual approach. If something doesn't seem to match the local aesthetics, it may belong elsewhere.
Consider the following code sample:
1namespace App\Models; 2 3class User 4{ 5 public function find($id) {} 6 7 public function create() {} 8 9 public function save() {}10 11 public function destroy() {}12 13 public function displayName() {}14 15 public function displaySignature() {}16 17 public function displaySalutation() {}18 19 public function createBadge() {}20 21 public function printBadge() {}22}
Here we have a model. Typically a model primarily contains the CRUD methods (create, read, update, delete). While it's perfectly acceptable for the model to contain additional methods, we may notice relationships between these other methods in the model.
By name alone we can spot methods related to display and other badge methods. We may be able to organize this code elsewhere. In this case, the display methods can be extracted to a Presenter class. The badge methods to a Printer class or into its own Badge
object.
Give these motivations a try. Maybe some work for your codebase, maybe some don't. The answer to did we improve code readability may vary from developer to developer and project to project. But always ask the question…
]]>While Shift is a fully automated service, there are times where human intervention is required. For example, if a customer uses an alternative form of payment or a Git related issue occurs. In which case I have to run the Shift manually. This involves:
I pride myself on support. Unless I'm sleeping, I try to handle every issue within an hour. Even though the steps above take under a minute, I would rather spend that time on something else. Your products should be fun, not a burden.
I know you developers are thinking - why don't you build a web administration? Well, YAGNI - that's why.
Consider the cost to develop (and maintain) such a web admin. I need to build login, listing/detail pages, search, and the action itself. Also from an experience side, it's roughly the same number of steps as before. Sure, it's easy to build with any framework. But I don't need it.
In the end, all I need is a quick way to run a Shift on the go. Looking back on almost two years of support, I often have the Shift number readily available. Creating the job and adding it to the queue is at most two lines of code. So the steps are not the pain point.
The pain point is connecting to the server. Unless I want to carry my laptop around, I can't connect to the server to run the Shift. (I actually have taken my laptop with me during peak times.)
What do I carry around with me all the time? My phone. I'm already reviewing the support emails from my phone. Wouldn't it be great when I need to run a Shift manually to just reply or send a text.
Although the backstory relays the importance of finding the right solution, I know you developers want to see the code.
As the SMS platform I used Nexmo. Services like Nexmo make handling SMS communication pretty easy. I rent a phone number and set a webhook. That's it.
Now anytime that phone number receives a text, Nexmo sends data to this web endpoint. The data contains meta information like a unique message ID and timestamps, as well as the sending phone number and message body.
Really all I have to develop is a web endpoint. Shift is built with Laravel. This means I can quickly generate an API resource by running php artisan make:controller --resource Api/SmsController
.
I remove the extra actions as I only want the store
endpoint. Since Nexmo sends a POST
request this was a natural choice. It also fits from a RESTful perspective as this endpoint creates a new job and places it on the queue.
1class SmsController extends Controller 2{ 3 public function store(RerunRequest $request) 4 { 5 $order = Order::findOrFail($request->get('text')); 6 7 Queue::push(new PerformShift($order)); 8 9 return null;10 }11}
Here's the corresponding route:
1Route::apiResource('sms', 'Api\SmsController', ['only' => ['store']]);
Those familiar with Laravel may have noticed RerunRequest
passed to store()
. This is a Form Request which handles request validation in Laravel. In this case, it performs some very basic checks to ensure the message is as expected.
1class RerunRequest extends FormRequest 2{ 3 /** 4 * Determine if the user is authorized to make this request. 5 * 6 * @return bool 7 */ 8 public function authorize() 9 {10 return true;11 }12 13 /**14 * Get the validation rules that apply to the request.15 *16 * @return array17 */18 public function rules()19 {20 return [21 'msisdn' => 'required|integer|in:15025555555',22 'text' => 'required|integer',23 ];24 }25}
As an aside, I was surprised given all the available validation rules in Laravel there wasn't an equals
or is
rule. I had to use in
to validate the sending phone number was my phone number.
That's it. A few generated classes and literally 8 lines of custom code. It fulfills all my requirements. I can maintain my speedy level of support from anywhere I have a cell signal. Even better, it saves me time. What used to take a minute now takes seconds. I've already used it several times.
It's FREE to receive a text. This means all I pay for is a phone number. That costs less than $10/year - which is roughly the cost of one Shift. So, while there are other platforms, Nexmo literally fit the bill.
Have something you want to build? Let's pair up! I offer pair programming sessions where we can tackle your projects together. It's a great way to crank out some code and level up our skills.
]]>This contributes to the steep learning curve with Git - what's the proper way to do something? I try to address in Getting Git by showing different ways Git commands may be used.
In this case, an alias of move
was created to solve the problem of committing work to an incorrect branch. It did so by running the following commands.
1MESSAGE=$(git log -1 HEAD --pretty=format:%s)2git reset HEAD~ --soft3git stash4git checkout destination-branch5git stash pop6git add .7git commit -m $MESSAGE
As mentioned in the replies, there are other ways to solve this problem.
Before exploring alternative solutions, I want to address the ambiguity of the problem. In order to determine the proper solution, we need to answer a few questions:
For me, proper means using commands with side-effects so I expend the minimal effort.
By that definition, I immediately rule out the use of stash
. While stash
is a helpful Git command, it is very nuanced. For example, it stashes everything in the index, but not untracked files. This may not be what you want. Maybe you just want staged changes. Maybe you do want untracked files.
There's also no need to reset the commit just to recommit it on another branch. The assumption being you want the commit as is. You just made it on the wrong branch.
Let's look at some alternative solutions.
A straightforward solution is to simply create another branch from your current branch. It will have the same commit history and therefore contain the incorrect commit. This allows you to remove the commit from the current branch. Then you can checkout the new branch and complete your work.
1git branch destination-branch2git reset --hard HEAD~13git checkout destination-branch
This makes the assumption that the destination branch does not exist. It also assumes all previous commits belong on the destination branch. If either of these assumptions are not true, use the cherry-pick
solution.
This also assumes you only made one commit incorrectly. If you made more, increase the relative reference accordingly (e.g. HEAD~2
, HEAD~3
, etc)
Another solution is to use cherry-pick
. As noted above, cherry picking may be used when the commit histories differ or the destination branch already exists.
First, you create and checkout the destination branch. You pass the second argument to checkout
to reference a branch point since the branches don't have the same commit history. Then you can cherry-pick
the incorrect commits. Once done, you can switch back to the previous branch and reset the incorrect commits.
1git checkout -b destination-branch good-reference2git cherry-pick 123453git checkout -4git reset --hard HEAD~1
This assumes the destination branch does not exist. If it does, change the first command to: git checkout destination-branch
.
As with other solutions, if you made more than one commit incorrectly, you will need to run cherry-pick
for each of the incorrect commits. You may also pass cherry-pick
a range as of Git 1.7.2. For example, if eddd21
referenced your first incorrect commit and 7e6802
referenced the last, you could run: git cherry-pick eddd21^..7e6802
. Cherry picking a range has its own nuances. I often find I just run the individual cherry-pick
commands.
In some scenarios, you may be able to simply push your current branch to a remote branch of a different name. Then reset your local branch to remove the incorrect commit.
1git push origin HEAD:destination-branch2git reset --hard HEAD~1
This assumes you are working with remote branches. It also assumes the commit histories are the same, but it does not matter if the destination branch exists or not.
As with other solutions, adjust the relative reference used in the reset
command to remove the appropriate number of commits.
You can see why Git can be challenging to learn and use. There are at least four different solutions for this one problem. While I advocate for a solution that keeps the commands simple, I hope by demonstrating all solutions you learned when to apply each.
Want to see more every day Git scenarios? In addition to learning about core commands, the Getting Git video series also demonstrates the commands you'll use to solve every day problems with Git.
]]>Implementation Patterns by Kent Beck Filled with principles and practices focused on improving code readability. The first few chapters provide motivation for adopting these practices. The remainder of the book contains code samples. It's also the origin of the quote: "We read code more than we write code". For me, this has become the single, biggest motivation for writing clean code.
Hunting for great names in programming by DHH Naming things is hard. This post takes us on the journey to find a name which communicates intent. DHH leaves us some breadcrumbs to do so ourselves. While it may seem excessive, taking this journey will improve your vocabulary of names. After just a few times, you'll notice naming things isn't so hard.
Seven Ineffective Coding Habits of Many Programmers by Kevlin Henney Watch this and if you're not convinced to write clean code, please check your pulse. Kevlin crushes common coding habits with researched examples and straight talk. While he mentions a few practices, the focus is mainly on exposing these ineffective habits. Similar to Implementation Patterns, this continually motivates me to refine my coding habits.
I plan to host Part 2 of the Writing Clean Code series Wednesday, September 13th. Sign up now to secure your spot for this free, one hour workshop where I'll demo practices for writing clean code.
]]>Unfortunately they all suffer from the same fundamental issue - inconsistency. Likely the result of years of code patching, large teams, changing hands, or all of the above.
This creates a problem because we read code far more than we write code. As I read a new codebase these inconsistencies distract me from the true code. My focus shifts to the mundane of indentation and variable tracking instead of the important business logic.
Over the years, I find I boy scout a new codebase in the same way. I apply three simple practices to clean up the code and improve its readability.
To demonstrate, I'll apply these to the following, real-world code I read just the other day.
1function check($scp, $uid){ 2 if (Auth::user()->hasRole('admin')){ 3 return true; 4 } 5 else { 6 switch ($scp) { 7 case 'public': 8 return true; 9 break;10 case 'private':11 if (Auth::user()->id === $uid)12 return true;13 break;14 default: return false;15 }16 return false;17 }18}
I know I'm the 1,647th person to say, "format your code". But it apparently still needs to be said. Nearly all of the codebases I've worked on have failed to adopt a code style. With the availability of powerful IDEs, pre-commit hooks, and CI pipelines it requires virtually no effort to format a codebase consistently.
If the goal is to improve code readability, then adopting a code style is the single, best way to do so. In the end, it doesn't matter which code style you adopt. Only that you apply it consistently. Once you or your team agrees upon a code style, configure your IDE or find a tool to format the code automatically.
Since our code is PHP, I chosen to adopt the PSR-2 code style. I used PHP Code Beautifier within PHPCodeSniffer to automatically fix the code format.
Here's the same code after adopting a code style. The indentation allows us to see the structure of the code more easily.
1function check($scp, $uid) 2{ 3 if (Auth::user()->hasRole('admin')) { 4 return true; 5 } else { 6 switch ($scp) { 7 case 'public': 8 return true; 9 break;10 case 'private':11 if (Auth::user()->id === $uid) {12 return true;13 }14 break;15 default:16 return false;17 }18 return false;19 }20}
Yes, something else you've heard plenty. I know naming things is hard. One of the reasons it's hard is there are no clear rules about naming things. It's all about context. And context changes frequently in code.
Use these contexts to draw out a name. Once you find a clear name, apply it to all contexts to link them together. This will create consistency and make it easier to follow a variable through the codebase.
Don't worry about strictly using traditional naming conventions. I often find codebases mix and match. A clear name is far more important than snake_case
vs camelCase
. Just apply it consistently within the current context.
If you're stuck, use a temporary name and keep coding. I'll often name things $bob
or $whatever
to avoid getting on stuck on a hard thing. Once I finish coding the rest, I go back and rename the variable. By then I have more context and have often found a clear name.
Clear names will help future readers understand this code more quickly. They don't have to be perfect. The goal is to boost the signal for future readers. Maybe they can incrementally improve the naming with their afforded mental capacity.
After analyzing this code, I have more context to choose clearer names. Applying clear names not only improves readability, but boosts the context making the intent of the code easier to see.
1function canView($scope, $owner_id) 2{ 3 if (Auth::user()->hasRole('admin')) { 4 return true; 5 } else { 6 switch ($scope) { 7 case 'public': 8 return true; 9 break;10 case 'private':11 if (Auth::user()->id === $owner_id) {12 return true;13 }14 break;15 default:16 return false;17 }18 return false;19 }20}
There are some hard rules regarding nested code. Many developers believe you should only allow one nesting level. In general, I tend to ignore rules with hard numbers. They feel so arbitrary given code is so fluid.
It's more that nested code is often unnecessary. I have seen the entire body of a function wrapped in an if
. I have seen several layers of nesting. I have literally seen empty else
blocks. Often adding guard clauses, inverting conditional logic, or leveraging return
can remove the need to nest code.
In this case, I'll leverage the existing return
statements and flip the switch
to remove most of the nesting from the code.
1function canView($scope, $owner_id) 2{ 3 if ($scope === 'public') { 4 return true; 5 } 6 7 if (Auth::user()->hasRole('admin')) { 8 return true; 9 }10 11 if ($scope === 'private' && Auth::user()->id === $owner_id) {12 return true;13 }14 15 return false;16}
In the end, coding is writing. As an author you have a responsibility to your readers. Maintaining a consistent style, vocabulary, and flow is the easiest way to ensure readability. Remove or change these and maintain readability you will not.
Want to see these practices in action? I'm hosting a free, one-hour workshop where I'll demo each of these practice, and more, through live coding. Sign up to secure your spot.
]]>While I want to focus on these distinctions, let's first focus on the code change.
Here's the original code:
1public static function before($subject, $search) 2{ 3 if ($search == '') { 4 return $subject; 5 } 6 7 8 $pos = strpos($subject, $search); 9 10 if ($pos === false) {11 return $subject;12 }13 14 return substr($subject, 0, $pos);15}
And the "refactored" code:
1public static function before($subject, $search)2{3 return empty($search) ? $subject : explode($search, $subject)[0];4}
A nice, clean one liner. All tests passed and the code was merged.
Developers with a keen testing eye may have already noticed an issue, but most noticed I quoted "refactored".
That's because this code wasn't "refactored" it was "changed". Let's recall the definition of "refactor".
to restructure software without changing its observable behavior
In this case, because the new code behaves differently than the original, the observable behavior changed.
How does it behave differently?
This takes that keen testing eye, but a ready example is when $search
is 0
. The original code would search within $subject
and return the string before the 0
occurrence. Whereas the new code would return early with $subject
. Not the same behavior.
Unfortunately the existing tests did not catch this. As such, it was on the contributor to spot this changed behavior - which they later did and submitted a patch with the missing test. Upon doing so, this became a true refactor and great work!
However, this lead to another interesting question - since all the existing tests passed, was the original contribution a successful refactor.
Given the symbiotic relationship between refactoring and testing, some consider the tests to be the requirements. So if all tests pass, you met the requirements.
I think that's a slippery slope. For me, the definition of "refactoring" again provides the answer through its own question - did we change the observable behavior?
In this case, yes - we can observe the behavior changed. So the original contribution was not a true refactor, despite the passing tests.
Nonetheless, I think there are some other interesting points around refactoring and testing. Ones I will explore in a future post. For now, be mindful you're truly "refactoring" code and not "changing" code.
]]>The third task - training the team on Git - proved to be the most challenging. Not because there's such a steep learning curve, but because everyone was using a different tool. I found teaching developers to use Git from the command line provided a strong foundation. The developers then applied this understanding to their own tool.
These developers became empowered by Git. I realized although Git is a tool most developers use everyday, it's the one we know the least. I have been on a journey to empower more developers - by training, writing posts, speaking at conferences, recoding videos, and now hosting an online workshop.
I provided the backstory because it's important to understand this is not something I am just doing. There was a long road that lead me here. An online workshop requires a format, schedule, and attendees. I'd like to share the plan for my own workshop not only for feedback, but breadcrumbs for anyone else thinking of hosting an online workshop.
A few months ago I spoke at Laracon Online. It was my first virtual conference as both an attendee and speaker. I was pretty impressed. I felt their format worked. I reached out to the organizer to see if he felt the same. He did. So why change a good thing? I adopted their format and will use Zoom to stream live to attendees and Slack for attendees to communicate.
Since I have lead Git workshops at conferences I had a rough schedule. I adapted it slightly for a virtual workshop - adding more breaks and designated time for questions. The workshop would be four 1 hour sessions followed by 15 minutes for questions and a 15 minute break. During which time attendees can mingle in Slack. This also gives me an opportunity to answer any remaining questions in Slack and prepare for the next session. Take a minute to view the full schedule.
This is the hard part. It's not as easy as if you build it the will come. Initially my goal was 100 attendees. I emailed attendees for my previous workshops talks and video subscribers. I barely made it half way to my goal. I considered cancelling the workshop. Then I thought maybe this first one will be small, but it's something I can grow over time. After all, developers are continually learning Git.
So if you're learning Git or want to improve your understanding I hope to see you virtually on July 19th for the first "Getting Git" Online Workshop. Or if you're considering hosting your own online workshop feel free to send me your questions.
]]>After jobs during high school I had a fair amount of savings. The bank noticed and suggested I open a CD. I was familiar with the interest I earned on my savings account. As I understood it, a CD would earn even more interest under the condition the money could not be withdrawn for a certain amount of time. This was okay since I rarely withdrew from my savings account.
By sophomore year of college I had steady work as a web developer. It paid well and allowed me to save even more. I still had my original savings account. I was also rotating money through CDs. With limited expenses as a college kid, I wanted to do something more with the money.
I can't remember why exactly I made the leap, but the stock market became my next evolution for investing. While my profession is programming, I have been investing in the stock market for nearly as long. These are the lessons I learned over the last 15 years.
In 2002 I opened an online brokerage account with Ameritrade (now TD Ameritrade). I filled out a few online forms, made a phone call, and mailed a check (it was 2002). Once the check cleared, I was able to start investing in the stock market.
People think investing in the stock market has all these barriers. It was pretty easy in 2002, and even easier now. You can probably open an account with an online brokerage faster than you can read the rest of this article.
There's no amount you have to invest. I started with $500. It was enough to get started and not too much if I lost it.
When I started investing I had some silly notions. I thought investing was about big trades - Buy 10,000 shares of Standard Oil. The problem was I only had $500. What could I buy 10,000 shares of? Penny Stocks.
There are all sorts of reasons why penny stocks are a terrible investment. Nonetheless, it seems to be a rite of passage for aspiring investors. Fortunately I made it through without losing money. I'll tell you the same thing everyone else will - don't invest in penny stocks!
It took almost two years, but I learned to investing in "real" companies, not penny stocks. Technically, this meant a company with a stock price over $5. This narrows the choice to a few thousand companies. To choose, you need to find value. What companies do you believe will be a good investment?
This is, of course, a fundamental question of investing. There's no clear answer, but I found it's best to invest in companies you know.
As a programmer, I knew tech companies like Apple and Amazon. Friends talked about trending companies like Lululemon and Under Armor. My Dad told me about a company called First Solar. I didn't have to do a lot of research. I just applied an investor mindset to conversations I was already having with people around me. All of these companies proved to be good investments at one point.
By now I was listening to podcasts and reading books on investing. In fact, I learned this one from Jim Cramer - stay diversified.
Since I knew tech, I found value in tech companies. While most of these investments did well, when the tech sector did poorly my portfolio dropped significantly.
The stock market moves in cycles. Although you never know when the cycle changes, it will happen. So don't have all your eggs in one basket. You want to spread out your investment across multiple companies and multiple sectors.
I try to invest in companies across five sectors. Right now I'm in tech, energy, financials, telecom, and airlines.
Similar to interest you receive from your bank account, dividends are distributions you receive as a shareholder. These are usually cash distributions, paid quarterly.
While I knew about dividends, I didn't have many dividend paying stocks in my portfolio. I thought the growth of my tech stocks outperformed dividend paying stocks. But dividends are pretty awesome.
Annaly Capital Management (NLY) yields 10%. Even though NLY has gained around 20% in the past few years, combined with the dividend it has gains of over 50%.
These days bank accounts yield less than 1%. A lot of household names pay dividends that outperform a bank account - Apple yields 2%, Target 3%, GE 3.5%, AT&T and Verizon over 5%.
Until 2008 I usually bought or sold my entire position at one time. As I read more articles and listened to more podcasts, I learned this is not how professional traders managed their positions.
They buy in phases. They buy some initial shares, maybe 50% of their total investment. If the stock price comes down a little, they buy a little more. If it goes down a lot, they can reevaluate the investment. If it goes up a lot, they already have gains.
They also sell in phases. When a stock reaches a certain gain, they may sell half their position. Depending on the gains, this may recoup the initial investment. Now they are in a position where they've locked in gains, have no risk of loss, and still have shares that may gain even more. This is what's called playing with the houses money.
Timing your trades is the most difficult thing about investing. Stock prices often go a little lower when you buy and a little higher with you sell. Phasing in and out of a position is a good way to manage this uncertainty.
The market is full of events. These include quarterly earnings reports, company announcements, even geopolitical events. Any of these can affect a stock price. I learned the hard way you need to be aware of when these events occur.
From Fall 2009 to Fall 2010 Amazon nearly doubled in price - going from $85 to $165. I had an open order to sell at $110. It filled when Amazon jumped nearly 30% overnight to open at $113 the next day. Had I simply marked my calendar with the date of their earnings report I could have seen the jump and canceled the order. In fact, Amazon has not fallen below $100 since that date. They just hit $1,000 last week.
I learned the truth in the saying you have to have money to make money. Even though I had gains of more than 20% on some investments, I wasn't making a lot of money.
That's because 20% of $1,000 is $200. A good percentage gain, but relatively speaking, not a large monetary gain. Even the rare 100% gain, still meant turning $1,000 into $2,000.
This is not about greed. This is about work. I'm choosing good stocks, investing at the right time, and making the trade. Same as the professional traders on Wall Street. I'm just not investing as much. So I don't make as much.
In 2010, I started making larger trades. Each year since, I try to increase the amount a little more.
Many people are familiar with buying a stock at a low price and selling at a higher price. This is known as being long. The belief is the stock price will go higher. There is another side of the trade. Meaning I sell a stock at a higher price and buy it back at a lower price. The belief is the stock price will go lower. This is known as being short.
In 2011 I shorted my first stock. It was pretty scary. Shorting a stock has more risk. When you're long a stock, worst case scenario the stock price goes to $0 and you lose your initial investment. When you're short a stock, worst case scenario the stock price goes up infinitely. Theoretically, you could have unlimited losses.
Why short a stock? Since the market moves in cycles, this means you can trade both the upward and downward movements. While I don't short stocks often, its important to know different ways to trade.
With diversification, dividend paying stocks, and speculative picks my portfolio had 20 positions. Jim Cramer recommends spending 1 hour of homework per stock per week. This means I needed to spend at least 20 hours a week managing my portfolio. That's a part time job.
Professional traders and investment intuitions have the time to manage large portfolios. I had a full time job programming. I found I did better by limiting the number of positions in my portfolio. I still try to keep it under 10 positions.
I took some big losses in 2013. Big losses.
I had a diversified portfolio. I had a few dividend paying stocks. In fact, most of my stocks were doing well. One position wasn't. I watched it closely. The company reported some bad news overnight and the next day they dropped another 30%. I sold immediately.
I made a lot of mistakes on this trade. But the real mistake was being overweight this position. Before the drop, it accounted for 60% of my portfolio. After it dropped, my portfolio lost almost half its value.
Had my portfolio been more balanced, with each stock representing an equal percentage of my portfolio, the loss would not have been as painful.
I took more losses in 2014.
When I looked back at the trades it wasn't necessarily because these were bad investments. There were points in time where they had gains. The mistake was I didn't know when to sell.
A dilemma exists. When an investment has gains you hope it gains more. When an investment has losses, you hope it reverses it losses. This hope makes selling hard. You get attached. You get emotional.
At some point you have to sell. I mean that literally. Closing your position is the final step of any trade. Any gain or loss before then isn't real. Maybe the investment will go up, but it may also go down. Being able to make the decision to sell, especially for a loss, is a critical part of investing.
Until 2015 I only traded stocks. In 2015, I started trading options. Options are relatively complex. I'm going to take some liberties and use insurance as an analogy.
You pay premiums to the insurance company to have coverage for a certain period of time. If something happens during that time, you have the right to claim reimbursement from the insurance company. If nothing happens, the coverage expires.
Options function in a similar way. You pay a premium for the right to shares at a certain stock price for a certain period of time. If the stock price goes higher during this time, you can purchase the shares at the predetermined price. If the stock price goes lower, you can let the rights expire and you only lost the premium.
So why trade options? The answer is leverage. Options represent a larger amount of shares. Often the ratio is 1:100 (1 option = 100 shares). This means small moves in the stock price can create big moves in the premiums (options prices).
I'll emphasize this through an example. Last week, Tesla's (TSLA) stock price gained 5%. On its own, an impressive gain for the week. But many of the options had 200%, 300%, and even 400% gains!
After trading options for a few years, I determined a strategy I liked best - hedging. When I hedge, I open a new position against an existing position. The new position is often an options position. So I collect the premium and take on the risk.
While I don't like to parallel investing with gambling, the ready analogy for hedging is a bet. I bet my existing stock position against a new position. If I win the bet, I earn the wager. If I'm wrong, I forfeit my existing stock position.
Let's look at a real world example of hedging (technically, selling covered calls).
Say I own shares of AT&T (T). As a dividend paying stock, I want to keep these shares. However, the stock price increases gradually. To improve my gains, I sell options against the shares I own. I determine a stock price that is high enough they won't reach it, but close enough to still collect enough premium to make the hedge worth the risk.
The process is rather meta. I'm basically investing against my investments. This comes at a risk. However, it's considered a low risk since I control the terms and have the assets to offset any loss.
Hedging seems to work for me. While I have lost money in options trading, I rarely lose money hedging. With more experience under my belt, I'm currently trying a few naked option positions. This is a form of hedging, but let me be clear it's the extreme form and incredibly risky.
With a naked option position, I don't have an existing position. So I open the new position against nothing. Hence the term naked. So I need to be right! Otherwise, I must invest in the new position.
Why take the extreme risk? Well, admittedly I'm still learning. My goal for the year is to build more investment capital. This is one way. Under the right market conditions it can yield big gains. As such, it's another tool in the investor toolbox.
Aside from a few tweets, this is the first time I've written about investing. I mostly write about programming. I have more I could share about investing. If you found value in the article, please let me know.
]]>To start improving performance, we may do the following:
Concatenate and minify assets. By condensing all of our JavaScript and CSS into a single file (respectively) we decrease network traffic. It's also faster to download a single larger file than downloading several smaller files.
Serve content from the edge. By serving content from a server that is physically closer to the user we improve performance. We can use a content delivery network (CDN) to do so.
Set cache and compression headers. Since these assets do not change often only want the user to download them once. We can do so by setting the expiration headers to be far in the future (say one year). In addition, we can decrease the download size by compressing them.
Nowadays, this architecture is pretty easy to implement. Tools like webpack or gulp and services from CloudFlare or Amazon CloudFront will handle most (if not all) of this for you.
However, this architecture has a known problem. Technically, anytime you implement browser caching you will encounter this problem. Let's take a closer look at this problem and a common solution.
There are only two hard things in Computer Science: cache invalidation and naming things.
While true, invalidating the cache is not so hard in this case. Due to the nature of the web, we have a centralized cache rather than a distributed cache. When a user requests our web page, we have the opportunity to invalidate the cache and load new assets.
A common practice is to version file names or append a query string parameter. While you can do this manually, it's likely the tool you use to concatenate and minify your files can do this too. I recommend using checksum hashes as opposed to version numbers.
Now the next time a user requests our web page, the paths to the assets will be different causing them to be downloaded and cached.
Everybody has a plan until they get hit in the mouth
The primary goal of this architecture is for users to only download these assets once. Then, on subsequent visits, these assets would load from their local browser cache greatly improving performance.
This architecture achieves this goal. Yet it's only optimized for the sad path. That is when a user has an empty or stale cache. In doing, so we've actually degraded the performance of the happy path. That is when a user has a primed cache.
Sites with assets that don't change frequently or don't have high traffic may not notice this trade off. Hence the double entendre in the title of edge case. Nonetheless, I want to emphasize this trade off as similar articles rarely do.
Let's play through a user flow under this architecture:
On the surface this seems good. The user downloaded the assets and utilized the cache upon a subsequent visit. Then when we updated the assets, the user downloaded the new assets the next time they visited the site.
The problem is with the last step. The user downloaded all the assets again. While these assets were indeed new, it's likely only a small amount of the file changed. As such, having a user with a primed cache download everything again is not optimal.
Let's use the condensed JavaScript file as an example. While custom JavaScript code may change frequently, most of the non-custom code will not. This
If we split our assets into two files we can optimize this architecture further while not adding many additional requests. So for the JavaScript file, we condense the infrequently changed code to one file and frequently changed code to another. We can do the same for our CSS.
Now if we play through the same user flow the last step becomes User downloads only changed assets. This is far more optimized. Especially for high traffic websites. If we consider separating out jQuery (40KB minimized) for a site with 1 million hits per month, that's 40GB of savings. Although that may not sound like much in the modern age of the internet, that could be the difference between plan tiers with your CDN.
]]>During my career I've changed jobs 14 times across 12 companies. These were strictly full-time positions. I'm not counting the various contract work I've done over the last 20 years.
My experience has forced me to become comfortable discussing compensation. But most people, especially developers, are not. In fact, as developers, we're likely to accept a position offering the ability to work with new tech or the latest hardware rather than higher compensation. I know I have.
At some point, however, you're going to want to increase your compensation. You'll be faced with the decision to seek a raise or change jobs.
Before addressing this specific scenario, I'd like to share some general advice on compensation.
Whether this is a downpayment on a side project or a higher starting salary - always get money up front. Getting money later is not only difficult, but a never ending game of catch-up.
At one of my first jobs, I accepted a salary of $45,000. I wanted $50,000. The company gave an annual 3% raise, so I figured I'd make it up. While true, I didn't do the math. At $45,000 it takes 4 years to raise to $50,000. Had my starting salary been $50,000, I would have made $21,000 more during that same time. In addition, my salary would have risen to $56,000.
Worth is a deserved amount. In regards to our compensation, we're likely to give ourselves a higher worth. Indeed, we may be worth it. But compensation is more about value, which is a judged amount. Your salary is an amount based on the value you provide to the company and the value the job provides to you.
At one company, I started a role as a Senior PHP Developer. I transitioned into an opening on the iOS team. In the industry, an iOS Developer is worth more than a Senior PHP Developer. However, my value was less because within the company I was not an experienced iOS developer.
Be as strict as possible with your hours while remaining a team player. If there is a special project or something you want to go above and beyond, do it. Just don't make this the norm. Otherwise, you've willingly lowered your compensation. One of my favorite uncon talks on the matter is Go the fuck home!. Take the 5 minutes to watch it.
In addition to your hours, also stick to the schedule for reviews. If a company says "let's talk again in 6 months", have the talk after 6 months. Do not wait.
I was on a team tasked with a large upgrade under a tight deadline. To meet the deadline, several of us were working more than 60 hour weeks. We all worked hard and got it done. But during that time I worked 50% more, effectively decreasing my compensation 34%.
While the circumstances varied, the specific question I was asked came down to:
Should I seek a raise or change jobs?
Ultimately you have to make this decision. But the following points may help guide you.
Depending on your circumstances, you may be past a point where a raise would help. Play through some scenarios. What happens if the raise is 3%? 5%? 10%? What if the raise isn't immediate? Also think through the psychology. Does a raise get you back to feeling good about the job? Or does a raise just make up for past circumstances?
It's easier to get a job when you have a job. There are, of course, exceptions. For most though, it's easier to make a lateral or even upward move in compensation when changing from a current job to a new job. Without a current job, there's a greater risk to take a decreased compensation.
If you're at a point where you want to leave your current job be sure to have your finances in order. You'll want enough savings to allow yourself extra time to find another job.
An ideal time to think about what you want in a job is when you're changing a job. Doing so will not only help you assess potential jobs, but how to value them. A few years ago I wrote Why I leave a job. It may help get you started.
]]>git bisect
, I didn't provide a demo.
Demoing git bisect
is challenging. The command has several subcommands and requires context about the code. As such, a contrived example doesn't do git bisect
justice.
Now, I've admittedly only used git bisect
five or six times in my Git career. But just the other day I used it to find a bug deep in my application. I want to share this scenario as a real world example of using git bisect
.
First, a little context. As I'm sure you have noticed, I recently released a video series on Git called Getting Git. I use Stripe Checkout to handle payments. This keeps things pretty simple, just requiring me to drop a piece of JavaScript on the page. Stripe injects the necessary front-end code to create a pay button that pops up a checkout form.
The other day a someone went to checkout and when they clicked the pay button nothing happened. Fortunately they reported this, so I started investigating. I confirmed the bug in a few different browsers. I reached out to Stripe support. There were no known issues on their side. So I dropped their checkout code onto a fresh page and it worked fine.
The bug was clearly in my code. But where? Looking at the commit log, there wasn't anything related to the checkout code in a while. In fact, using git blame
showed that the checkout code hadn't changed in over a month. I knew this bug hadn't existed for that long.
While I could've continued this detective work myself and eventually found the bug, I could instead use git bisect
.
Basically, you provide git bisect
a commit where the bug exists (the bad commit) and a commit where it does not (the good commit). git bisect
then systematically moves through this commit range to find the commit where the bug was introduced. Along the way it pauses to allow you to test for the bug. If the bug exists, you enter report the commit as bad. If it does not, you report it as good.
I took a few screenshots when I used git bisect
to find my checkout bug. I'll review these to work through the process of using git bisect
.
First I run git bisect start
to start the bisect process.
I then provide the bad commit by running git bisect bad
. In my case, this was the top commit as the bug currently appeared in my code.
I then provide the good commit by running git bisect good
. In my case, I got this commit from git blame
as I knew the checkout originally worked. Finding the good commit may take a little detective work. However, this doesn't have to be precise. That's what git bisect
is for. Often, I'll jump back several commits at a time until I find a good commit.
Once I provide both commits, git bisect
starts moving through this commit range. It pauses to allow me to test if the bug exists in the current commit. If so, I type git bisect bad
. If not, I type git bisect good
.
After a few iterations, git bisect
outputs the first bad commit. Or the commit where the bug was introduced.
Honestly, the first few times I used git bisect
I didn't believe this was the right commit. But I assure you there's some change in this commit that introduced the bug.
In my case, I added some JavaScript that listened for click events. It was preventing the default behavior and, as such, preventing the checkout form from launching.
git bisect
is not a command you'll use very often. Nonetheless, it's one of the most helpful and impressive Git commands. Next time you have a bug in your code, don't play try to find the need in the haystack of your commit history - use git bisect
.
Want to see git bisect
in action? I demo git bisect
and other Git commands you'll use every day in my video series Getting Git
However, lately I've come across numerous claims stating aliasing core commands is the Right Way to use Git. Unfortunately, even Pro Git aliases core Git commands in their examples. Regardless, this is not the Right Way.
Why?
Two reasons: obfuscation and speed.
While aliases give us freedom, there's no convention for aliasing core commands. So they're all subjective.
While these commands exhibit our personal flare, they've lost their meaning. Sure git up
sounds cool and might impress your coworkers. But they have no idea what it does and it isn't available on their setup.
The primary motivation for aliasing core commands is speed. Oh, the need for speed. Anything to save a few keystrokes. But how many keystrokes are you really saving by aliasing core Git comamnds?
Let's compare some common aliases against command completion.
With the exception of git status
, command completion tied or beat aliases. In addition, command completion also completes references and options. So command completion saves keystrokes across all commands, not just aliases.
In the end, aliases are a useful feature. But stop aliases core Git commands. Instead, use command completion as a clearer and often faster alternative.
Reserve aliases for Git commands you run frequently and require options. For example, here are my current aliases. Two alias long git log
commands and the others compliment Git's command set with additional custom commands.
Want to use Git the "Right Way"? Getting Git contains over 60 videos covering Git commands as well as scenarios you'll encounter using Git every day.
]]>Now let me tell you why…
As the creator of Laravel Shift I get a unique pulse on the Laravel community. Something I noticed is the ratio of Laravel to Lumen Shifts is pretty staggering - about 500 to 1. At first, you may attribute this to selection bias. However, similar ratios can be found on Packagist.
The Laravel Framework currently has around 20M downloads, while the Lumen Framework has around 125k. That's a ratio of 160 to 1. Now these are overall numbers and Laravel has been out longer than Lumen.
Despite all these disclaimers, the download charts draw the same conclusion. The ratio between their scale is still 100 to 1.
Lumen also has a smaller feature set. To be fair, this is by design, as Lumen caters strictly to API development. However, while I personally agree with this direction, I think developers eventually find this restrictive. Once they hit this barrier, they are forced to switch to Laravel.
The shift to stateless APIs in Lumen 5.2 is a perfect example of this. Although this decision was clearly inline with the direction of the Lumen Framework, as a developer you were forced to limit your Lumen application or convert to a Laravel application.
I expect Lumen's feature set will continue to lessen. Relative to other Laravel projects, it's clear that Lumen has taken a backseat. This is evident by the documentation often referring to Laravel and the release cycle falling weeks after Laravel releases. In fact, since version 5, there have been only 10 Lumen releases compared to 132 for Laravel.
Finally, one of the largest proponents for using Lumen is its performance. It still beats most other frameworks (Laravel included). However, Laravel is speeding up. We see from Taylor's recent benchmarks Laravel (without sessions) pushes 600 req/sec. This is still a third of what Lumen touts - around 1900 req/sec.
Nonetheless, I'm sure with additional optimizations one could improve Laravel's performance if 600 req/sec was preventing them from converting from Lumen. In addition, I wouldn't be surprised to see a few configuration options added to Laravel to facilitate Lumen-like performance boosts.
For these reasons I say Lumen is dead. But I believe Lumen will live on - just not as a separate framework. Instead, I expect Lumen will be rolled back into a future version of Laravel.
Need to convert Lumen to Laravel? The Lumen to Laravel Shift is now available to help you convert your Lumen projects to their Laravel equivalents.
]]>isolated unit testing is incompatible with TDD
Write a unit test that tests in isolation from its collaborators and passes for all three implementations.
As a member of an extreme programming team, I have practiced TDD every day for the past 2 years. As such, I'm compelled to accept the challenge. However, I'm going to focus first on the claim.
The premise of Adam's claim is centered around the refactor phase of TDD. Yet, there are other phases of TDD which can make the challenge easier.
TDD is about driving your implementation through tests. So, if we're talking about TDD, it doesn't make sense to go from implementations to your test.
Nonetheless, I want to accept the spirit of the challenge. So, let's follow the full TDD process and see where we end up.
While refactor is the final phase in the TDD process, there are two others.
However, a core tenant of the TDD process is that we only write enough code to make the test pass. This promotes doing the simplest thing possible.
In this case, I would go through several red/green cycles testing:
Redirector
Redirector
CommandBus
CommandBus
is calledCommandBus
is called with Command
built with Request
dataThe resulting implementation might look something like:
1<?php 2 3class ProductsController extends Controller 4{ 5 private $commandBus; 6 private $redirector; 7 8 public function __construct(CommandBus $commandBus, Redirector $redirector) 9 {10 $this->commandBus = $commandBus;11 $this->redirector = $redirector;12 }13 14 public function store(Request $request)15 {16 $command = new AddProductCommand(17 $request->user()->id(),18 $request->name,19 $request->description,20 $request->price21 );22 23 $this->commandBus->dispatch($command);24 25 return $this->redirector->to('/products');26 }27}
The background for this challenge comes from Adam's frustrations regarding testing styles ("Classist" vs "Mockist"). It's important to point out that TDD does not dictate a testing style. The only style, if any, is minimal amount of code to make the test pass.
In this case, since CommandBus
and Redirector
are under contract, mocking likely requires less test code. We could simply mock the interface and reliably stub and verify collaboration.
While we could also mock the Request
object, it's used in several places and primarily represents a data object. As such, mocking would require more test code than testing with a real Request
object. So, we'll just use a real one.
So, we've reached the final TDD phase - refactoring. Let's see how we're doing.
Much of the variance between Adam's implementations was avoided. For example, by following the full TDD process we would not have required an Auth
dependency. Anything we need we can get from the Request
object.
We would also be able to freely refactor our use of the Request
object since we are testing with a real one.
That leaves one bit of variance to support Adam's claim - refactoring the use of the Redirector
.
There are a few options:
Redirector
interface. In this example, Redirector
is part of the Laravel framework. As such, it's not something we own potentially making it harder to test.It seems this last option is what Adam is tired of hearing. And so, I concede that some coupling between the test and implementation does exist. As such, there will be times a refactor requires a change in the corresponding test.
However, the refactor phase should include refactoring the test. If there is a better, simpler, or more consistent way to do something by all means change it.
In the end, I believe Adam's frustration is not with TDD or unit tests, but the specificity of the test code. I too have never liked when a test matches an implementation line for line. But this should indicate an opportunity to improve either the test or implementation.
Stepping back from the code, I think there are two final take aways:
git rebase
.
So, let's talk about git rebase
. Jumping right in, I use git rebase
for two reasons:
Let's take a closer look at both of these.
For some, git rebase
falls on the magic end of the spectrum for Git commands. Yet, if we break down the actions taken by git rebase
we can understand the magic.
While a tree is the goto analogy when visualizing Git commands, I find video editing also helps describe git rebase
.
In the case of bringing a stale branch up to date, let's consider the following tree progression.
Starting with the full tree, we have a stale branch (in red) off a master branch. If we zoom in, we see the branch is stale because it's missing the recent commits from master (in blue).
When we run git rebase
, it first will rewind both branches back to the first point when their commit history matches (in gray). From this point, git rebase
will fast-forward through the commits on the master branch and apply them to the stale branch. Finally, git rebase
replays the commits from the stale branch.
The resulting tree is as if you just created a new branch off master and made your commits. In doing so, git rebase
facilitates a clean merge.
I also like to use git rebase
to change a set of commits. Often these are quick commits I made on a feature branch I want to clean up before merging. Either by condensing commits or improving their commit messages.
To do so, I'll run git rebase -i
. The -i
stands for interactive, because git rebase
allows you to edit the commit list.
The output looks similar to the output from git log --oneline
. However, each commit is prefixed with a command. The comments contain a legend for each of the commands.
I'll commonly use r
to reword a quick commit and f
to fixup a commit into the previous commit without changing the message. Although many people talk about squashing a commit, I use fixup far more often than squash as the latter requires an extra step of editing the commit messages.
Upon saving, git rebase -i
will replay these commits using the commands you specified.
If you're making small, cohesive commits (as outlined in When to make a Git commit) any conflicts should be easy to resolve.
Finally, it's important to note that git rebase
will change the SHA of any replayed commits. So if you shared your commits with others or merged them into another branch, Git will no longer see these commits as being the same.
Want to Master more Git commands? This post was adapted from my video series Getting Git. It contains over 50 videos covering Git commands as well as scenarios you'll encounter using Git every day. The Master: git rebase is available on Vimeo.
]]>Now I'm not going to talk about writing commit messages. Here's the post on that. I want to talk about the equally important topic of when to make commits.
I get asked this a lot at conferences. Enough to where I made two rules I've continually put to the test.
I make a commit when:
Anytime I satisfy one of these rules, I commit that set of changes. To be clear, I commit only that set of changes. For example, if I had changes I may want to undo and changes that completed a unit of work, I'd make two commits - one containing the changes I may want to undo and one containing the changes that complete the work.
I think the second rule is pretty straightforward. So let's tackle it first. Over the course of time, you'll make some changes you know will be undone. Be it a promotional feature, patch, or other temporary change someday soon you'll want to undo that work.
If that's the case, I'll make these changes in their own commit. This way it's easy to find the changes and use git revert
. This practice has proven itself time and again, I'll even commit changes I'm simply uncertain about in their own commit.
So back to the first rule.
I think generally most of us follow this rule. However, you don't have to scroll through too many repositories on GitHub to see that we're pretty bad with commits.
The discrepancies come from how we define a unit of work.
Let's start with how not to define a unit of work.
A unit of work is absolutely not based on time. Making commits every X number of minutes, hours, or days is ridiculous and would never result in a version history that provides any value outside of a chronicling system.
Yes, WIP commits are fine. But if they appear in the history of your master branch I'm coming for you!
A unit of work is not based on the type of change. Making commits for new files separate from modified files rarely makes sense. Neither does any other type abstraction: code (e.g. JavaScript vs HTML), layer (e.g. Client vs API), or location (e.g. file system).
So if a unit of work is not based on time or type, then what?
I think it's based by feature. A feature provides more context. Therein making it a far better measurement for a unit of work. Often, implicit in this context are things like time and type, as well as the nature of the change. Said another way, by basing a unit of work by feature will guide you to make commits that tell a story.
So, why not just make the first rule: I make a commit when I complete a feature?
Well, I think this a case where the journey matters. A feature can mean different things, even within the context of the same repository. A feature can also vary in size. With unit of work, you keep the flexibility to control the size of the unit. You just need to know how to measure. I've found by feature gives you the best commit.
]]>die
command.
But why? What's wrong with GUIs?
I didn't randomly label GUIs as evil wizards. This term comes from one of the first and still top programming books I've ever read – The Pragmatic Programmer.
The Pragmatic Programmer is filled with stories to highlight everyday scenarios you'll encounter as a programmer. Most of the stories end with a Tip. The book contains over 100 tips.
In this case, I'll reference Tip 50:
Don't use wizard code you don't understand
This tip results from Section 35: Evil Wizards and can be applied to the command line versus GUI debate. Since a GUI is generating Git commands on our behalf it classifies as a wizard.
So the question becomes, what's wrong with using a wizard?
I've adapted the following passage from the section:
unless you actually understand the commands that have been produced on your behalf, you're fooling yourself. You're programming by coincidence... If the commands they produce aren't quite right, or if circumstances change and you need to adapt the commands, you're on your own.
I think this hits the main point. You have to actually understand Git. As programmers, it's a tool we use every day. One that has a very small set of commands - around 15, less than half of which you'll use frequently.
In the end, the problem isn't with the GUI, it's with a lack of understanding. I'll use a GUI for visual diffs or as a merge tool. But, I'm also comfortable viewing diffs and resolving merge conflicts from the command line.
If you're using a GUI for Git, I encourage you to challenge yourself. As you're using it, try to identify the underlying commands used to generate the current screen. If you can't, you're using an evil wizard.
Want to be more comfortable using Git from the command line? Getting Git contains over 40 videos covering Git commands from the command line as well as scenarios you'll encounter using Git every day.
]]>I'm doing so for a few reasons and thought sharing them might help others make similar decisions on their own products.
First, it's good not to have all your eggs in one basket. As much as Laravel is wildly popular, history of PHP frameworks tells us one day Laravel will no longer be the popular framework. While I hope that's years from now and maybe Shift could facilitate any transition, it's nonetheless a reason to put some effort into other products.
Second, it's good to take a step back from products. While Shift may have needed coddling early on, I don't want to continually breathe life into the product. So it's nice to see Shift has been running smoothly on its own these past few weeks. This has also given me some perspective and allowed me to realign my vision of Shift. For example, putting effort into the Shift Developer Platform instead of doing everything myself.
Finally, in 2016 I gave my "Getting Git" workshop at several conferences. Each time to a large audience with great feedback. At first, I believed conferences were just a microcosm. However, the most common support requests I receive for Shift were Git related. So while Meetups and conferences were a target rich audience, seeing the need in Shift's audience has validated a customer need pivot.
So, I decided to turn "Getting Git" into a comprehensive video series on Git. In my standard MVP fashion, it is now available in early access. I plan to release the remaining videos by the end of January and periodically add new videos to a sub-series I'm calling "Everyday Git".
Time will tell if this proves to be the right choice. However, even if not, the MVP approach and value add for Shift users alone would prevent it from being a total loss.
]]>Next, I wanted to see how easily another developer -- unfamiliar with the platform -- could build a Shift. So I did a pilot with Bobby Bouwmann and Freek Van der Herten to develop the Lumen and Laravel Package Shifts.
Now I'm ready -- and excited -- to announce the Shift Developer Platform.
I will always build the core Laravel Shifts. But it's clear from feedback there are more Shifts to build than I have time for. So, I'd prefer to focus on the core and allow developers to build Shifts.
Anything that would convert, transform, or upgrade the codebase of a Laravel project. This includes Laravel, Laravel Packages, and Lumen as well as components of the Laravel framework, such as Vue.js.
Examples range from micro-Shifts that convert Filters to Middleware or routes to the new fluent syntax to larger Shifts that upgrade code related to a Laravel Package or lint the codebase for best practices.
The Shift Developer Platform will support both paid and free Shifts. Inline with other app development platforms, revenue from Shifts will be split 70/30. 70% for the developer, 30% for Shift to cover payment processing fees, server costs, and support.
The beta for the Shift Developer Platform will launch in February. You can enroll to become a Shift Developer so you have early access to the platform as it's available.
]]>What I've found from speaking and pairing is that most of us aren't as comfortable with Git as we might like to be. It's sharing insight into the Git command options and workflows that developers really seem to enjoy.
So here are three Git commands I use every day. Yes, I'm going to skip git status
. No, they aren't Git commands you've never heard.
So you've been hacking away all day on some changes, then you add all of them with git add .
or git add -A
.
Oh, the irony.
Leaving aside the heavy handed nature of these commands, you spent all that time crafting changes just to throw them in the Git repository. It's like preparing a nice meal, then shoving it all in your mouth at once.
When I complete my changes, I prefer running git add -p
. The -p
stands for patch. Running this command allows you to interactively review each of your changes. In doing so you can decide if you want to add the change or not.
While more time consuming than git add .
, it's well worth it. More often than not I find some changes I probably don't want to commit -- a comment or debug statement. git add -p
provides a final review to ensure my changes are ready to be committed.
When working on something, I usually only make one or two commits total. However, given the 10x ratio of reading code versus writing code these commits might happen over a long period of time. In between that time I like to make small, incremental commits -- even if it's just a WIP commit.
For these commits, I like to use git commit --amend --no-edit
. Yes, I know I can use git rebase
instead. But most of the time work is done sequential. So I don't need to need all that, I can simply append my changes to the previous comment.
This also allows me to keep a clean state, which makes it easier to run other Git commands as well as keep track of my changes over time. It also provides the freedom to spike on some changes that I may not end up using without relying on ⌘-z.
I'll admit, this starts to get into what I consider a commit (which I'll wrote about in my next post).
I know a few of you just freaked out. Some people find git reset
scary, especially when run with the --hard
option. However I find it complements the other two commands. For example, if there were changes I didn't add with git add -p
or changes from a spike I didn't want to commit I can easily discard them with git reset --hard
.
Now, that's not to say you should be cavalier with git reset --hard
. There are still some scary stories. Simply being mindful will mitigate this fear. In reality, you should never be afraid to run a Git command when armed with git reflog
and git fsck
.
In the end, I think these 3 Git commands say more to my everyday workflow. Maybe you see how they fit into your own. I explain these and over 20 other Git commands in my upcoming video series Getting Git. Which is now available in early access. And check out my next post on when I make commits.
]]>Over the last 5 years I've helped companies migrate from SVN to Git, trained teams on using Git, and spoken at conferences about Git. The one thing I see each time is developers feel empowered once they learn Git.
The issue is that at first I didn't really learn Git. I just memorized a handful of commands, like git add
and git commit
. Or, worse yet, I used an evil wizard to manage Git for me.
This meant whenever there was a problem I got stuck. I resorted to silly things like making backup files and recloning the repository to put Humpty Dumpty back together again. When all else failed, I would ask my coworker Richard (the resident Git master) to fix it for me.
The problem is not everyone has a Richard (no pun). Or maybe you are the Richard of your team (again, no pun) and want to remain the Git master.
Either way, I decided to turn my talks and training materials into a video series I'm calling "Getting Git". Currently I have outlined over 40 videos, which I will continue to add to even after the initial release.
The format is simple - No evil wizards. We will learn Git from the command line. Each command will be covered in two videos: the basic usage followed by more advanced usages.
My goal is to release the introductory videos in the next few weeks, with an early access by end of year.
]]>However, attendees wanted to see more code. So for this iteration of my talk, I spent more time discussing how the code evolves while practicing YAGNI.
You can read Practicing YAGNI in Code on the Humana DEC blog. If you are new to YAGNI, I recommend reading my initial article Practicing YAGNI first.
]]>PHP Update: Mac OS X Sierra comes pre-installed with PHP version 5.6, however the latest version of PHP is 7.1. After you complete this post, you should upgrade PHP on Mac OS X.
When Mac OS X upgrades it overwrites previous configuration files. However, before doing so it will make backups. The backup files often have a suffix of previous
or pre-update
. Most of the time, configuring your system after updating Mac OS X is simply a matter of comparing the new and old configurations.
This post will look at the differences in Apache, PHP, and MySQL between Mac OS X El Capitan and Mac OS X Sierra.
Mac OS X El Capitan and Mac OS X Sierra both come with Apache pre-installed. As noted above, your Apache configuration file is overwritten me when you upgrade to Mac OS X Sierra.
There were a few differences in the configuration files. However, since both El Capitan and Sierra run Apache 2.4, you can simply backup the configuration file from Sierra and overwrite it with your El Capitan version.
sudo cp /etc/apache/httpd.conf /etc/apache/httpd.conf.sierrasudo mv /etc/apache/httpd.conf.pre-update /etc/apache/httpd.conf
However, I encourage you to stay up-to-date. As such, you should take the time to update Sierra's Apache configuration. First, create a backup and compare the two configuration files for differences.
sudo cp /etc/apache/httpd.conf /etc/apache/httpd.conf.sierradiff /etc/apache/httpd.conf.pre-update /etc/apache/httpd.conf
Now edit the Apache configuration. Feel free to use TextEdit if you are not familiar with vi.
sudo vi /etc/apache/httpd.conf
Uncomment the following line (remove #
):
LoadModule php5_module libexec/apache2/libphp5.so
In addition, uncomment or add any lines you noticed from the diff
above that may be needed. For example, I uncommented the following lines:
LoadModule deflate_module libexec/apache2/mod_deflate.soLoadModule expires_module libexec/apache2/mod_expires.soLoadModule rewrite_module libexec/apache2/mod_rewrite.so
Finally, I cleaned up some of the backups that were created during the Mac OS X Sierra upgrade. This will help avoid confusion in the future.
sudo rm /etc/apache/httpd.conf.pre-updatesudo rm /etc/apache/extra/*~previoussudo rm -rf /etc/apache/original/
Note: These files were not changed between versions. However, if you changed them, you should compare the files before running the commands.
Restart Apache:
apachectl restart
Mac OS X El Capitan came with PHP version 5.5 pre-installed. This PHP version has reached its end of life. Mac OS X Sierra comes with PHP 5.6 pre-installed. If you added any extensions to PHP you will need to recompile them.
Also, if you changed the core PHP INI file it will have been overwritten when upgrading to Mac OS X Sierra. You can compare the two files by running the following command:
diff /etc/php.ini.default /etc/php.ini.default.pre-update
Note: Your file may note be named /etc/php.ini.default.pre-update
. You can see which PHP core files exist by running ls /etc/php.ini*
.
I would encourage you not to change the PHP INI file directly. Instead, you should overwrite PHP configurations in a custom PHP INI file. This will prevent Mac OS X upgrades from overwriting your PHP configuration in the future. To determine the right path to add your custom PHP INI, run the following command:
php -i | grep additional
MySQL is not pre-installed with Mac OS X. It is something you downloaded when following the original post. As such, the Mac OS X Sierra upgrade should not have changed your MySQL configuration.
You're good to go.
]]>PHP Update: Mac OS X Sierra comes pre-installed with PHP version 5.6, however the latest version of PHP is 7.1. After you complete this post, you should upgrade PHP on Mac OS X.
Note: This post is for new installations. If you have installed Apache, PHP, and MySQL for Mac OS El Capitan, read my post on Updating Apache, PHP, and MySQL for Mac OS X Sierra.
Mac OS X runs atop UNIX. So most UNIX software installs easily on Mac OS X. Furthermore, Apache and PHP come packaged with Mac OS X. To create a local web server, all you need to do is configure Apache and install MySQL.
I am aware of the web server software available for Mac OS X, notably MAMP. These get you started quickly. But they forego the learning experience and, as most developers report, can become difficult to manage.
First, open the Terminal app and switch to the root
user so you can run the commands in this post without any permission issues:
1sudo su -
1apachectl start
Verify It works! by accessing http://localhost
First, make a backup of the default Apache configuration. This is good practice and serves as a comparison against future versions of Mac OS X.
1cd /etc/apache2/2cp httpd.conf httpd.conf.sierra
Now edit the Apache configuration. Feel free to use TextEdit if you are not familiar with vi.
1vi httpd.conf
Uncomment the following line (remove #
):
1LoadModule php5_module libexec/apache2/libphp5.so
Restart Apache:
1apachectl restart
You can verify PHP is enabled by creating a phpinfo()
page in your DocumentRoot
.
The default DocumentRoot
for Mac OS X Sierra is /Library/WebServer/Documents
. You can verify this from your Apache configuration.
1grep DocumentRoot httpd.conf
Now create the phpinfo()
page in your DocumentRoot
:
1echo '<?php phpinfo();' > /Library/WebServer/Documents/phpinfo.php
Verify PHP by accessing http://localhost/phpinfo.php
Download and install the latest MySQL generally available release DMG for Mac OS X.
The README suggests creating aliases for mysql
and mysqladmin
. However there are other commands that are helpful such as mysqldump
. Instead, you can update your path to include /usr/local/mysql/bin
.
1export PATH=/usr/local/mysql/bin:$PATH
Note: You will need to open a new Terminal window or run the command above for your path to update.
Finally, you should run mysql_secure_installation
. While this isn't necessary, it's good practice to secure your database.
You need to ensure PHP and MySQL can communicate with one another. There are several options to do so. I do the following:
1cd /var2mkdir mysql3cd mysql4ln -s /tmp/mysql.sock mysql.sock
The default configuration for Apache 2.4 on Mac OS X seemed pretty lean. For example, common modules like mod_rewrite
were disabled. You may consider enabling this now to avoid forgetting they are disabled in the future.
I edited my Apache Configuration:
1vi /etc/apache2/httpd.conf
I uncommented the following lines (remove #
):
1LoadModule deflate_module libexec/apache2/mod_deflate.so2LoadModule expires_module libexec/apache2/mod_expires.so3LoadModule rewrite_module libexec/apache2/mod_rewrite.so
If you develop multiple projects and would like each to have a unique url, you can configure Apache VirtualHosts for Mac OS X.
If you would like to install PHPMyAdmin, return to my original post on installing Apache, PHP, and MySQL on Mac OS X.
]]>Recommend switching to Docker
If you are running macOS Mojave or higher, the recommended solutions in this tutorial may no longer work. For those reasons, I recommend following my latest tutorial on installing Apache, MySQL, and PHP on macOS using Docker.
As noted in my posts on installing Apache, PHP and MySQL on Mac OS X, Mac OS X comes pre-installed with Apache and PHP. Unfortunately, the pre-installed version of PHP with macOS is outdated:
Many of these PHP versions are already end of life. In fact, macOS Mojave was the first time the pre-installed version was recent - although still not the latest PHP version.
So what do you do if you want to upgrade or install a different PHP version on your Mac? Well, you could use Homebrew. But I found a pre-packaged alternative - PHP OSX.
PHP OSX is a package installer for PHP versions 5.3 to 7.3 (current). It's available for Mac OS 10.6+ (Snow Leopard to Mojave). While installing PHP OSX is just a few steps, I'll walk you through each of them.
First, choose the version of PHP you want to install. In this example, I'll install PHP 7.2 as that is the latest stable version of PHP. However, if you want to install PHP 7.1 that is available as well.
curl -s http://php-osx.liip.ch/install.sh | bash -s 7.2
If you're not comfortable executing scripts from the Internet, you can do the install by hand.
Provided you are using the pre-installed version of Apache, PHP OSX will add the /etc/apache2/other/+php-osx.conf
configuration file which will automatically be loaded by Apache.
If you had previously enabled PHP (as I did), you'll need to comment out the following line in /etc/apache2/httpd.conf
:
1LoadModule php7_module /usr/local/php5/libphp7.so
If you are running an older version of Mac OS X, the line may be:
1LoadModule php5_module /usr/local/php5/libphp5.so
PATH
Although Apache will now run the new version of PHP, the command line will not. In order for the command line to use the new version of PHP you will need to update your PATH
.
export PATH=/usr/local/php5/bin:$PATH
If you don't want to run the command above every time you open a new terminal, you can update the PATH
in your .bash_profile
.
vi ~/.bash_profile
Finally, you will want to update some of the PHP configuration values. PHP OSX installs a PHP INI file for you to change. To edit this file, run:
sudo vi /usr/local/php5/php.d/99-liip-developer.ini
If you kept all of your local PHP configuration within a single INI file (as I did), you can simply append it to the PHP OSX file with:
sudo cat /Library/Server/Web/Config/php/local.ini >> /usr/local/php5/php.d/99-liip-developer.ini
That's it!
Now you'll just need to review your PHP code to ensure it's compatible with your newly installed PHP version. And for that, I recommend PHP Shift.
]]>In this post, I want to focus more on reaching the milestone of 1,000 Laravel applications upgraded. This may not sound like many, however for my first SaaS product it marks the achievement of my stretch goal. So allow me to share the most important decision, biggest challenge, and what the future holds for Laravel Shift.
Like many developers I have dozens of personal projects. Some I work on, some I don't, most I never complete. That's normally okay because if nothing else they are learning opportunity.
To that point, that's something my personal projects have taught me - you have to distinguish between a project and a product. This can be tough because we're passionate about our ideas. As such we're willing to spend countless hours trying to bring them to life. It's easy to think, "Who cares? It's just my time." But when treated as a product, we start to value our time. Because as a creator your time is the most valuable.
I took this even further by treating Shift not only as a product, but a minimum viable product (MVP). Initially Shift only supported upgrading to the latest version of Laravel (upgrading from 5.0 to 5.1). I remember during this initial release, Jeffrey Way tried it out on Laracasts and reported Shift as a "cool tool", but "somewhat buggy".
Such feedback coming from a big name in the Laravel community could be crushing. But not for Shift. Because I knew I built an MVP. Its features were deliberately limited until I proved the product. Proof came in preset milestones of 100, 250, 500, and 1,000 Shifts. Each time Shift reached a milestone, I would spend more time either fixing bugs, adding minor features, or releasing new Shifts.
I feel the decision to adopt an incremental, measured approach has been the most important, and provided the foundation to continue to grow Shift.
As with any product, marketing can be a challenge. Being a programmer, I carry with me the stigma of social awkwardness. The last thing I'm comfortable doing is peddling my product to the public. Fortunately, Shift has granted me personal recognition within the Laravel community. This has allowed me to appear on podcasts and speak at Laracon. So I am thankful to be given these opportunities to mention Shift.
Shift also has a marketing sub-challenge. Many say Shift "should cost more". This has been my biggest challenge. On one hand, charging more would increase revenue. On the other hand, increasing price could slow growth. I'm not sure what's best. So, I do what I'm comfortable with.
I have risen prices slightly, particularly for shifting older versions of Laravel. Which really I consider an incentive to stay up-to-date. I also accept donations. Although there have been a few, I realize getting more money after-the-fact is a low probability. Nonetheless, it's available for those wanting to show their appreciation or who use Shift commercially.
I expect pricing will always be a challenge. For now, I'd rather users say Shift "should cost more" than say Shift "costs too much".
So now that Shift has achieved its initial milestones, what's next?
Generally, the next milestones will be 2,500, 5,000, and 10,000 Laravel applications upgraded.
More specifically, a redesign for laravelshift.com is already underway. It will include a dashboard for managing your Shifts as well as streamlining the purchase process.
In addition, I'm formally announcing a set of human services from Laravel Shift. While these have always been available, they were briefly mentioned on the FAQ page and only offered by request. Now you can purchase them just as you would a Shift.
Finally, I'll begin development on the most requested feature - support for upgrading Laravel Packages. My plan is to release these with the redesign (or shortly after). Support for Lumen has been requested, but my MVP approach forces me to prioritize Laravel Packages first.
So, until the next milestone, keep shifting!
]]>I feel it's easier to explain with code samples. Consider the following function which filters items in an array using a callback.
1function array_filter(array, callback) { 2 var i; 3 var length = array.length; 4 var filtered = []; 5 6 for (i = 0; i < length; ++i) { 7 if (callback(array[i])) { 8 filtered.push(array[i]); 9 }10 }11 12 return filtered;13}
This code has a simple, traditional style. It groups similar statements together into blocks of code separated by whitespace. Each group tells a story - initialize, execute, respond.
However, this story is a bit robotic. Fine for the computer, but humans need to read this story too. Let's look at the same code after applying the Proximity Rule.
1function array_filter(array, callback) { 2 var i; 3 var filtered = []; 4 5 var length = array.length; 6 for (i = 0; i < length; ++i) { 7 if (callback(array[i])) { 8 filtered.push(array[i]); 9 }10 }11 12 return filtered;13}
By moving the length
assignment closer to the for
loop I emphasize their relationship. So the Proximity Rule is not just about grouping similar statements of code. Its also about grouping related code.
Let's look at another example. Consider the following tests for our array_filter
function.
1describe("array_filter", function() { 2 var actual; 3 var odd_callback; 4 var even_callback; 5 6 beforeEach(function() { 7 odd_callback = jasmine.createSpy('odd'); 8 odd_callback.and.returnValues(true, false, true, false, true); 9 10 even_callback = jasmine.createSpy('even');11 even_callback.and.returnValues(false, true, false, true, false);12 });13 14 describe("when filtering odd numbers", function() {15 beforeEach(function() {16 actual = array_filter([1, 2, 3, 4, 5], odd_callback);17 });18 19 it("should return only odd numbers", function() {20 expect(actual).toEqual([1, 3, 5]);21 });22 });23 24 describe("when filtering even numbers", function() {25 beforeEach(function() {26 actual = array_filter([1, 2, 3, 4, 5], even_callback);27 });28 29 it("should return only even numbers", function() {30 expect(actual).toEqual([2, 4]);31 });32 });33});
We again see code grouped by statement. If we focus on the context when filtering even numbers, we might ask ourselves, "What is even_callback
?"
If we apply the Proximity Rule, we can improve the readability and eliminate this question.
1describe("array_filter", function() { 2 var actual; 3 4 describe("when filtering odd numbers", function() { 5 beforeEach(function() { 6 var callback = jasmine.createSpy('odd'); 7 callback.and.returnValues(true, false, true, false, true); 8 actual = array_filter([1, 2, 3, 4, 5], callback); 9 });10 11 it("should return only odd numbers", function() {12 expect(actual).toEqual([1, 3, 5]);13 });14 });15 16 describe("when filtering even numbers", function() {17 beforeEach(function() {18 var callback = jasmine.createSpy('even');19 callback.and.returnValues(false, true, false, true, false);20 actual = array_filter([1, 2, 3, 4, 5], callback);21 });22 23 it("should return only even numbers", function() {24 expect(actual).toEqual([2, 4]);25 });26 });27});
This example also demonstrates how the Proximity Rule can help condense code. Especially when Code Smells, such as Lazy Class, are in the air.
For me, the Proximity Rule is simply a coding style. One I doubt is new. I am sure Knuth or Beck or one of the other Programming Godfathers have written about this in some capacity. If so, please let me know. One of my recent goals is to call things by their proper name. To be fair, I did attempt to ask on Twitter.
]]>To that point, many people have asked me to share my slides. As the slides were mostly placeholders for discussion, I felt a blog post would better summarize the talk. However, if you must see those slides, you can watch my talk, and other Laracon talks, on StreamACon.
I consider myself a searcher. On a quest to find the Holy Grail of programming practices - that single practice which instantly levels up my skills. While I know this doesn't exist, I do believe in a set of practices. Recently, I found one to be YAGNI.
YAGNI is a principle of eXtreme Programming - something I practice daily at work. YAGNI is an acronym for You Aren't Gonna Need It. It states a programmer should not add functionality until deemed necessary. In theory, this seems straightforward, but few programmers practice it.
Before we continue talking about YAGNI, we need to understand the problem it solves. The problem is over engineering. At some point, we started priding ourselves on complexity - obsessed with playing design pattern bingo and building ever more intricate architectures in our head.
XKCD illustrates over engineering well with "The General Problem".
This is funny because it's true. But it begs the question - why can't we just pass the salt?
What ever happened to KISS? What's wrong with an MVP? The answer is nothing. We need to find our way back to simple. YAGNI can help us get there.
I think Ron Jeffries, one of the co-founders of eXtreme Programming, summarizes practicing YAGNI well:
Implement things when you actually need them, never when you just foresee that you need them.
Nonetheless, the most common contention is timing. We continually write code sooner than we actually need them. This is the over-engineer in us. We confuse foreseeing with needing.
To help distinguish between the two, we can create a time horizon. Kent Beck describes this well during an interview on Full Stack Radio:
…I did a little experiment… what if I deliberately stopped trying to predict the future and limit my design horizon to six months… things went better for me… I was less over engineering. I was making progress sooner. I was less anxious… Things were cleaner, easier to understand… So what about three months? One month? I never reached a limit with that experiment…
In this way, practicing YAGNI becomes a time experiment. One where we keep decreasing our time horizon to help limit the code we write. Ideally until we reach a point where we don't write code until it's actually needed. Not just because we're thinking about it, or want to, or it relates to code we're working on. We wait until the current code requires us to implement new code in order to work.
At first, I'll admit, this will feel like laziness. It's going to seem like you're intentionally avoiding writing code. In a way, this is true. The catch is, the code you're wanting to write isn't ready to be written. By waiting, you prevent all the bad things that happen when you make assumptions.
Once you realize the benefits of YAGNI, you're going to try to apply it to everything (another programmer curse). You need to remember with great power, comes great responsibility. YAGNI isn't about saying no. YAGNI is about deferring unnecessary complexity.
As such, there will be times when you should not call YAGNI. Unfortunately, this takes experience. So I will outline a few scenarios to help those getting started.
Practicing YAGNI gives me confidence. I am comfortable delaying design decisions because I will be better informed in the future. I trust my ability to pivot quickly because my code is simple, making it easy to refactor and evolve. I write less code, and let's be honest, the best code is no code.
]]>About a year ago, I started mentoring at Code Louisville. They offer 12-week programs for anyone interested in learning to program. I've found as a teacher you can learn just as much as the student.
Around the same time, I also took a job on an extreme programming team. Since then I have pair programmed with another developer every workday from 8 to 5. This one to one, peer to peer interaction has made me realize I'm missing an entire audience.
So, while I plan to continue speaking and mentoring, starting today I will offer personal coaching.
The format is simple: one-hour sessions available in sets of 1 (for $99), 3 (for $279), or 10 (for $899).
Coaching focuses are:
So whether you want to learning a new language, level up, or just get another developer's opinion, schedule your coaching sessions now.
If you have additional questions, you are welcome to email me.
]]>You're just starting out. The world of 1
and 0
is new and harsh. Everything is a challenge. You're thirst for the motherboards milk keeps you going. But if you don't get the nourishment you need, you won't survive.
You've learned enough to tie your own for
loops. Now you're able to go out and play. You discover new things. You tinker. You want to do everything yourself - who needs that third party library anyway. You're still young and as such make silly mistakes. Sometimes you'll try to hide them as you know there's more to learn.
You're coming into your own. You've learned enough to think you're invincible. You think you can do things in 5 minutes. You obsess over the minutia and constantly look at your code in the mirror. You think your way is cool and anything else is not. Let's face it, you're a programming punk.
At some point you grow up enough to realize a few things.
In the end, a well-developed programmer possess traits from all stages. They maintain their hunger and passion from early years balanced by knowledge gained in later years.
]]>This past week I presented All Aboard for Laravel 5.1 at the 2015 PHP[world] conference. This talk focused on the new features in Laravel 5.0 and steps to upgrade from Laravel 4.2.
In researching this talk, I only found one resource, aside from the official Upgrade Guide, detailing the upgrade process. I was surprised to not find a Laravel upgrade tool. The changes from Laravel 4.2 to Laravel 5.0 were significant, yet straightforward and easily automated.
Fortunately Taylor Otwell, creator of the Laravel framework, was also at PHP[world]. He was not aware of any automated upgrade tool and expressed interest in such a tool.
So during the conference hackathon Shift was born. I wrote an initial Shift to automatically upgrade a Laravel 5.0 application to Laravel 5.1.
I was able to get a few alpha testers from Taylor's initial tweet. However, I am still looking for additional alpha testers. If you have a Laravel 5.0 application and it's available through Git please contact me.
In the meantime, I am going to use Laravel Spark to create a site where developers can log in with their GitHub account and easily submit their Laravel projects for automated upgrade. Shift will automatically upgrade the project and submit a pull request for review.
I hope to have the site live as well as a Shift ready for Laravel 5.2 release in December.
I welcome your feedback to gauge interest and request features. And please, contact me to alpha test the Laravel 5.0 Shift. It's a free upgrade!
]]>PHP Update: Mac OS X El Capitan comes pre-installed with PHP version 5.5 which has reached its end of life. After you complete this post, you should upgrade PHP on Mac OS X.
When Mac OS X upgrades it overwrites previous configuration files. However, before doing so it will make backups. The backup files often have a suffix of previous
or pre-update
. Most of the time, configuring your system after updating Mac OS X is simply a matter of comparing the new and old configurations.
This post will look at the differences in Apache, PHP, and MySQL between Mac OS X Yosemite and Mac OS X El Capitan.
Mac OS X Yosemite and Mac OS X El Capitan both come with Apache 2.4 pre-installed. As noted above, your Apache configuration file is overwritten me when you upgrade to Mac OS X El Capitan.
Comparing the configuration files show no differences other than the changes made in the original post. As such, you can simply overwrite El Capitan's configuration file with the original by running the following command:
sudo mv /etc/apache/httpd.conf.pre-update /etc/apache/httpd.conf
Both Mac OS X Yosemite and Mac OS X El Capitan run PHP 5.5. However, there is a difference between the minor versions. So if you added any extensions to PHP you will need to recompile them.
Also, if you changed the core PHP INI file it will have been overwritten when upgrading to Mac OS X El Capitan. You can compare the two files by running the following command:
diff /etc/php.ini.default /etc/php.ini.default.pre-update
Note: Your file may note be named /etc/php.ini.default.pre-update
. You can see which PHP core files exist by running ls /etc/php.ini*
.
I would encourage you not to change the PHP INI file directly. Instead, you should overwrite PHP configurations in a custom PHP INI file. This will prevent Mac OS X upgrades from overwriting your PHP configuration in the future. To determine the right path to add your custom PHP INI, run the following command:
php -i | grep additional
MySQL is not pre-installed with Mac OS X. It is something you downloaded when following the original post. As such, the upgrade should not have changed your MySQL configuration.
MySQL has had a few minor version updates since my original post. If you wish to upgrade MySQL you may do so by following the instructions in this post
]]>PHP Update: Mac OS X El Capitan comes pre-installed with PHP version 5.5 which has reached its end of life. After you complete this post, you should upgrade PHP on Mac OS X.
Note: This post is for new installations. If you have installed Apache, PHP, and MySQL for Mac OS X Yosemite, read my post on Updating Apache, PHP, and MySQL for Mac OS X El Capitan.
Mac OS X runs atop UNIX. So most UNIX software installs easily on Mac OS X. Furthermore, Apache and PHP come packaged with Mac OS X. To create a local web server, all you need to do is configure Apache and install MySQL.
I am aware of the web server software available for Mac OS X, notably MAMP. These get you started quickly. But they forego the learning experience and, as most developers report, can become difficult to manage.
First, open the Terminal app and switch to the root
user so you can run the commands in this post without any permission issues:
1sudo su -
1apachectl start
Verify It works! by accessing http://localhost
First, make a backup of the default Apache configuration. This is good practice and serves as a comparison against future versions of Mac OS X.
1cd /etc/apache2/2cp httpd.conf httpd.conf.bak
Now edit the Apache configuration. Feel free to use TextEdit if you are not familiar with vi.
1vi httpd.conf
Uncomment the following line (remove #
):
1LoadModule php5_module libexec/apache2/libphp5.so
Restart Apache:
1apachectl restart
You can verify PHP is enabled by creating a phpinfo()
page in your DocumentRoot
.
The default DocumentRoot
for Mac OS X El Capitan is /Library/WebServer/Documents
. You can verify this from your Apache configuration.
1grep DocumentRoot httpd.conf
Now create the phpinfo()
page in your DocumentRoot
:
1echo '<?php phpinfo();' > /Library/WebServer/Documents/phpinfo.php
Verify PHP by accessing http://localhost/phpinfo.php
Download and install the latest MySQL generally available release DMG for Mac OS X.
The README suggests creating aliases for mysql
and mysqladmin
. However there are other commands that are helpful such as mysqldump
. Instead, you can update your path to include /usr/local/mysql/bin
.
1export PATH=/usr/local/mysql/bin:$PATH
Note: You will need to open a new Terminal window or run the command above for your path to update.
Finally, you should run mysql_secure_installation
. While this isn't necessary, it's good practice to secure your database.
You need to ensure PHP and MySQL can communicate with one another. There are several options to do so. I do the following:
1cd /var2mkdir mysql3cd mysql4ln -s /tmp/mysql.sock mysql.sock
The default configuration for Apache 2.4 on Mac OS X seemed pretty lean. For example, common modules like mod_rewrite
were disabled. You may consider enabling this now to avoid forgetting they are disabled in the future.
I edited my Apache Configuration:
1vi /etc/apache2/httpd.conf
I uncommented the following lines (remove #
):
1LoadModule deflate_module libexec/apache2/mod_deflate.so2LoadModule expires_module libexec/apache2/mod_expires.so3LoadModule rewrite_module libexec/apache2/mod_rewrite.so
If you develop multiple projects and would like each to have a unique url, you can configure Apache VirtualHosts for Mac OS X.
If you would like to install PHPMyAdmin, return to my original post on installing Apache, PHP, and MySQL on Mac OS X.
]]>So with respect to the Three Laws of TDD here are my caveats:
Before you punch your screen allow me to elaborate.
In theory, and according to the first law of TDD:
You can't write any code until you have first written a failing test.
In practice, I rarely write tests for content, design, configuration, etc. I write tests for any code that contains logic.
In theory, and according to the second law of TDD:
You can't write more of a test than is sufficient to fail.
In practice, I often write a few failures at a time. However, these are typically within the same test and always at the same level. That is a few unit tests failures or a few integration tests failures. Then I make them pass one by one.
In theory, and according to the third law of TDD:
You can't write more code than is sufficient to pass the currently failing test.
In practice, I follow TDD Law #2 and #3 when working with a new codebase or new technology. Once I am familiar, I write the failing test and code to pass in one cycle. I see no need to repeat the red-green cycle at the minimal pace [1].
In theory, as noted in the third law of TDD, the green phase is about writing minimal code to make the test pass.
In practice, many people refactor during the green phase (or earlier). This is too early. To avoid refactoring during the green phase I call YAGNI on nearly everything. Delay design decisions until the blue phase. By then you'll have a better understanding of the code and tests to guide your refactor.
In theory, all code should be refactored.
In practice, tests are rarely refactored. Tests are code too and should be refactored during the blue phase. Futhermore, when practicing TDD, tests serve as documentation. It is therefore equally, if not more important that you ensure the test code communicates clearly.
[1] While writing this post, I found a post by Uncle Bob in which he discusses the different TDD cycles. Much of the theory above operates on the nano cycle. What I have described in practice combines mostly the minute and later cycles.
]]>m + d = yy
So I wondered, what year would have the most dates that satisfy this equation?
Initially I thought this would be year 13 - since there are 12 months in a year the lowest possible sum is 13. However, this assumes two things.
First, it assumes there is a single maximum year. And after thinking about it more, I realized there can be multiple maximum years.
Second, it assumes there is only one equation per month satisfying a year. While this seems true, I was not the guy who could write equations on my dorm room window.
But I am the guy who can write a quick program to test these assumptions. The following is a script written in PHP which outputs the frequency of dates satisfying this equation per year:
1$date = new DateTime('2001-01-01'); 2$sums = array(); 3 4do { 5 $sum = $date->format('n') + $date->format('j'); 6 ++$sums[$sum]; 7 $date->modify('+1 day'); 8} while($date->format('n/j') != '1/1'); 9 10foreach($sums as $sum => $count) {11 echo $sum . ',' . $count . PHP_EOL;12}
This data forms the graph:
As you can see it forms an even distribution between 13 and 30 (31 for leap years). So these years all tie with a maximum frequency of 12. Furthermore, since the maximum frequency is 12 and there are 12 months in the year the second assumption is true (for this equation).
While this does answer the main question, a few sub questions arose.
If you can answer these questions let me know on Twitter.
]]>Most teams cherry-pick a few methodologies and tools and claim they're agile. Even Kent Beck admits this in his interview on Full Stack Radio. To him, being agile simply means:
...that you can respond in time. Things are going to change. Can you respond in time? If you can, you're agile. If not, you're not.
By his definition this team seemed agile. Not because they hold daily standups or use Pivotal Tracker. Instead it is their practice of extreme programming. I became intrigured when this team made the distinction.
Both Agile and Extreme Programming share their value of lean processes. But two key practices set extreme programming apart: test driven development and pairing. So far, I find the combination revolutionary.
I struggle practicing test driven development (TDD) on my own. I never know if I am correctly driving development through testing. Individually, I might lack discipline, but paired with another developer we can answer such questions and in turn improving our craft.
Pairing with another developer also gamifies TDD. We take turns writing tests. My pair will write a "good, failing" test and then I will make the test pass. For the next test we swap roles.
Sure, plenty of teams practice TDD and pair program. However, this team pairs all day, every day. Not always two developer either. Designer and product owners enter the mix. Having the entire team together, a core principle of extreme programming, sharing this process helps us remain agile.
Now, I have to admit, being a manager before, pairing all day seemed wasteful. After all, we produced the code of one developer for the price of two, right?
No.
First, there's the assumption that the developer pair writes the same amount of code. Although not scientific, I am more productive while pairing. Having another developer sitting right next to me undoubtedly increases my productivity and efficiency.
Second, there's the assumption that a single developer is 100% productive. Regardless if they're a junior or a 10x developer, I think we can all agree no developer is 100% productive. Between meetings, nerd sniping, coffee, and kittens we are unproductive at some point.
So let's do some math. Let's say solo I am 60% productive. However, when paired I am 80% productive. So two developers individually provide 120% productivity, while paired they provide 80% productivity.
While there is a loss of productivity, it was not cut in half. Furthermore, you have to consider the ancillary benfits of pair programming: sharing domain knowledge, improved code quality, leveling up skill sets.
In closing, I think back to the quote:
Software development is a team sport. Even if you're the only one on the team.
Practicing Extreme Programming makes software development a true team sport.
]]>Years ago my college roommate and since long-time friend, Steve, and I hiked the Bright Angel Trail in the Grand Canyon. Now before I tell this story, you need to know one thing about Steve — he isn't much of a planner. Admittedly I'm more of a planner than most. But Steve likes to wing it. So the plan was flawed from the start and we brought what was to follow upon ourselves.
Originally we planned to stay the night in the Grand Canyon. However, upon arriving to the Grand Canyon, we found that you needed a camping permit. Which, of course, we did not have. So a decision was made to turn what would have been a two day hike into a day hike.
Now we started hiking the Bright Angel Trail around 10:00am. Rather late in the day to start a 12 mile, 6,000ft elevation change hike. In fact, about a mile in a park ranger stopped us. He gave us a quick check.
How far you guys heading? To the point. Kind of a late start. You'll be on the point during the hottest part of the day and probably be hiking out in the dark. … You got flashlights? Yes Food? 2 meals each and a couple snacks. Water? Yes. Each have 3-liters. Okay.
I guess we passed his test. We continued hiking down and reached the 3-mile station. There was a station every 1.5 miles along the trail. We had a snack and refilled with water. The trail began to level out and we made good time to Indian Garden (4.5). It was probably around 2:00pm.
Steve decided to rest at Indian Garden. This was the first time he had mentioned being tired. I tried to convince him to hike to the point. The Grand Canyon has two rims — the outer rim and inner rim. It's rare to see all the way down to the Colorado River from the outer rim. Plateau Point is a lookout from the top of inner rim. From there you can look straight down and see the Colorado River.
Now I couldn't hear the person on the other end of the line. So I am filling in the dialogue. But it was pretty obvious they were assessing the gravity of the situation.
Park Services I'm on the Bright Angel Trail and I need asistance. Are you hurt? No What's the problem sir? I'm physically exhausted. I can't hike any farther. Is anyone with you? Yes. My friend Jason. Is he okay? Yes. He's fine. I'm holding him up. Do you have food? Yes. Water? Yes. Medicine? No. Stay where you are, hydrate, and elevate your legs. You don't understand. I'm physically exhausted. I need assistance! Rest and call us back.
They didn't tell Steve anything I didn't know already. Steve could make it out of the Grand Canyon. It would have been painful and slow-going. But he could have. He had resolved to stop. And that was that.
I rested with him for a half hour or so. Surprisingly a few lone hikers were behind us. One a former trail guide. He gave Steve a few eloctrolyte mixes. He said he'd rest with Steve and hike out with him. I hadn't contacted my Dad in a few hours.
]]>I don't disagree.
While I recognize the diplomacy of this statement, it remains cryptic. Regardless of its grammatical or mathematical interpretations, there is something lost in translation.
What does this statement actually convey? Does it mean you agree? Then why not say, "I agree."
Maybe you disagree, but have watered-down the language to avoid disruption. However, in doing so you have withheld critical feedback.
I have reached a point in my career where I am honing my craft. As a software engineer I have found value in the simplicity and clarity of my code. I try to boast the signal and decrease the noise.
Such statements are noisy. Much like my first draft, it detracts from the message. There is nothing harder than communication. We should do what we can to simplify the delivery.
]]>This came up again in a review of the code:
1// filter out contacts that have unsubscribed2$contacts = $unsubscribedFilter->filter($contacts);3 4// filter out duplicate contacts5$contacts = $duplicateFilter->filter($contacts);
The reviewer asked why I "removed the documentation" when I condensed the code to:
1$contacts = $unsubscribedFilter->filter($contacts);2$contacts = $duplicateFilter->filter($contacts);
I'll come back to the difference between comments and documentation. For now, there is a difference and what I removed were indeed comments.
First, let me acknowledge all the team leads and engineering managers crying out:
Remove Comments?!!
Yes, I am suggesting removing comments from your code.
Surely you don't mean removing useful comments?
Well, what's a useful comment?
Let's back up and address the distiction between comments and documentation. Documentation is formatted comment blocks (e.g. DocBlock, JavaDoc, etc). Comments are everything else.
A comment should relay why, not what or how. Said another way, if there is something that can't be relayed by reading the code, then a comment may be needed.
Going back to the code review, there was nothing the comments relayed that the code did not. I can infer from the assignment and method names we are "filtering duplicate contacts". So the code comment above is not useful. In fact, I wasted time reading it.
For me, removing comments is about achieving code that clearly communicates. One could even refactor the code to improve readability. Consider:
$contacts->filterUnsubscribed();
Comments can not only be useful, they can also be misleading. I continually come across outdated comments that have not evolved as the code has changed. I recently needed to fix the following legacy code which was prematurely ending.
1foreach ($items as $item) {2 if ($item->published) {3 // we've hit the most recent item before this push, so stop looping4 exit;5 }6}
The comment says to stop looping, but the code exits. I wasted several minutes debating which to trust. Given the bug, I updated the code to follow the comment and stop looping. Regardless, this bug would have been solved without the comment. Combined with the buggy code, it did more harm than good.
That's really what it's about – doing good. Leaving something better than you found it. That's why it's called Boyscouting. If you come across a comment that you can remove, remove it. If you can't remove it, see if you can refactor the code so you can remove the comment. Future developers will thank you. Even if that future developer is you.
Update: I recently came across the following passage from Rob Pike regarding comments which, quite effectively, summarizes this entire post.
]]>[comments are] a delicate matter, requiring taste and judgment. I tend to err on the side of eliminating comments, for several reasons. First, if the code is clear, and uses good type names and variable names, it should explain itself. Second, comments aren't checked by the compiler, so there is no guarantee they're right, especially after the code is modified. A misleading comment can be very confusion. Third, the issue of typography: comments clutter code.
In the process of redesigning this blog, I made the decision to migrate from Octopress to Jekyll.
Now some of you may be thinking - isn't Octopress Jekyll? Why transition to Jekyll?
First, let me say I have nothing against Octopress. Octopress was my gateway to Jekyll. For that I am thankful.
However, now that I am familiar with Jekyll, I don't need Octopress. In fact, in the authors own words:
Octopress is basically some guy's Jekyll blog [...] released as a single product, but it's a collection of plugins and configurations which are hard to disentangle.
Furthermore, Octopress last release was 2011. While I don't update this blog often, Octopress seems to be dead.
Ultimately the abstraction of Jekyll through Octopress is cost without benefit. Migrating to Jekyll made it easier to find a blog theme and afforded me the opportunity to use GitHub pages.
Since Octopress is Jekyll, much of the configuration remained the same. There were variables where I had to cross-reference the documentation. In addition, some of the custom front-matter variables for my posts didn't match my new theme. I wrote a quick script to convert/duplicate variables.
I also lost some of the Octopress specific features, notably:
To be fair, all but the last item have more to do with the theme than Octopress or Jekyll. Nonetheless, I had to rebuild these features.
Adding integration for Disqus and Google Analytics was straightforward. I added some configuration variables to _config.yml
and updated the liquid templates in the theme to include the respective code snippets.
The archive pages were not as straightforward. By default, Jekyll does not include a complete archive page with pagination. Furthermore, it does not generate category archive pages.
Within Jekyll you have access to all posts through the site.posts
variable. As such, I could create my archive page simply by looping over site.posts
.
1{% raw %}2 {% for post in site.posts %}3 {% include post_preview.html %}4 {% endfor %}5{% endraw %}
I was willing to lose pagination. So this simple loop was fine. If more you can review this and that.
For the category pages I created a Jekyll Plugin. Technically a generator. While the documentation actually contains CategoryGenerator, I ported the Category Generator from Octopress.
Eventually I may deploy to GitHub pages. For now, I deploy to a web server using the following rsync.
rsync -vrz --checksum --delete _site/ server:~/webroot/
Eventually, I'd like to turn this into a rake task. For now, it's easy enough to run.
]]>For most of our childhood, we lived on a street which dead ended on a hill. One time we got the idea that I would pull him behind my bike in his Playskool Cozy Car. You know the big plastic red and yellow Flintstone mobile.
We would go to the top of the hill, Jeff would hold the rope, and I'd peddle like a bat out of hell down the hill.
We did this for weeks. Faster and faster. We added a latch to prevent the door from swinging open. We installed a floorboard so he could keep his feet up.
Now we had a fail-safe, of course - Jeff could let go of the rope at anytime.
One day, I looked back to see the end of the rope skipping along the pavement. Jeff was no where to be found. I mean, he was no where. Not in a yard. Not flipped over in the street. No where.
"Jeff...Jeff!", I yelled.
Nothing.
Where does a kid in a big, red plastic car hide?
I went back up the hill and heard a low, muffled, "Zazon."
Turns out, when Jeff let go of the rope he ended up in the storm ditch. Like a car pulling into an underground parking garage.
Now you have to understand that car was as wide as that ditch. How he ended up in this ditch is one in a million and nothing short of the finest precision driving I have ever seen.
The great part about all this was he was stuck. The front was smashed up against the dirt and he couldn't open the doors. All he could do was peak out the back window.
I'm dying laughing.
Jeff is not happy about all this, "I'm going to kill you Zazon!"
I don't know about you, but when someone says they're going to kill me, I bail.
To this day, I still don't know how Jeff got out.
]]>Leave it better than you found it.
Applied to development, this meant eliminating dead code, removing comments, and standardizing format. Samuel did this before he made changes.
Since then, I have tried to follow this practice [2]. It requires discipline. Not only in routine, but in restraint. It's tempting to add other changes to your "Boyscouting" commit.
It is important to understand boyscouting does not change code, only cleans it. Boyscouting is not refactoring. Boyscouting is not fixing bugs.
When in doubt, see if your boyscouting passes this test:
Would reverting the commit result in code loss?
If so, then you've done more than boyscouting. Commits are cheap. As shown in the screenshot, separate changes into their own commit.
Practicing something as simple as boyscouting not only improves the codebase, it improves my development. I no longer waste time on dead code or fixing formatting. Instead I can focus on making changes and use any extra time to improve the code further.
Share the practice of boyscouting with others as Samuel did with me. Boy Scout your code!
If you're wondering about the icons next to the commit hashes check out Mergeatron.
[1] As pointed out by SwabTheDeck on reddit and Neal in the comments this is not the Boy Scout motto, but a passage left by Robert Stephenson Smyth Baden-Powell, founder of Scouting.
[2] Upon researching the Boy Scout motto, I also came across The Boy Scout Rule in 97 Things Every Programmer Should Know.
]]>First, let me define task driven development simply as the process of developing from a task list. A developer is assigned a set of tasks. When all the tasks are complete, development is complete.
To begin exploring the psychological effect of task driven development, I want to parallel it with gaming. People enjoy games. Given a set of rules within a system, we work to figure out a solution.
The process of tasking creates a game. The system is a set of tasks and the rule is to complete the tasks. So how do we best play the game?
Focus on completing your tasks.
Now on the surface that might sound good. In reality this is not good. By gaming another psychological effect is introduced, tunnel vision.
Let's look at tasks as instructions. For this example the goal is to start a car. Consider the following set of instructions:
While these instructions would likely help most people start a car, instructions create a slippery slope.
How granular do the instructions need to be? In the example, do we need to describe the keys or the brake? The impetus is on the instructor. They must have the knowledge and discretion to properly create each instruction necessary to reach the goal. This slides us farther down the slope.
Following instructions can be debilitating. Such instruction removes the need for you to think. In doing so, you lose a critical component of problem-solving. Going back to our example, what happens if the keys aren't on the key rack? What if the car has push button ignition? The instruction is now incorrect and you do not know how to proceed.
Knowledge workers, such as software engineers, posses a craft. A craft that requires an element of creativity. We can not recreate their work simply by completing a set of tasks. In the case of software engineering, the result would likely not work or come with technical debt.
To avoid the psychological effects of task driven development, we can transition to feature driven development. Tasks that focus on simple, functional units. Going back to our example consider the simple instruction:
While this is seemingly less helpful, it leaves room for change (slack). It provides enough context to complete the task, but allows creativity in finding the keys and determining how to use them to start the car.
]]>The dictionary's definition for slack:
loose, characterized by a lack of activity
Tom DeMarco's definition for slack:
the degree of freedom in a company that allows it to change
When it comes to business, this is a bit counterintuitive. After all, slack is lack of activity. Not necessarily what you expect in running an efficient business. Tom DeMarco would agree. He admits slack is the natural enemy of efficiency and efficiency is the natural enemy of slack.
So how then does slack help?
Well I could talk about the cost of task switching or the myth of 100% utilization. I could talk about how this leads to burnout and decreased quality. However, I'd rather tell a story.
Over the years, I have worked for development companies who are primarily task driven. For the story, let's use Company X. At Company X, developers are assigned tasks to fill their week, often beyond their capacity.
To be fair, Company X didn't reach this method over night. This was the eventual result of minor adjustments to immediate problems. In the end, tasking became the solution. They believed tasking everything out meant it would get done efficiently.
As an outsider, it is easy to see this isn't efficient. Developers rarely reach task list zero which has a psychological affect. A feeling of no light at the end of the tunnel. More on this in how task driven development kills the craft of software engineering. For now, suffice it to say things spiral downward from here.
Company X needs slack.
Decreasing the day unit is an easy way to build in slack. Although developers still worked, say, a 7 hour day, they are only tasked for 6 hours. This builds in an hour of slack per day, giving developers the freedom to change as Tom DeMarco defined. Time for the unexpected. Time to task switch. Time to plan.
It isn't that easy though. You'll often hear justifications like, "that's what slack is for." This is a mistake. Slack is slack. Slack is not meeting time. Slack is not overtime. Slack is not time for pet projects. Such things should be scheduled separately. If slack becomes one thing, it is no longer slack.
Within just a few weeks the entire team at Company X had caught up on their workload and reached task list zero frequently. The mood had also improved and you could see more collaboration.
Although slack is the opposite of efficiency, the two are complementary. You need to balance both. Introducing slack can improve productivity. It's something to introduce not only at work, but in life.
]]>Jason, have you tried a modified
Include
statement for virtual hosts to map a directory? So instead of/etc/apache2/extra/httpd-vhosts.conf
as indicated, one would use/etc/apache2/extra/vhosts/*.conf
and then just create adefault.conf
for the first virtual host, and then add/edit/delete vhost files as needed. I think it would be easier to manage host files and changes.
Indeed, mountaindogmedia, this is an easier way. In fact, this is the default configuration for many servers.
By default, the Apache Virtual Host configuration on Mac OS X is located in a single file: /etc/apache2/extra/httpd-vhosts.conf
. You need to edit the Apache configuration to include this file and enable virtual hosts.
Over the years, I have created many virtual hosts. Each time editing httpd-vhosts.conf
. To mountaindogmedia's point, this becomes difficult to manage. Furthermore, Apache configurations often get reset when upgrading Mac OS X. In the same amount of steps (two), you can adopt a more manageable configuration.
From the Apache Virtual Host documentation:
The term Virtual Host refers to the practice of running more than one web site on a single machine.
By default, the Apache configuration on Mac OS X serves files from /Library/WebServer/Documents
accessed by the name locahost
. This is essentially a single site configuration. You could mimic multiple sites by creating subdirectories and access a site at localhost/somesite
.
This is not ideal for several reasons. Primarily, we would rather access the site using a name like somesite.local
. To do that, you need to configure virtual hosts.
Before I being, I assume you already installed and configured Apache on Mac OS X.
First, open the Terminal app and switch to the root
user to avoid permission issues while running these commands.
1sudo su -
Edit the Apache configuration file:
1vi /etc/apache2/httpd.conf
Find the following line:
1#Include /private/etc/apache2/extra/httpd-vhosts.conf
Below it, add the following line:
1Include /private/etc/apache2/vhosts/*.conf
This configures Apache to include all files ending in .conf
in the /private/etc/apache2/vhosts/
directory. Now we need to create this directory.
1mkdir /etc/apache2/vhosts2cd /etc/apache2/vhosts
Create the default virtual host configuration file.
1vi _default.conf
Add the following configuration:
1<VirtualHost *:80>2 DocumentRoot "/Library/WebServer/Documents"3</VirtualHost>
I create this file to serve as the default virtual host. When Apache can not find a matching virtual host, it will use the first configuration. By prefixing this file with an underscore, Apache will include it first. Techincally this file is not needed as it simply repeats the configuraton already in httpd.conf
. However, it provides a place to add custom configuration for the default virtual host (i.e. localhost
).
Now you can create your first virtual host. The example below contains the virtual host configuration for my site. Of course, you will want to substitute jasonmccreary.me with your domain name.
Create the virtual host configuration file:
1vi jasonmccreary.me.conf
Add the following configuration:
1<VirtualHost *:80> 2 DocumentRoot "/Users/Jason/Documents/workspace/jasonmccreary.me/htdocs" 3 ServerName jasonmccreary.local 4 ErrorLog "/private/var/log/apache2/jasonmccreary.local-error_log" 5 CustomLog "/private/var/log/apache2/jasonmccreary.local-access_log" common 6 7 <Directory "/Users/Jason/Documents/workspace/jasonmccreary.me/htdocs"> 8 AllowOverride All 9 Require all granted10 </Directory>11</VirtualHost>
This VirtualHost
configuration allows me to access my site from http://jasonmccreary.local for local development.
Note: I use the extension local. This avoids conflicts with any real extensions and serves as a reminder I am developing in my local environment.
Note: The Require all granted
configuration became available in Apache 2.4 which comes with Mac OS X Yosemite. If you are running a version of OS X before Yosemite, use the equivalent 2.2 configuration in the upgrading Apache examples.
The final step is to restart Apache:
1apachectl restart
If you run into any problems, run:
1apachectl configtest
This will test your Apache configuration and display any error messages.
In order to access sites locally you need to edit your hosts file.
1vi /etc/hosts
Add a line to the bottom of this file for your virtual host. It should match the value you used for the ServerName
configuration. For example, my site:
1127.0.0.1 jasonmccreary.local
I like to run the following to clear the local DNS cache:
1dscacheutil -flushcache
Now you can access your site using the .local extension. For example, http://jasonmccreary.local.
You may receive 403 Forbidden when you visit your local site. This is likely a permissions issue. Simply put, the Apache user (_www
) needs to have access to read, and sometimes write, to your web directory.
If you are not familiar with permissions, read more. For now though, the easiest thing to do is ensure your web directory has permissions of 755
. You can change permissions with the command:
1chmod 755 some/web/directory/
In my case, all my files were under my local ~/Documents
directory. Which by default is only readable by me. So I had to change permissions from my web directory all the way up to ~/Documents
to resolve the 403 Forbidden issue.
Note: There are many ways to solve permission issues. I have provided this as the easiest solution, not the best.
Any time you want to add a site to Apache on your Mac, simply create a virtual host configuration file for that site and map it in your hosts file.
]]>PHP Update: Mac OS X Yosemite comes pre-installed with PHP version 5.5 which has reached its end of life. After you complete this post, you should upgrade PHP on Mac OS X.
I recently upgraded to Mac OS X Yosemite. It seems Mac OS X Yosemite makes my original post on installing Apache, PHP, and MySQL on Mac OS X obsolete. Specifically, Yosemite includes Apache 2.4. This post is a complete update for installing Apache, PHP, and MySQL on Mac OS X Yosemite.
A reminder that Mac OS X runs atop UNIX. So most UNIX software installs easily on Mac OS X. Furthermore, Apache and PHP come packaged with Mac OS X. To create a local web server, all you need to do is enable them and install MySQL.
I am aware of the web server software available for Mac OS X, notably MAMP. These get you started quickly. But they forego the learning experience and, as most developers report, can become difficult to manage.
First, open the Terminal app and switch to the root
user to avoid permission issues while running these commands.
sudo su -
apachectl start
Verify It works! by accessing http://localhost
First, make a backup of the default Apache configuration. This is good practice and serves as a comparison against future versions of Mac OS X.
cd /etc/apache2/cp httpd.conf httpd.conf.bak
Now edit the Apache configuration. Feel free to use TextEdit if you are not familiar with vi.
vi httpd.conf
Uncomment the following line (remove #
):
1LoadModule php5_module libexec/apache2/libphp5.so
Restart Apache:
apachectl restart
You can verify PHP is enabled by creating a phpinfo()
page in your DocumentRoot
.
The default DocumentRoot
for Mac OS X Yosemite is /Library/WebServer/Documents
. You can verify this from your Apache configuration.
grep DocumentRoot httpd.conf
Now create the phpinfo()
page in your DocumentRoot
:
echo '<?php phpinfo();' > /Library/WebServer/Documents/phpinfo.php
Verify PHP by accessing http://localhost/phpinfo.php
Note: If you are upgrading MySQL you should skip this section and instead read this.
The README suggests creating aliases for mysql
and mysqladmin
. However there are other commands that are helpful such as mysqldump
. Instead, I updated my path to include /usr/local/mysql/bin
.
export PATH=/usr/local/mysql/bin:$PATH
Note: You will need to open a new Terminal window or run the command above for your path to update.
I also run mysql_secure_installation
. While this isn't necessary, it's good practice.
You need to ensure PHP and MySQL can communicate with one another. There are several options to do so. I do the following:
cd /varmkdir mysqlcd mysqlln -s /tmp/mysql.sock mysql.sock
The default configuration for Apache 2.4 on Mac OS X seemed pretty lean. For example, common modules like mod_rewrite
were disabled. You may consider enabling this now to avoid forgetting they are disabled in the future.
I edited my Apache Configuration:
vi /etc/apache2/httpd.conf
I uncommented the following lines (remove #
):
1LoadModule deflate_module libexec/apache2/mod_deflate.so2LoadModule expires_module libexec/apache2/mod_expires.so3LoadModule rewrite_module libexec/apache2/mod_rewrite.so
Note: Previous version of Mac OS X ran Apache 2.2. If you upgraded OS X and previously configured Apache, you may want to read more about upgrading to to Apache 2.4 from Apache 2.2.
If you develop multiple projects and would like each to have a unique url, you can configure Apache VirtualHosts for Mac OS X.
If you would like to install PHPMyAdmin, return to my original post on installing Apache, PHP, and MySQL on Mac OS X.
]]>The following is the intersection of a long list of books. It has been culled through cross-reference and repeated recommendation. I call this The Reading List. Some believe it's what every software engineer must read.
I want to thank Jeff Moore, who originally provided me this list. Over time there have been few changes.
]]>This morning I received an email with the following subject line:
Jason McCreary: php[world] talk proposals accepted!
To which I replied:
Fuck yeah!
I'm honored that not one, but two of my talks were accepted for the inaugural php[world] conference this November in Washington D.C.
The two talks are From CakePHP to Laravel and the latest iteration of my previous talk - 21 ways to make WordPress fast.
This has been a goal of mine for some time. I look forward to seeing my fellow PHP developers at php[world].
]]>For the past several months I've lead a small team of developers. We have a lot of broken windows. In managing these broken windows, I realized an important distinction between a failure and a fuck-up.
A failure is lack of success. This implies success exists and for failure to exist, success can not. Failure is often systematic, occurring in steps which prevent success. Conversely, failure provides the opportunity to learn how we may achieve success.
Not everyone experiences failure. We don't always expect failure. As such failure is hard, but it is important we learn from it.
A fuck-up results in a lack of success. But, different from failure, a fuck-up can occur without preventing success. It is isolated. Often the result of carelessness or accident. A fuck-up does not provide the opportunity to learn how we may achieve success, only how we may prevent the same fuck-up.
We all know shit happens. Similarly, fuck-ups happen. Since they are not without some expectation, we can handle them more easily.
If we want to achieve success we need to determine which is more detrimental, failure or fuck-up? Distinguishing between the two allows us to answer that question.
While the occasional fuck-up is not detrimental, continual fuck-ups slow progress. True failure is not detrimental. In fact, it is essential for progress.
]]>Don't question others until you've questioned yourself.
Developers, especially new developers, often forget this when debugging. We jump into the debugger. We add tracing statements. We review the commit log.
Such actions can be misguided. Before debugging the code we must follow a moral code. Debugging needs a Golden Rule. A rule to remind developers of a few important facts of debugging.
I had an excellent TA for my introductory Computer Science course. He gave great advice for improving your craft. Some of which became the foundations for routines of a good developer.
In one of our more difficult labs he expressed his frustration with the class:
Listen up! Stop asking me, "What's wrong with
gcc
?"gcc
has been widely used for over three decades. You have been programming for half a semester.gcc
is not broken!
I remember his words anytime I start questioning others. A far majority of the time, the bug is in my code.
Debugging is the art of asking the right questions. If you start by questioning others, you will likely waste your time asking the wrong questions.
We've all done it. A recent upgrade revealed a bug in the code. Now you have a bug in your brain: it's the upgrade.
Of course you should question the upgrade. But question question other changes too.
Let's say you prove the language has a bug, Internet Explorer behaves differently, or the developer before you broke the build. What then?
Well, you still have to fix it. Even when it is not you, you still must develop the fix. No point in focusing on blame.
Following the Debugging Golden Rule keeps developers grounded, focused, and part of the solution. Remember it the next time you find a bug in the code.
]]>I've read The Myth of the Rockstar Programmer. Despite the title, the author concedes the rockstar developer does exist in some form. One he defines as a thoughtful, senior developer.
By that definition, let's say the rockstar developer does exist. Let's say you manage to find and hire one. They can't save you.
Why?
Because of what I call the developer gap.
A gap exists between the developers on your team. A gap created by varying skill levels, experiences, and personalities.
A rockstar developer cannot bridge this gap. To do so would defy the very laws of nature.
Let's look at it from a physical point of view. And by physical I mean physics. Think gravity, momentum, and energy.
Consider the pull required by the rockstar developer to influence the entire rest of the team. That's a massive rockstar. Instead, and inline with natural law, the larger body (team) will influence the smaller body (rockstar developer).
Let's look at it from an arithmetic point of view. Maybe overall you want your team to operate at a 7. You currently have a 7, two 5s, and a 3.
People have equated a rockstar developer to a 10x developer. Adding a 10 brings the average from 5 to 6. Still not a 7. In fact, you would need to double your team, hiring only rockstar developers, to operate at a 7.
What's more likely is you hire a rockstar developer, burn them out, and alienate your team.
Remember:
Today I decided, just weeks away from the tournament, to let PocketBracket fail. I will not release a version for the 2014 season.
So why let a successful app fail? The short answer, it's not worth it anymore. The longer answer tells more of the story.
People think apps are easy. Everyone has an idea for an app. The rest is easy, right? Just put it in the App Store.
I assure you, creating and maintaining a successful idea is not easy. That's if you have a successful idea. Most app ideas are shit or have already been done.
After the idea comes development, release, marketing, maintenance, and support. On top of that, PocketBracket is a time-sensitive, data-intensive app.
PocketBracket must also navigate legal waters. Nearly everything is trademarked. Using one results in an immediate Cease and Desist order.
The reality is, PocketBracket is always just an Apple rejection, 1-star review, or bug away from failure.
March Madness is undoubtedly a multimillion dollar industry. Yet, I've learned that doesn't necessarily trickle down to the App Store.
The space has become more crowded over the years. Every season brings more new apps and copycats. More slices to cut from the same small pie. PocketBracket also competes with big names like ESPN, CBS, and Yahoo!
The season is short-lived with sales only lasting two weeks. While #1 in our space, PocketBracket sales have never taken off. PocketBracket seems to have reached the end of the long tail.
In the beginning, PocketBracket had a team. Now it's just me. While it'd be great for more to bear the hardships, I'd rather share the success. After all, what's anything if it's not shared?
Season after season, the late nights and long weekends have taken their toll. During the season it requires my full attention. If I don't spend time on PocketBracket, it doesn't get done.
I've reached a point where I'm putting more into PocketBracket than I'm getting in return. I lack the support necessary to keep going.
This sounds like giving up. I'll admit, it feels like it. But it's a calculated decision. One balancing risk and reward. It's time to let PocketBracket fail and move on.
]]>Over time our epic races attracted coworkers. We did versus and battle, but it wasn't as fun as two player. We needed something more. One Friday, when Snappy Hour was about to begin, Beerio Kart was born.
The rules of Beerio Kart are simple.
No drinking and driving. You cannot play while you're drinking.
You can only drink during the race. The race starts after the green light and ends once the first racer finishes.
You must finish your beer before the end of the last race in the cup. Failure to finish your beer results in disqualification.
The player with the best score at the end of the cup wins. For two players you can use the Mario Kart scoring. For three or more players you will need to track the place of each player after each race. Sum the places up at the end of the cup. The lowest score wins.
You're welcome to create your own track rules. Such as increasing the number of drinks per cup or further restricting when a player can drink.
Enjoy and drink responsibly.
]]>if
statements. I provided a quick, simple answer. A few hours later I received the following comment from tereško.
Awesome answer. This is exactly the level of complexity and depth, that one would expect from 30k+ user.
tereško's sarcasm reads pretty thick. At first, it pissed me off. But then I got to thinking... What was wrong with my answer? With a reputation over 30k, must I always provide a complex and deep answer?
The short answer, no.
tereško clearly would not approve of that answer. Allow me to provide more depth.
I could make the whole the answer should match the level of depth of the question argument. Do I need to explain the internals of a language parser when someone's missing a semi-colon? Some developers pride themselves on knowing such complexities. I consider it an unnecessary detail. To each their own. Point being the right level of complexity and depth is too subjective.
Instead of looking at a specific answer, we need to look at the process of answering. StackOverflow, at the end of the day, is a game. The objective of the game is simple - provide the answer. How is the answer determined? Well it's actually determined two ways - by the author of the question and by the community.
Now if there's one thing I have learned earning my 30k+ reputation, these aren't always the same. There are plenty of questions where an author accepted an answer the community did not find the best and vice-versa. In addition, I have seen plenty of one-line fixes beat complex and deep answers.
While the game is simple, how users play differs. The basic strategies I have noticed is providing the first right answer or a more thorough answer. In this case, I provided the first right answer. It would seem tereško plays the game only by providing a more thorough answer.
So what's the big deal? After all, it's just a game. Well there are two things I don't like about tereško's comment.
First, 30k+ users providing only complex and deep answers is not a universal maxim. If it were, StackOverflow would not receive as many answers from its top users. While I recognize and advocate improving the quality of answers, this is not the way.
Second, and more importantly, it's trolling. tereško campaigned to close the question (a topic for another day) and picked at answers. He did so through ridicule and sarcasm. Neither have a place on StackOverflow. While my answer may have lacked complexity and depth, it was nonetheless helpful. tereško's contributions helped no one.
I love StackOverflow. I love playing the game. But I want to see good sportsmanship. StackOverflow feels more negative lately. I see more questions closed and elitist behavior. Above all else, StackOverflow should be helpful.
]]>Crowdsourcing obtains resources from a larger group instead of individuals. For example, if your goal is to raise $1,000, it may be easier to get $5 from a lot of people than it is to get $1,000 from one.
Kickstarter allows people to pledge money to projects. In return, these backers may receive rewards. Normally something to do with the project. If the project reaches its goal it receives the funds. If not, everyone gets their money back.
As a software engineer my spoken vocabulary has suffered. After all, I talk to computers all day. For years I've wanted to improve my vocabulary.
I'll continually hear words I want to use myself. Even though I jot these down somewhere I never remember to use them.
I thought about making an app to store the words I want to learn. But a simple word list is not enough. I want the app to help you learn words. I've slowly refined this idea and finally have enough to make an app.
I'm nicknaming the app wadl (pronouced waddle). wadl is a duck-themed app to help improve your vocabulary. Take a minute to watch the video.
A lot goes into an app. You have design, development, marketing, and depending on the app, server or support costs. But, in my opinion, creating an app that nobody uses is far worse than the possibility of wasting money.
wadl seems pretty simple - just add some words. But that's actually asking a lot. You have to stop, open the app, and take time to add a word. On top of that, for the app to be useful, wadl needs lots of people to do this, continually. Because wadl relies on user generated content, making this a paid app would further limit its user base.
While wadl seems like a simple app on the surface, it's really not. Kickstarter not long allows me to generate funding for a free app, but also to build initial buzz before the app hits the market.
Launching a project on Kickstarter was pretty straightforward. However, it was a longer process that I expected. Especially the administrative items. Here's the process:
The biggest time drains were creating my Amazon Payments account and submitting to Kickstarter. The verification process took about a week and required me faxing several documents to Amazon. Kickstarter also takes a few days to review your project before you can launch.
If you plan to launch a Kickstarter project I strongly recommend starting items 1-3 immediately.
A quick rant about Kickstarter's pledge process. Kickstarter requires registering for a Kickstarter account before making a pledge. Kickstarter seems more interested in gathering user data for themselves before collecting money for your project. Several of my friends came back to me saying, "I don't have a Kickstarter account.". While I understand building a user base, providing a guest checkout or registering for a Kickstarter account after making a pledge could lead to more funding.
Currently wadl is about 10% funded. At this rate wadl should reach its goal. Unfortunately I've read that a lot of projects are funded in the first few days. So I have to admit I'm a little concerned.
In the event, wadl reaches it's goal, I'll do a follow-up post with some addition tips for a launching a successful Kickstarter project.
In the meantime, back wadl.
]]>git push
I open the browser, go to GitHub, and navigate to the branch.
While only a few clicks, I repeat this process many times a day. In lazy developer fashion I wanted to automate this process.
A Google search for open GitHub from command line yielded two promising results.
First, hub, which not only opened GitHub from the command line but wrapped git
entirely to provide even more features. hub
looked awesome, but went well-beyond my needs.
The second result was a bash function that generates your GitHub URL and uses the Mac OS open
command to launch the browser.
Unfortunately it didn't work. Being just a few lines of code, I decided to fix the script. To honor the original author, I kept the same command name - gh
.
By simply typing gh
I can open the current branch in my repository on GitHub.
I also extended the original script with optional parameters for remote and branch. It follows a similar format as git push
:
gh [remote-name] [branch-name]
These default to origin and the current checked out branch, respectively.
Now I can open any repository and branch on GitHub from the command line with:
gh origin dev
I shared gh
on GitHub. Then Paul Irish turn it into an even better npm
script as git open.
I understand it's a recruiters job to pursue talent. I can't fault them for doing their job. But I can fault them for their methods.
Let's take a closer look.
Jason,
Need an experienced PHP Developer. This is an iterative, startup development process and culture, with the comfort and security of a big business.
[random bullet points]
If this doesn't fit you, can you suggest someone else?
Thanks,
[long email signature]
Craft a better email.
Do some research recruiters. Say that you found me on StackOverflow, LinkedIn, or read my blog. Breaking the ice with a personal touch could be the difference between opening your email or marking it as SPAM.
If you don't have the time, then admit sending me a mass email. I can tell anyway. Given your honesty I may at least look at the job description.
- Over 7 years experience programming in Language X, Y, Z
- Strong design principles.
- Solid on coding fundamentals e.g. Object-Oriented design, data structures, and dependency injection.
- Experience in enterprise-level integration technologies including X and Y, in Z
- Hands-on experience in widely used third party frameworks
[several more]
- The candidate must be highly self-motivated confident and mature, well developed analytical and problem solving skills with the aptitude to learn as well as a flexibility to adapt to change.
- Team player and proven ability to work under pressure and meet project dates
That's not a job description. It's a catch-all list of qualifications.
Tell me about the job - without all the buzzwords.
[company name] is looking for a senior PHP developer to join their web app team. You'll help complete development on [some awesome project] and report directly to [some impressive title].
If I want more information, I'll reply. If you must include more information, list it after telling me about the job.
Recruiters want your resume in Word format.
Never send recruiters your resume in Word format.
First, Word come on. We're developers. Our resume is in Markdown, HTML, or some other plain text formatting syntax.
Second, recruiters want an editable format so they can easily doctor your resume. I've seen my resume after recruiter doctoring. It wasn't pretty.
I understand the need to present the best candidate. But don't doctor my resume. Instead ask me to cater my resume for the position.
Similar to resume doctoring, recruiters pitch you to a potential employer. Words like expert and rockstar get thrown around with reckless abandonment.
A recruiter once pitched me as a .NET developer. I haven't written a line of .NET. I proudly admitted that in the interview. Fortunately they had another developer position open. Until we discussed that position it was the worst interview of my career.
Recruiters, don't say I'm someone I'm not.
If you receive an offer get ready for your recruiter to always be closing. They'll say anything to close the sale.
A recruiter once told me my current employer didn't give bonuses. My employer outlined a bonus when I started the position. However, I believed the recruiter and in turn accepted the offer. The bonus was awarded two days after I left.
The point is, a recruiter will say anything to get you to accept. Remember they have no affiliation with your current employer or new employer. Take what they say with a grain of salt.
To a recruiter you're meat, and they're the butcher. Realize they'll chop you up and sell you to whoever might be interested.
Unfortunately recruiters are often the gatekeepers to better jobs. Their connections get you in the door when otherwise you're just another resume in the jobs@company.com inbox.
In the end, the relationship should be mutually beneficial. You get the job you want and they get a commission. Make sure they earn it.
]]>Can I convert
uniqid()
to a timestamp?
Sort of.
From the PHP documentation on uniqid()
:
without being passed any additional parameters the return value is little different from
microtime()
The comments note that uniqid()
outputs a hexadecimal string. So let's convert microtime()
to a hexadecimal string and compare it to uniqid()
.
1$microtime = microtime(true);2$id = uniqid();3 4echo dechex($microtime); // 5228cee55echo $id; // 5228cee5564a0
We see both share the same prefix (5228cee5
). So what are the remaining characters of uniqid()
?
Turns out the answer is pretty obvious. It's the microseconds. But uniqid()
does not simply multiply $microtome
by 1,000,000. Instead it appends the microseconds as a hexidecimal string.
Let's take another look:
1$microtime = microtime();2$id = uniqid();3 4list($microseconds, $timestamp) = explode(' ', $microtime);5$suffix = str_replace(dechex($timestamp), '', $id);6 7echo $microseconds; // 0.239299008echo '0.', hexdec($suffix); // 0.239327
Pretty close. The few nanosecond difference is the runtime between executing line 1 and 2.
So using microtime()
we've proven uniqid()
, without parameters, is the concatenation of a timestamp and microseconds as hexadecimal strings.
Why then did I say sort of?
The suffix. If you run the last script enough you'll notice an inconsistency for low microsecond values.
0.009974000.9984
Notice the leading zeroes are missing. So you can't get a timestamp with microsecond precision from uniqid()
.
However, given this inconsistency, can we trust the suffix is a specific number of hexadecimal characters (i.e. 5)?
The documentation states, without parameters, uniqid()
returns 13 characters. That said, the simplest code to get the timestamp from uniqid()
is to extract the prefix:
1$timestamp = substr(uniqid(), 0, -5);2echo date('r', hexdec($timestamp)); // Thu, 05 Sep 2013 15:55:04 -0400
Why the negative anchor? Consider the Unix timestamp 4294967296
. You don't want to start Y2.1K!
After this exercise I reviewed the source code for uniqid()
to confirm using a negative anchor (-5
) is indeed safe.
So yes, you can convert uniqid()
to a timestamp (without microsecond precision).
I made a list of all these app ideas. Most apps at that time were immature noise makers or games. Neither appealed to me. I narrowed the list to unique ideas. In early 2009, the choice was clear. I started developing PocketBracket.
The success of PocketBracket validated my conviction to become an iOS developer. I attended Apple's WWDC that year. A large expense for an individual developer. But a solid investment towards becoming an iOS developer.
With the release of iPhone SDK 3.0, I toyed with the new MediaPlayer and MapKit APIs. I developed LastPlayed. A social playlist of sorts that allowed you to geotag and share what you were listening to. A lot of potential at a time before Pandora or Spotify.
Yet each year I returned to PocketBracket. As a seasonal, time-sensitive app, I spent most of the time updating the codebase to the latest SDK. This was both a blessing and a curse. While it forced me to learn the new SDK, it took away from developing new app features. More importantly it took away from developing my skills.
I continually struggled with how to architect an app. New to Objective-C, the heavy use of the delegate and observer design patterns was unfamiliar. Not only did I need to learn a new language, but also the iPhone SDK. Which evolved each year.
In a webinar someone referenced the 10,000 Hour Rule - essentially it takes 10,000 hours to become an expert. With roughly 2,000 business hours a year, that's 5 years. So those developers who were hacking away full-time since the beginning may just now meet this rule. I do not.
Regardless I never call myself an expert. I know I don't know everything. As such, I don't see how I could be an expert. I do know that I am more proficient in other languages. I know I'd like to be more proficient with Objective-C and the iOS SDK. But knowing is only half the battle. Much like Pinocchio, I long to be a real iOS developer.
I recently transitioned into a full-time iOS developer position. So I'm putting in more hours towards those 10,000. I also follow the blogs of NSHipster and Ray Wenderlich. I'm watching all the videos from WWDC 2013. When I can, I contribute on the Apple Developer Forums and StackOverflow.
Unfortunately I have reached a frustrating level of stagnation. I'm developing comfortably. I need a break through. I think the only way to do that is to work among stronger iOS developers. Until then, I'll continue to hack away on my own apps knowing that my iOS development may never be more than a hobby.
]]>I have developed with PHP for over a decade. During that time I've encountered nearly every error. This post covers how to interpret a PHP error as well as fixing common PHP errors.
We will parse the following PHP code and resolve the errors. There are three. Four depending on how you define errors (more on that later). For now, bonus points if you can find the other error.
1<?php2echo 'Hello Errors!'3if ($user->name) {4 echo 'It's time to stop writing errors ";5 echo $user->name, '!';
When we run this code, we receive the first error:
PHP Parse error: parse error, expecting ',' or ';' in errors.php on line 3
Before we fix this error, let's interpret the error. PHP errors have a three important parts:
Parse
or Fatal
errors being more common. Example: PHP Parse errorTogether these parts provide all the information we need to fix our code.
PHP Parse error: parse error, expecting ',' or ';' in errors.php on line 3
The error tells us we have a parse error on line 3. Looking at line 3 again:
if ($user->name) {
Seems correct. What's wrong?
This is where error type can help solve the mystery. For parse errors, the error typically occurs on the preceding line since the parser continues until it reads invalid syntax. Let's look at line 2:
echo 'Hello Errors!'
Now if you wrote this code, you may not see the error. In which case the error message provides a hint: expecting ',' or ';'.
Expecting a comma… What? echo
allows you to output multiple strings separated by commas. However, this was not our intention.
Expecting a semi-colon… Ahh. The line is missing its required semi-colon line ending. Let's fix the error by adding a semi-colon to the end of line 2.
PHP Parse error: unexpected T_STRING in errors.php on line 4
Another parse error. Applying what we've learned, we look at line 4.
echo 'It's time to stop writing errors ";
Let's examine the strings on this line. The intended string was: It's time to stop writing errors. In PHP strings are quoted. Using the quotes, we see that our string is really It then s time to stop writing errors.
We confused ourselves, and PHP, by starting with a single quote and closing with a double quote, while the string contains an apostrophe (single quote).
To fix this, we can either start the string with a double quote or use single quotes throughout and escape the apostrophe:
echo 'It\'s time to stop writing errors ';
These errors can be difficult to spot. Often syntax highlighting helps. If your IDE doesn't have syntax highlighting, please switch IDEs. Even this blog post has syntax highlighting!
On a side note, there are many arguments between using single-quotes versus double-quotes in PHP. Allow me to end this - it doesn't matter. What does matter is consistency. Personally, I use single-quotes everywhere.
PHP Parse error: unexpected end of file in errors.php on line 7
Another parse error. The fact that line 7 does not exist reminds us to look at the preceding line for parse errors.
echo $user->name, '!';
This line seems fine. Let's keep going up a line until something looks wrong. Now I've written enough PHP to know that this particular error message deals with unterminated syntax. Meaning that the perser was expecting more syntax, but instead reached the end of the file.
Knowing this, I know the error relates to following line:
if ($user->name) {
We never closed the if
block. Adding the closing brace, }
, on line 7 fixes the error.
if ($user->name) { echo 'It's time to stop writing errors "; echo $user->name, '!';}
Formatting your code goes a long way to prevent these errors. Generally speaking, if you reach the end of a code block at an indentation level you forgot to terminate something. Most IDEs have auto-indentation features. Configure indentation and choose your side in the battle between tabs and spaces.
Our code now runs without errors. But there are a few warnings. Often warnings are errors that haven't happened yet. But under the right edge case they will, and when they do, your code will fail. As such, many developers treat warnings like errors.
There are also notices. Since PHP is a dynamic language, I often don't treat notices as errors. But notices can indicate just as much danger as a warning. Over the years, I have slowly treated notices as errors. There is something to be said for PHP code that contains no errors, warnings, or notices.
Now fix your errors and write pure code.
]]>Before I talk about contributing to Open Source, I want to define Open Source. In asking people I'd hear words like: public, free, software, and shared. I want to discard software. As explained in Open Source and Open Source Software are not the same thing… well you get the idea.
For the purpose of this post, the best of these is free. But not free in the sense you might think. Consider this quote:
Not free as in beer, but free as in freedom.
There's a spirit behind Open Source. A free-spirit. I consider Open Source a philosophy. A philosophy to freely share with others. This philosophy creates an interdependence. Open Source could not exist without these free-spirits contributing back to the source.
But how do you contribute? Because of the strong link between Open Source and Open Source Software, many think you have to develop code. While this is one way to contribute, there are many others. My hope is you will find one that allows you to contribute to Open Source.
As noted the most obvious way to contribute to Open Source is code. And most obvious way to do that is Github.
GitHub makes it incredibly easy to release (push), copy (fork), and contribute (pull request) code. They've also done an excellent job of abstracting this process, while still keeping good development practices - source control.
Github is built atop git. If you're just getting started with Github or git, I suggest browsing Github's Help and reading [Pro Git](free digital copy).
We've reached the data age. You've probably heard the latest buzzword Big Data. Data, big or small, drives the Internet. And there is a growing movement towards Open Data.
Many organizations have released their data to the public. Often in formats readily used by developers. A good example of this is U.S. Census Data.
You don't have to have big data to contribute. You just need data. If so, contribute your data.
Similar to Open Data, services also drive the Internet. API's are everywhere. Twitter and Google have led the way by opening their services. In turn, these services created entire ecosystems.
If you provide a service, consider releasing it as an Open Service. If you can not open all your services, you could adopt a freemium model. Your service could help foster another.
Releasing code, data, or services is the easy part. Out in the wild, it needs support. It needs your help. To me this is the lifeblood of Open Source - its community. Without you, these projects would not survive.
Open source projects need communities. People to help support the project by testing, reporting bugs, and promoting growth. You don't need to be a guru to support a project. Jump in and get started by sharing your experiences.
Often Open Source projects lack documentation. After all developers hate documenting. If you use an Open Source project that lacks documentation, contribute by writing or expanding the documentation. You can also write tutorials. If you know another language contribute by translating the documentation to help the project reach more people.
Developers rarely design. An Open Source project often lacks color. As a designer, contribute your creativity by helping brand the project.
Finally, you can contribute by simply spreading the word about the Open Source projects you use. The goal of any Open Source project is to reach people. You promoting the project helps accomplish that goal. Write a blog post, tweet, or email the author to say thanks.
Why should you contribute? Well, sharing is caring. We all just want to help, right? As noted, the Open Source spirit is a free-spirit.
Let's be honest, we live in a material world. Sometimes we follow more along the lines of show me the money. Contributing to Open Source is not without recognition.
Contributing can be a form of self-promotion. Employers often request Github accounts from potential candidates. Personally, my reputation on StackOverflow has led to many recruiter calls and talking points during interviews.
It's also not uncommon for an author to earn money from their project. Organizations often use open source project, but will pay for consulting, installation, or support. In some cases, end-users pay to fix or improve projects.
Whatever your reason, start small. Any contribution helps. I know you'll find the experience rewarding.
]]>I recently moved to New York. So once Spring was here to stay, I broke out the trail map. A train stops right along the Appalachian Trail 86 miles north of New York City.
Unfortunately not all of my gear made the move. Several items were left behind. One of which was my hatchet. I needed a replacement.
I set out to the local Home Depot over lunch. You see I am from Kentucky. Where Home Depot has a whole aisle of axes and a guy who could tell you about each one. So I didn't think anything of it.
I jumped on the subway to midtown. There was a Home Depot off 23rd Street and Fifth Avenue in the Flatiron District.
This happened to be the fanciest Home Depot ever. Storefront windows. Elegant displays. The look of a retail store, not the concrete and orange steel of a standard Home Depot.
I walked straight in and asked:
"Where are your axes and hatchets?"
The preppiest Home Depot worker ever answered awkwardly:
"Ahh. What are you doing?"
I did not respond. Only stared at him waiting for the answer. Which I now realize likely made things more awkward.
He quickly became helpful.
"Downstairs. In the back."
Needless to say, their selection was not great. Then again, why would anyone in Manhattan buy a hatchet?
]]>First, debugging is hard. Especially debugging database issues. Often times the best approach is to systematically rule out what cannot be the problem. This checklist adopts such an approach from a low to high level.
Verify you can connect to your database by logging into MySQL from the command line.
mysql -u dbuser -p -h localhost database
If you have a specific database user for your application, be sure to verify their credentials as well.
If you do not have command line access, you can use another database administration tool (e.g. PHPMyAdmin).
If you cannot connect to the database, you need to start at the beginning: Ensure MySQL is running, your database exists, and your credentials are correct.
Verify you can connect to the database from PHP. Test with a separate script to also rule out bugs in your codebase:
1$link = mysqli_connect('localhost', 'my_user', 'my_password', 'my_db');2 3if (!$link) {4 die('Connect Error (' . mysqli_connect_errno() . ') ' . mysqli_connect_error());5}6 7echo 'Connected... ' . mysqli_get_host_info($link) . "\n";
If this code connects, but your application code does not, debug your application code.
If this code does not connect use the output for clues. You can also check your PHP error logs. It's likely your MySQL module is misconfigured. Use phpinfo()
to review your MySQL configuration.
More often than not the query is the problem. Especially if the query is generated dynamically. The best way to verify your query it to output and run it yourself.
1$sql = 'SELECT column FROM table WHERE column = $bad_var';2echo $sql;3if (!$mysqli->query($sql)) {4 echo 'Error: ', $mysqli->error;5}
In this case, we'd see that $bad_var
is not set. As such, the query becomes:
SELECT column FROM table WHERE column =
Note: This code above is a contrived example of a dynamic query. If you do not see what else is wrong with this query, please read about SQL injection.
You can debug in any order. Top down or bottom up. Just remember this is by no means exhaustive. Nonetheless, following this debugging checklist will help diagnose a majority of your database issues. Please share other common database debugging you use.
]]>My original solution symlinked all-the-things. The entire top-level WordPress structure symlinked to the core WordPress install. While this works, it's brittle. If the top-level WordPress structure changed in a new version the tenant install may break. Although I mitigated this with an install script, there was room for improvement.
Bastiaan pointed out that you could move WordPress into its own directory. After following the steps outlined in the WordPress Codex (carefully in order) you can use a single symlink. A much cleaner solution.
Having a single symlink also makes maintaining tenant installs easier. I can quietly install a new version of WordPress while tenant sites safely point to an old. Then update their symlink (thus updating WordPress) as needed.
WordPress also introduced Must Use Plugins. A WordPress install must use these plugins - meaning they are automatically activated, and can not be deactivated. Using WPMU_PLUGIN_DIR
and WPMU_PLUGIN_URL
I can configure the location of mu-plugins
just as I did for wp-content
. Now the WordPress multitenant install can share even more between the tenants.
Strebel left a comment that there were "significant security concerns" with my WordPress multitenant solution. Unfortunately he did not elaborate. Thanks Strebel…
I am not a sysadmin. Nonetheless, to mitigate any security concerns I set permissions of the core WordPress directories and files to 755 and 644 respectively. In addition, all of the core WordPress are owned by a non-tenant, non-web user. Note: This will not work in an suPHP environment.
In addition, I have moved some of the configuration settings related to the multitenant install to the core wp-config.php
. This prevents tenants from changing their configuration. And as you can not redeclare PHP constants, they can not overwrite this configuration.
1// set global configurations2define('WP_CONTENT_DIR', $_SERVER['DOCUMENT_ROOT'] . '/wp-content');3define('WP_CONTENT_URL', 'http://' . $_SERVER['SERVER_NAME'] . '/wp-content');4 5// load site-specific configurations6require_once dirname($_SERVER['DOCUMENT_ROOT']) . '/wp-config.php';
I also follow common WordPress security practices, such moving wp-config.php
outside webroot for both the core and tenant installs.
The web directory of a tenant using the updated WordPress multitenant install:
webroot$ ls -ltotal 16-rw-r--r-- 1 jason staff 200 Mar 30 13:35 .htaccess-rw-r--r-- 1 jason staff 405 Mar 30 16:17 index.phplrwxr-xr-x 1 jason staff 20 Apr 6 14:30 wordpress -> /opt/wordpress/3.5.1drwxr-xr-x 6 jason staff 204 Mar 30 16:35 wp-content
A few notes:
/opt/wordpress/
. Such a structure allows for multiple WordPress installs.wp-content
lives at the top-level.mu-plugins
is a symlink under wp-content
.As always, I welcome your feedback.
]]>use
breaks the fundamental aspects of PHP namespaces. Avoid use
.
Oh, you want to know why? Fine. Keep reading.
Let's review the fundamental aspects of PHP namespaces as stated in the PHP Docs Namespace Overview:
namespaces are designed to solve two problems that authors of libraries and applications encounter when creating re-usable code elements
So namespaces focus on re-usable code elements. Let's look at the two problems:
- Name collisions between code you create, and internal PHP classes/functions/constants or third-party classes/functions/constants.
- Ability to alias (or shorten) Extra_Long_Names designed to alleviate the first problem, improving readability of source code.
namespace
solves problem #1. use
solves problem #2. But things can get circular. use
can introduce name collisions and confusion. Which respectively reintroduces problem #1 and is the opposite of improving readability.
Consider the following namespaces and classes:
1// MyApp/Service.php 2namespace MyApp; 3 4class Service { 5 public function method() { 6 echo __NAMESPACE__ . '\Service'; 7 } 8} 9 10// MyApp/ComponentA/Service.php11namespace MyApp\ComponentA;12 13class Service {14 public function method() {15 echo __NAMESPACE__ . '\Service';16 }17}
A Controller
class with use
:
1// MyApp/Controller.php 2namespace MyApp; 3 4use MyApp\ComponentA\Service; 5 6class Controller { 7 public function output() { 8 $service = new Service(); 9 $service->method();10 }11}
Which Service
class is created? MyApp\Service
or MyApp\ComponentA\Service
?
It may be straightfoward when the entire codebase fits within your screen. But consider a larger codebase. What if you refactored output()
into another class? It all depends on the use
statement. Meaning the code is tightly coupled with use
.
The same Controller
class without use
:
1// MyApp/Controller.php2namespace MyApp;3 4class Controller {5 public function output() {6 $service = new MyApp\ComponentA\Service();7 $service->method();8 }9}
No question on which Service
class is created and no coupling.
There are other problems with use
, such as dynamic naming. But that's another post. use
breaks what namespaces solve.
Spend a few extra keystrokes typing absolute namespaces for code clarity and portability. Future developers will thank you.
]]>So why did I leave? It's unfair to look at any specific job. I liked the The New York Times. So the question isn't why I left The New York Times, but instead why I leave a job.
This is something I've reflected on after leaving each of my former jobs. Actually, I first drafted this post after leaving Humana in 2010. Over the years, I reduced the citeria down to three.
There's an entire article bouncing around the web recently dedicated to this topic. So I will not go into great detail on the importance of a good manager. We all want to work for someone we respect. A true leader. Someone in the chain of upper management must be a good leader.
Good developers learn. I believe the best way to learn is to surround yourself with talented people. While I believe I am talented, I know I'm not the most talented. I want to be among peers not only so I improve, but we improve together. Anything else and you risk becoming a big fish in a little pond.
Either personally or professionally, your job must offer growth. We're human. We want to know that whatever we do, it's done for the better. If your job isn't going somewhere, you should go somewhere else.
Our society pushes a live to work mentality. I've never bought into that notion. In the words of Tyler Durden, "you're not your fucking job".
The average American spends a third of their adult life working. You should find a job you like. So I use these criterion to form my own mentality:
Some day my work/life balance will shift, and these things may not matter as much. But today is not that day.
]]>First, for those not familiar, Family Feud is a television game show. Two teams - typically families - compete against one another. They face-off to guess the top answers of a survey question. If you win the face-off, your family has three individual attempts to guess the rest of the top answers. If your family can not, the other family has the chance to steal if they guess one of the remaining answers. One family is awarded points from each round. The family with most points after a few rounds goes to the final round.
Now the common strategy is to play if you win the face-off. This is wrong. In fact, it's ridiculous. Yes, I am saying everyone who has ever played Family Feud is wrong.
So what's the secret to winning Family Feud... defer.
That's right. It's that simple. If you win the face-off, defer.
I've crunched the numbers on this (from my extensive viewership). You can flip the odds in your favor by defering. Put the pressure on the other family to guess all the answers. When they don't (and they won't) you steal.
Not convinced? Allow me to introduce something called Probability. Family Feud surveys 100 people. You have to guess the top most common answers of these 100 people. Seems easy enough. And it is for a few answers. The rest of the answers occur far less frequently. This is called a long tail distribution.
So, if you play, your family must guess all the top answers answers. That's unlikely. Or shall I say improbable. Remember this survey is not from factual data. It's from people. People who provide what I'll call a subjective answer.
The probability of guessing the top answers in the face-off is very high. But the probability of guessing all the remaining long tail answers is low. So, instead, defer. Have the other family try, while your family has the time to think of one of the long tail answers together.
To this day, I have yet to see a family defer after winning the face-off. The desire to play is too great.
If you're a contestent on Family Feud (or if Family Feud would like to put my family and I on the show) try this. You'll make it to the finals. Just don't forget to thank me when you win.
]]>I recently had a task to update some legacy code. This code was high-profile. All of our stacks ran a version. So I needed to ensure that my updates were compatible.
Upon reviewing the code it contained a version variable (VER
). Perfect! A version variable is perfect to use as a feature flag. I could wrap my updated code inside conditionals until the rest of the stacks were upgraded.
1if (this.version == 101) {2 // new code3}
Done. Right? Well, yes and no. Yes, this code is backward-compatible. I safely wrapped my new code in featured flags. So I can rest assured it will only run when the feature flag is set. In this case, when this.version
equals 101
. However, no because unit tests failed for old versions of the code.
After some debugging, I found the issue:
1if (this.version > VER || this.version < 100) {2 return;3}
Although I incremented VER
for my new version, the old version still had the previous version number. While my code was indeed backward-compatible, old versions always failed this little gem: this.version > VER
. The old code was not forward-compatible. This logic prevented me from using an ideal version variable as a feature flag.
I will not speculate on the original developer's intention. However, given the code's high-profile and the existence of VER
the logic above is odd and a good demonstration of code that is not forward-compatible.
Last summer I migrated WordPress to Amazon EC2. I decided to stay on EC2 for Octopress for two reasons. First, a micro instance is, essentially, free. Second, if the micro instance can serve a WordPress blog, it can serve a static HTML blog.
I made a few optimizations to the Apache configuration. Namely decreased Timeout
, KeepAlive
enabled, and tweaked connection limits. I also disabled AllowOverride
.
For PHP I installed and enabled APC.
WordPress used object-cache and Hyper Cache.
I benchmarked the following configurations using the Apache benchmarking tool (ab
):
Each benchmark made 1000 requests for 50, 100, 150, and 200 concurrent connections using both close
and keep-alive
. I performed each benchmark 3 times to average the result.
I created two graphs from the benchmark results:
Without surprise, Octopress is faster than WordPress. Roughly 3 times faster (300%). In some cases reaching an impressive 2,000 requests per second for close
connections, and nearly 3,000 requests per second for keep-alive
connections.
Octopress performed the same as WordPress for page requests with 200 concurrent close
connections. However, this implicates the micro instance more than Octopress or WordPress.
The time per request results are similar to the requests per second results. Even the page request anomaly appeared. Nevertheless, Octopress is still faster than WordPress.
For most of the benchmarks, Octopress response times were under 100 milliseconds. This not only improves user experience, but search engine optimization as well.
The following are screenshots of memory and CPU usage graphs taken from my New Relic dashboard during the benchmarks.
With WordPress, the server spikes well above its physically memory and CPU limits.
With Octopress, the server has 60% of its physical memory available and vi
shows up in the Top 5 processes — wow.
It's no surprise Octopress is faster than WordPress. Octopress uses static files whereas WordPress uses 10,000 lines of PHP code performing various database queries. While you can make WordPress faster, it's worth nothing that without caching WordPress did not finish any of the benchmarks above. In fact, it crashed my server.
I plan to add another benchmark configuration for nginx and possibly Varnish. In addition, I'm monitoring the potential search engine optimizations from this migration. Look for posts on both in the coming months. In the meantime, I welcome your feedback.
]]>Years ago, I created LastPlayed — an app around sharing your playlist with those around you. A social soundtrack to introduce you to new music. I've since let it die to the rise of giants like Pandora and Spotify.
Spotify spoke at our recent TimesOpen Hack Day. I learned more about their service. Things which made me think of Apple, and why Apple should buy Spotify.
For years, Apple has tried to expand iTunes with services like Ping (#Fail) and iTunes Match. Clearly Apple wants to evolve iTunes into a social network.
Buying Spotify would give iTunes the boast it needs. By integrating Spotify with iTunes both sides benefit. Spotify can grow subscribers with the appeal of the larger music collection offered by iTunes. Apple can up-sell music downloads.
Spotify has its own app ecosystem. But as far as I can tell, all these apps are free. While a great a value add for Spotify subscribers, they're missing an opportunity for monetization.
If Apple buys Spotify, Apple can package the Spotify API with in the next iOS SDK release. Opening the door to a larger developer base to develop both free and paid apps. I know I'd be very interested in developing such apps.
Apple has the cash. I have to believe the revenue generated by expanding iTunes and the App Store alone would show a return on investment. Apple should buy Spotify — before Facebook does.
]]>First, I am a fan of WordPress. I've written many posts on WordPress, spoken at WordCamps, and will continue to develop with WordPress. But WordPress is slow. And I had a need… a need for speed. Greasy, fast speed.
Enter Octopress:
Octopress is a framework designed for Jekyll - the blog aware static site generator powering Github Pages.
GitHub uses it — that's reassuring. Static site — you don't get much faster than serving a static resource. Look for a follow-up post with the performance showdown between Octopress and WordPress soon.
I also wanted something simple. I don't use all the features of WordPress. I just write posts from time to time. From the beginning I've drafted my posts in Markdown. Jekyll uses Markdown in its templates. Simple.
You may be wondering the difference between Jekyll and Octopress. Jekyll is tool, Octopress is the packaging. Octopress nicely wraps some of the rough edges of Jekyll making it easier to manage. It also offers themes and plugins.
Now if, like me, you're sold on Octopress read on. If not, thanks for reading this far. Long live WordPress!
Here is an outline of the steps for migrating from WordPress to Octopress with more details below.
For the most part, I followed the Octopress Setup. The only exception being Ruby. I'm on Mac OS X Mountain Lion. So my Ruby version was 1.8.7. I updated Ruby with RVM.
curl -L https://get.rvm.io | bash -s stable --ruby
There were several migration options. I tried a few of them and found Export to Jekyll best as it ran content through the approriate WordPress filters. While Export to Jekyll was the best of the bunch, it wasn't perfect.
rake generate
erred about gsub
. The issue was UTF-8. With some debugging, I found several UTF-8 characters in my posts. Mostly smart quotes and other artifacts like EM dashes from Mac OS X. Unfortunately I didn't find a quick fix. I ended up replacing these with HTML entities using some sed
commands. This was the worst part of the migration. And it wasn't that bad.description
and keywords
to the Front Matter. I will likely fork Export to Jekyll soon. If you're interested in these, please leave a comment.comment
in the Front Matter. I fixed this with a quick sed
command as all my posts allow comments. However, this is something Export to Jekyll could have done.curl
script to do so.Octopress has a few automated deployment options. I used rsync
. However, my blog runs on Amazon EC2. So I needed to configure my EC2 private key to deploy Octopress. After doing so, I deployed to Octopress to my Amazon EC2 instance by simply typing rake deploy
.
Octopress is not without its own challenges. I found limited SEO out-of-the-box and I will need to learn the nuiances of Octopress themes. Look for future posts on both.
Nonetheless, with Octopress I can write like I always have. I don't have to manage WordPress upgrades or plugins. I don't have to make WordPress faster. I just write. This frees up my time for other things.
]]>On a personal note, it bothers me to find such poor quality posts in a PHP newsletter. Posts like this confuse developers and in turn contribute to the poor code notorious in the PHP community. Adding fuel to the fire of the anti-PHP community for why PHP sucks.
I have no doubt the author had good intention. But at the least, he should have provided supporting evidence. After all, a good developer asks Why? I reviewed the recommended optimizations in the original post. Evaluating recommendations to be absolute truths and marking each true or false. Please read the full section before you segfault.
foreach
vs. for
False.
foreach
is faster when looping over an array for reading. If you need to write to the array the performance of foreach
degrades significantly. So for
has its place.
Another case for using for
is when the block contains counting logic.
Consider:
1for ($i = 0; $i < $count; ++$i) {2 // block3}
Versus the foreach
equivalent:
1$i = 0;2foreach ($i < $count) {3 // block4 ++$i;5}
Exception: When looping over a sequential numerically indexed array, the array key could serve as a counter.
for
TruthTwo absolute truths when using a for
loop.
for
evaluations the condition on each iteration. Avoiding the overhead function calls which return value will not change during the loop will optimize your code.Code:
1$count = count($arr);2for ($i = 0; $i < $count; ++$i) {3 // block4}
False.
Back in 2007 I emailed Ilia Alshanetsky about this very matter. He called it an Optimization Myth. However, that was PHP 4. Somewhere in PHP 5 double quotes were optimized (I believe PHP 5.1).
Double quotes performing better than single quotes is counter intuitive. Without the need for variable expansion, it stands to reason single quotes would be faster. Furthermore literal values (single quote) could be optimized in memory.
I've benchmarked double quotes versus single quotes several times without finding anything conclusive. Maybe double quotes are indeed faster. But to replace all single quotes with double quotes as the original post suggests is not worth the time. In the end, following your code style is more important.
UNION
vs. OR
False.
I am currently reading High Performance MySQL. In fact, I just finished the chapter on query optimization. This recommendation actually put me on the path to writing this response post. Stating change all `OR` to `UNION` is just plain reckless.
First, the original example is bad. It suggests changing:
select username from users where company = 'bbc' or company = 'itv';
to:
select username from users where company = 'bbd'unionselect username from users where company = 'itv';
When using the same column, the opposite of what the author suggests is more performant. That is you should change from a UNION
to an OR
when the WHERE
clause operates on the same column.
Second, changing OR
to UNION
in your queries may not return the same result. While UNION
may be an optimization, you need to understand when to use it. Do not sweepingly replace OR
with UNION
in you codebase.
As I am admittedly still learning MySQL Optimizations, I posted the topic to the StackOverflow community. I encourage you to read the answers for more details on why UNION
vs OR
is not always an optimization.
The original post did contain a few true optimizations.
echo
versus print
. True.Performance follows the 80/20 Rule. If single quotes vs double quotes accounts for 80% – you're optimized. Congratulations. You can go home. That is an absolute truth.
There is no silver bullet. Be skeptic of absolute statements. There are many moving parts in a system. What works for someone else may not work for you. When it doubt, benchmark it yourself.
If you are interested in PHP performance and optimizations, check out the following resources:
Also, consult the PHP Documentation. The function definitions and user comments contain valuable information.
]]>“[certain language] developers are better developers.”
I generalized the argument because I've heard it before. We all have. Fill in the blank with any fashionable language – Scala, Ruby, Go, Python…
This argument quickly degrades into a language debate. One filled with feature comparison and syntactical analysis to demonstrate superiority. Why? Well, let's face it – developers can be elitist when it comes to their language.
I also generalized to keep the focus off [certain language] and focus on the developer. I want to evaluate this argument objectively. And if I said, “PHP developers are better developers” you would have dumped core. Which proves the point.
From this argument, I propose the following, implied premises:
Applying the Law of Syllogism:
Developers that learn fashionable languages are better developers.
This becomes a much more acceptable argument.
As recommended in The Pragmatic Programmer, you should learn a new programming language every year. This being a routine of a good developer. One I personally follow. The purpose is to learn something new from each language. In turn making you a better developer.
So next time you hear, “[certain language] developers are *better developers”, consider the developer. It might just be valid.
]]>This year we named our team the Kentucky Irregulars from the movie Reign of Fire. Each of us adopted a theme from the movie. My brother wore a Hard Rock London shirt. Joel grew his dense beard to resemble Quinn. As the most extreme, I honored Van Zan by buzzing my head, growing a rugged beard, and replicating his bomber jacket vest.
Similar to last year, the weather was overcast, windy, and in the 40s. We had an 8:00am start time. So limited sleep added to the challenge. But we prefer the early start for a fresh course. Free from obstacle lines and everything covered in mud.
Now the Tough Mudder is challenging all around. Beyond the obstacles. You're running on uneven ground over rock, sand, mud, or tall grass. You're constantly wet and often covered in mud. So you're constantly carrying a few extra pounds. The weather, hot or cold, also drains your energy.
Arctic Enema.
Previously named Chernobyl Jacuzzi. This obstacle is a 30ft long pool of 5ft deep ice water. Literal ice water. You climb up one side and jump in. Instant shock. You struggle to breathe. A barrier divides the pool forcing you under the ice. You climb out the other side. The water, so cold, shrinks your clothes.
Everest.
Everest is a 12ft quarter pipe. You get a running start and leap for the rim. Typically mud covers the approach and ramp, adding to the challenge. This obstacle requires a helping hand from your fellow Mudder. And it's that camaraderie which makes this obstacle fun. Headbands off to the Tough Mudders who tackle Everest solo.
Berlin Walls.
The Berlin Walls are a set of wooded barriers ranging from 6-12ft high. Typically each course contains a few sets. The first few are easy. But when you get to the series of 10-12ft walls, the fun stops. By that point in the course, it takes everything you have and a fellow Mudder, to get over these walls.
Electroshock Therapy.
This is the signature obstacle of Tough Mudder. A 10-yard muddy gauntlet of dangling 10,000 volt hot wires. The finish line waits on the other side. My goal is always simple – don't fall.
While everyone loves the pictures, people always ask why. Why would you do that? It looks miserable. My brother tells me, “They wouldn't understand”. I agree it is difficult to explain. Ultimately, you're not going to understand Tough Mudder until you do Tough Mudder. I consider Tough Mudder hard fun. I respect the challenge.
There are signs placed along the Tough Mudder course. I noticed one this time to this very point. It read:
]]>Be patient and tough. One day this pain will be useful to you.
Coding standards vary greatly among developers. Even when writing the same code. And therein lies the problem. This becomes most evident when reviewing code that is not your own.
My own coding standards have changed over the years. As team lead, I drafted coding standards documents. This time, I wanted something active and easily adopted.
The PEAR coding standard is arguably the most prevalent among the PHP community. However, it is exhaustive and therefore not easily adopted. When reading about PHP namespacing last year, I came across the PHP Standard Requirements (PSR).
The latest version of this standard is PSR-2, which expands PSR-1, is a straightforward document outlining basic coding standards. It leaves some flexibility for developer style. And while I may not agree with every standard – mainly the curly brace conventions – it passes the governance.
It is human nature to bend the rules. But there's no point in adopting a standard only to break it. I wanted to follow PSR-2 strictly. Not just the parts I liked. So I needed something to keep me honest.
A while back I came across PHP CodeSniffer. I intended to use it for automated code validation with an svn post-hook. PHP CodeSniffer features pluggable coding standards you can validate against. In addition, one for PSR-2 exist.
You can download PHP CodeSniffer. If you have PEAR installed, it's easier:
pear install PHP_CodeSniffer
Verify PHP CodeSniffer with:
phpcs --version
Note: If you receive warnings, your PHP include_path
likely does not include the PEAR directory. Check your PEAR installation to resolve this issue.
You can run PHP CodeSniffer against an entire directory.
phpcs --standard=PSR2 api/
Since I just adopted the PSR-2 coding standard, I had several violations in my current projects. However, as traditional lazy developer, I didn't want to edit hundreds of lines of code.
I found PHP CS Fixer. It auto-formats code to meet PSR-2 (among others). While it doesn't correct everything, it fixes the tedious ones.
php-cs-fixer fix api/ --level=psr2 --dry-run
Note: I added --dry-run
for demonstration purposes. Remove it to update your files.
A good developer should follow a coding standard. While I am advocating PSR-2 here, it is really up to you. What matters is that you follow it strictly. Hopefully the tools above can help you do so.
This post is part of a series on How to be a Better PHP Developer.
]]>PEAR is PHP's Package Repository and makes it easy to download and install PHP tools like PHPUnit and XDebug. I specifically recommend these two for every PHP developer.
1curl -O http://pear.php.net/go-pear.phar2sudo php -d detect_unicode=0 go-pear.phar
You should now be at a prompt to configure PEAR.
/usr/local/pear
/usr/local/bin
You should be able to type:
1pear version
Eventually, if you use any extensions or applications from PEAR, you may need to update PHP's include path.
]]>In addition, I will be co-speaking with Nick Temple about WordPress Deployment. This talk includes open-discussion of the following:
I have installed Apache, PHP, and MySQL on Mac OS X since Leopard. Each time doing so by hand. Each version of Mac OS X having some minor difference. This post serves as much for my own record as to outline how to install Apache, MySQL, and PHP for a local development environment on Mac OS X Mountain Lion Mavericks.
I am aware of the several packages available, notably MAMP. These packages help get you started quickly. But they forego the learning experience and, as most developers report, eventually break. Personally, the choice to do it myself has proven invaluable.
It is important to remember Mac OS X runs atop UNIX. So all of these technologies install easily on Mac OS X. Furthermore, Apache and PHP are included by default. In the end, you only install MySQL then simply turn everything on.
First, open Terminal and switch to root
to avoid permission issues while running these commands.
1sudo su -
1apachectl start
Note: Prior to Mountain Lion this was an option for Web Sharing in System Preferences → Sharing.
Verify It works! by accessing http://localhost
OS X Mavericks Update: You will need to rerun the steps in this section after upgrading an existing install to Mac OS X Mavericks.
First, make a backup of the default Apache configuration. This is good practice and serves as a comparison against future versions of Mac OS X.
1cd /etc/apache2/2cp httpd.conf httpd.conf.bak
Now edit the Apache configuration. Feel free to use TextEdit if you are not familiar with vi.
1vi httpd.conf
Uncomment the following line (remove #
):
1LoadModule php5_module libexec/apache2/libphp5.so
Restart Apache:
1apachectl restart
The README also suggests creating aliases for mysql
and mysqladmin
. However there are other commands that are helpful such as mysqldump
. Instead, I updated my path to include /usr/local/mysql/bin
.
1export PATH=/usr/local/mysql/bin:$PATH
Note: You will need to open a new Terminal window or run the command above for your path to update.
I also run mysql_secure_installation
. While this isn't necessary, it's good practice.
You need to ensure PHP and MySQL can communicate with one another. There are several options to do so. I do the following:
1cd /var2mkdir mysql3cd mysql4ln -s /tmp/mysql.sock mysql.sock
You could stop here. PHP, MySQL, and Apache are all running. However, all of your sites would have URLs like http://localhost/somesite/ pointing to /Library/WebServer/Documents/somesite. Not ideal for a local development environment.
OS X Mavericks Update: You will need to rerun the steps below to uncomment the *vhost* Include
after upgrading an existing install to Mac OS X Mavericks.
To run sites individually you need to enable VirtualHosts. To do so, we'll edit the Apache Configuration again.
1vi /etc/apache2/httpd.conf
Uncomment the following line:
1Include /private/etc/apache2/extra/httpd-vhosts.conf
Now Apache will load httpd-vhosts.conf. Let's edit this file.
1vi /etc/apache2/extra/httpd-vhosts.conf
Here is an example of VirtualHosts I've created.
1<VirtualHost *:80> 2 DocumentRoot "/Library/WebServer/Documents" 3</VirtualHost> 4 5<VirtualHost *:80> 6 DocumentRoot "/Users/Jason/Documents/workspace/dev" 7 ServerName jason.local 8 ErrorLog "/private/var/log/apache2/jason.local-error_log" 9 CustomLog "/private/var/log/apache2/jason.local-access_log" common1011 <Directory "/Users/Jason/Documents/workspace/dev">12 AllowOverride All13 Order allow,deny14 Allow from all15 </Directory>16</VirtualHost>
The first VirtualHost
points to /Library/WebServer/Documents
. The first VirtualHost
is important as it behaves like the default Apache configuration and used when no others match.
The second VirtualHost
points to my dev workspace and I can access it directly from http://jason.local. For ease of development, I also configured some custom logs.
Note: I use the extension local. This avoids conflicts with any real extensions and serves as a reminder I'm in my local environment.
Restart Apache:
1apachectl restart
In order to access http://jason.local, you need to edit your hosts file.
1vi /etc/hosts
Add the following line to the bottom:
1127.0.0.1 jason.local
I run the following to clear the local DNS cache:
1dscacheutil -flushcache
Now you can access http://jason.local.
Note: You will need to create a new VirtualHost
and edit your hosts file each time you make a new local site.
You may receive 403 Forbidden when you visit your local site. This is likely a permissions issue. Simply put, the Apache user (_www
) needs to have access to read, and sometimes write, your web directory.
If you are not familiar with permissions, read more. For now though, the easiest thing to do is ensure your web directory has permissions of 755
. You can change permissions with the command:
1chmod 755 some_directory/
In my case, all my files were under my local ~/Documents
directory. Which by default is only readable by me. So I had to change permissions for my web directory all the way up to ~/Documents
to resolve the 403 Forbidden issue.
Note: There are many ways to solve permission issues. I have provided this as the easiest solution, not the best.
Unless you want to administer MySQL from the command line, I recommend installing PHPMyAdmin. I won't go into the details. Read the installation guide for more information. I install utility applications in the default directory. That way I can access them under, in this case, http://localhost/phpmyadmin.
1cd /Library/WebServer/Documents/2tar -xvf ~/Downloads/phpMyAdmin-3.5.2.2-english.tar.gz3mv phpMyAdmin-3.5.2.2-english/ phpmyadmin4cd phpmyadmin5mv config.sample.inc.php config.inc.php
A local development environment is a mandatory part of the Software Development Process. Given the ease at which you can install Apache, PHP, and MySQL on Mac OS X there really is no excuse.
]]>I downloaded the latest version of Eclipse and Subclipse for my new work Macbook Pro. When I ran svn
commands in Terminal I received some odd messages. After some confusion, I realized Subclipse checked out the repository using SVN version 1.7. Unfortunately Mac OS X Mountain Lion runs SVN version 1.6.
I could have downgraded Subclipse. However, I had already checked out several repositories. Furthermore, I liked the smaller footprint of SVN 1.7. In typical lazy developer fashion, I went with updating SVN to version 1.7 for Mac OS X.
To give due credit, the foundations of this post came from a post on Building SVN 1.7. Although I expanded on it, I encourage you to read the original post. For completeness, I outlined the full process below.
Note: To compile and install SVN 1.7 you need Xcode with the Command Line Tools installed.
cd ~/Downloads/curl -o subversion-latest.tar.gz http://apache.mirrors.tds.net/subversion/subversion-1.7.8.tar.gztar -xvf subversion-latest.tar.gz
Note: You may need to update the curl
command to download the latest SVN 1.7 source.
The default SVN install on Mac OS X uses neon. neon allows you to connect to remote SVN repositories via HTTP and HTTPS. Lines 2-7 installs neon. Line 8 builds SVN using the --with-neon
configuration flag.
1cd ~/Downloads/subversion-1.7.* 2sh get-deps.sh neon 3cd neon/ 4./configure --with-ssl 5make 6sudo make install 7cd .. 8./configure --prefix=/usr/local --with-neon 9make10sudo make install
Your environment will still use SVN version installed with Mac OS X:
svn --version
To use the SVN version you just installed, you can update your PATH
. Assuming you are using the bash shell, add or edit the following line in your ~/.bash_profile
:
export PATH=/usr/local/bin:$PATH
You should now see the SVN version you installed:
svn --version
]]>Upon returning to the dorm Liam noticed his roommate arrived. He was paired with a roommate from Sumatra. Liam, a good old boy from Pennsylvania, felt a little uneasy without having first met the foreigner. My roommate was gone for the weekend. So I told Liam he could sleep in his bed. We passed out.
Some hours later I woke up. Something was off. As my brain began to function I noticed things. These weren't my sheets. I didn't have a dehumidifier. And that sure wasn't Liam in the bunk across from me. I got down from the loft. I'm in my boxers. Where the fuck am I? I unlock and open the door. I'm in my dorm hall. After stepping into the hallway, I realize I'm next door in Liam's room.
I go to open my door, expecting it to be unlocked. It's locked. I knock. I hear Liam scramble around. He opens the door, “Dude, what the hell?” I explain. He assures me we went to sleep in my room. We try to figure it out for a minute, laugh, and go back to sleep.
In the morning, we ask Liam's roommate if he remembered anything. He didn't let me in. I didn't have keys. How did I get out of my bed, lock my door, and get into Liam's room without a key?
To this day, it's still a mystery…
]]>When I was little we were waiting at the airport for my Uncle. I spotted an ice cream stand across the way. I wanted ice cream.
My Mom gave me some money and said, “Go get something.”
I remember being at the counter. Eyes wide looking at the menu. While I understood cost, I had no idea of how it related to portion size. I spotted the Triple Scoop Ice Cream Sunday and I had enough money. It came with all the toppings: hot fudge, caramel, whip cream, nuts. This thing was as big as my head. Welcome to heaven Jashon.
As I'm walking back I felt everyone looking at me. I'm presenting this 10,000 calorie monstrosity for everyone to see. Just smiling my way through hell. Then I see my Mom's face, “Jason!”
I was so embarrassed.
I didn't eat a single bite. It just sat there and melted. A goddamn ice cream tragedy.
To this day I still feel bad. Poor little Triple Scoop Ice Cream Sunday.
]]>Fashion is the latest trend — in vogue. Technologies such as Ruby on Rails might have been high-fashion a few years ago or NoSQL now. These technologies advocated by diehard evangelists. After all fashion is not without passion. It's hip and cool and you should do it.
An interesting quality of fashion is that it moves in cycles. Upon closer inspection these technologies are not new. Merely new faces of old technology. MVC from the 1970s. NoSQL from the 1990s.
Style is more lasting. More personal. This is the way we write our code — format, naming conventions, procedural vs. object-oriented. All become our coding style.
We may identify with new fashion and choose to incorporated pieces into our style. Say the descriptive (arguably long) method names common in Objective-C. Although we may not write Objective-C, we can adopt similar method naming when writing PHP code.
In the end, one must balance both fashion and style. Not enough fashion and you risk stagnation. Your style becoming behind the times. Too much fashion and you may be too cutting edge. A victim of the hype curve.
This post resulted from a conversation with Jeremy McEntire. He presented the Fashion vs. Style analogy.
]]>Walking the streets of any big city you're bound to cross paths with a bum. Now I know, bum is politically incorrect. But please continuing reading.
I always feel bad when they ask for money. I used to want to give them something. But I don't and it isn't because I never have cash.
When I was a kid, I remember being out with my Mom and saw a bum. Cardboard sign and all. I told my Mom I felt bad for him. My Mom said, “You have money, go help him.”
I did have money. A crisp $10 bill from cutting the lawn. So I went over, “Here Mister!”, and gave him my $10. Little Jashon making a difference. I was so proud.
That bum pulled a roll of bills from his pocket, wrapped my $10, and put it back in his pocket. No acknowledgment. No “Thanks“. He just turned around and kept begging.
So I don't give money to bums. That bum ruined it for everyone.
]]>A page has many parts. Server-code and client-code. Dynamic content and static content. Simply put, we want all these to load fast. But each has a certain weight. In the case of performance, weight is a factor of quantity and size. Weight and performance have an inverse relationship. Therefore, if we decrease the weight, we increase performance.
WordPress itself is pretty heavy. On each request, thousands of lines of code are loaded executing dozens of database queries. All just to generate the page. While a small part in the process of loading a page, WordPress can do this faster. But at the end of the day, making WordPress fast is also an exercise in making your site faster. So several of these tips apply beyond WordPress.
Invalid code requires the browser to make assumptions about your page. While ultimately this could result in incorrect rendering, it also slows down rendering. Furthermore, invalid code can lead to front-end development headaches. It's simple to validate your code using the W3C Online Validator. Do it.
WordPress offers Permalinks to customize your site's URLs structure. Internally WordPress uses this structure to process your request. Some structures can make this job difficult – decreasing performance. Generally speaking, the more WordPress can match against your structure the better.
Quick tests showed barely a 1% decrease in a permalink structure of
/%postname%/
vs. /%year%/%monthnum%/%postname%/
. This may be a greater concern in previous versions of WordPress. In the end, consider search engine optimization over performance.
There are over 20,000 WordPress Plugins. The ease at which you can install WordPress Plugins is both a beauty and a curse. Often leading to plugin bloat. Each plugin adds more and more code for WordPress to load. Adding more weight and decreasing performance..
It comes down to quantity and quality. Instead of using 3 social sharing plugins, use 1. Plugins may also be developed poorly. Using hooks like init
inappropriately. You should audit your plugins often and deactivate/remove those that are useless.
A fast page makes as few requests as possible. Google, for example, makes around 8. 404s are wasted requests. Your page should not have 404s.
Trackback and Pingbacks are notifications between websites. While often background requests, they still use resources and add traffic. In addition, it can lead to SPAM. For these reasons combined, I disable it. This can be done in Settings → Discussion.
Ensure your per page settings are reasonable. A small value leads to more pagination (and therefore more page requests) and a large value leads to larger pages. Also consider displaying excerpts instead of full content. You can adjust these in Settings → Reading.
Per the HTML specification CSS should be loaded in the <head>
section. Linking stylesheets outside <head>
will block progressive loading. This prevents the browser from displaying content as it is loaded.
JavaScript also blocks progressive loading. When a <script>
tag is encountered the browser interprets this code before loading more of the page. Moving your <script>
to the bottom (footer) allows a majority of the page to load first.
While the page still has the same weight, these simple adjustments make the page appear faster. However, depending on your UI, this may lead to the dreaded flash of unstyled content.
A Content Delivery Network (CDN) distributes your resources across the globe. This results in faster response times for the user. Ultimately making your site load faster. There are additional benefits to CDNs such as increased parallel downloads and redundancy.
Most browsers download 2 resources in parallel per domain. Since most resources are on a single domain (yours) the browser queues requests. By using multiple domains, the browser can download more resources at a time. However, there is a balance. Most suggest using 2-4 separate domains to be best.
In addition, using a separate domain for static content (images, CSS, etc) will prevent unnecessary data – such as a cookie – to be sent for each request.
Sharing Widgets often include their own JavaScript and CSS within an iFrame. Likely loading resources from an external domain. All of which go against. Understand how the sharing widget works so you can implement it in a way that doesn't slow down your page.
Similar to Sharing Widgets, Gravatar can add significant weight to your page. Each comment includes a Gravatar and therefore an additional request and image resource.
If Gravatar is enabled, the most waste comes from commenters without a Gravatar. Using Blank vs. Mystery Man is negligible. Although Blank was indeed faster, the aesthetics of Mystery Man likely outweigh any gain. Disabling Avatar Display (Settings → Discussion), decreased load times by 10%.
Using CSS Image Sprites help decrease the number of image requests your page makes. Since most pages contain many images, this can greatly reduce the total number of requests. In addition, the file size of a single, albeit larger image is less than the sum of the original images.
Creating a CSS image sprite and coding its styles can be time consuming. But once you've mastered this skill, I guarantee your sites will be more performant.
1#header-logo {2 background: url(../assets/images/some-sprite.png) no-repeat -119px -9px;3 height: 35px;4 width: 111px;5}
Similar to compression, minification is another way to reduce file size. Minification removes unnecessary characters, such as whitespace and comments. I also consider condensing all files into a single file part of minification.
For example, CSS files are often split out for ease of development. This is unnecessary in production. Condensing them not only reduces file size, but also the number of requests.
Compressing your resources can greatly reduce the amount of data transferred between your server and the client. Services like Smush.it can compress image resources. Using gzip compression for text based resources (HTML, CSS, JavaScript) can reduce sizes by 70%.
Enabling gzip compression in Apache is available through mod_deflate. I use the following configuration for this site:
1AddOutputFilterByType DEFLATE text/html text/plain text/xml text/css text/javascript application/javascript application/x-javascript
Most site resources are static. Your site's background images, CSS, and JavaScript don't change frequently. As such, these resources should be cached. Caching tells the browser to save these resources instead of requesting them again on subsequent page requests.
Adding an Expires
header by file type is simple in Apache:
1ExpiresActive On2ExpiresByType image/gif "access plus 6 months"3ExpiresByType image/jpeg "access plus 6 months"4ExpiresByType image/png "access plus 6 months"5ExpiresByType text/css "access plus 6 months"6ExpiresByType text/javascript "access plus 6 months"7ExpiresByType application/javascript "access plus 6 months"8ExpiresByType application/x-javascript "access plus 6 months"
In addition, I remove ETags
. Unless you understand their role in caching, removing them is generally best.
1Header unset ETag2FileETag None
As mentioned earlier, WordPress is heavy. Thousands of lines of code are loaded and dozens of database queries are executed on every request. Even for highly-dynamic website, content is mostly static. As such, it can be cached.
There are several WordPress plugins. Some are basic, like Hyper-Cache, only caching page content. Others are highly configurable and cache additional WordPress resources, like W3 Total Cache. Ultimately the less WordPress code loaded the better, ideally avoiding it entirely.
PHP Caching is important for when WordPress does run. While hopefully this isn't often if you've implemented WordPress Caching, it improves performance nonetheless. As PHP is an interpreted language, code is typically parsed and run on each request. An opcode cache saves the parsed PHP code. APC is the most common PHP cache. If APC is available, you should install APC Object Cache or enable this with W3 Total Cache.
While most of the plugins above include Database Caching, I have included it for completeness. WordPress executes dozens of queries on each request. Database connectivity is one of the more expensive operations.
Over time, WordPress can store a lot of extra data. This includes, revision data, trashed data, and custom meta data.
By default, WordPress tracks revisions for pages and posts. If you have a large or an old site, records for revisions can outgrow records for actual content. While disabling revisions might be too extreme, you can set a maximum number of revisions as well as the auto save interval in your wp-config.php file.
Similar to revisions, trashed items are just taking up space in the database. Be sure to empty the trash regularly. You can also set the frequency with the EMPTY_TRASH_DAYS
configuration setting.
Be mindful when using custom fields. The database structure for custom fields is one to many. Using custom fields can quickly lead to an N+1 Problem. If you have data that you require for all posts, see if a custom post type or plugin solves the problem.
The database engine used by MySQL can lend a slight performance boast. This depends heavily on your MySQL version. Prior to 5.5, using MyISAM may provide better read performance. Whatever the database engine, most WordPress sites can be tweaked for heavier read operations.
Avoid redirects. Especially at the WordPress level. If you must perform redirects, do them at the Apache level. Add a RewriteRule
or preferably a Redirect
.
There are a few performance gains at the Apache level. Each of which squeeze a few requests per second. Your ability to implement these will depend greatly server access.
Avoiding mod_rewrite. By default, WordPress uses RewriteRule
to route requests to index.php.
1RewriteRule ^index\.php$ - [L]2RewriteCond %{REQUEST_FILENAME} !-f3RewriteCond %{REQUEST_FILENAME} !-d4RewriteRule . /index.php [L]
Since Apache 2.2.17, FallBackResource
performs the same:
1FallbackResource /index.php
When possible, add these directly to your site's Apache configuration file. Doing so allows them to load with Apache and not for every page request (when using .htaccess). Might add a few requests per second depending on your setup.
You'll be lucky to get more than 10 requests/second on $3/month shared hosting. Hosting on a WordPress optimized host or VPS will immediately improve this. Upgrading your hosting is likely the simplest way to make WordPress fast. Albeit costlier.
I find the following tools helpful when benchmarking performance:
I also recommend the following resources:
Go forth and make WordPress fast…
]]>I got the opportunity to explore WordPress multitenancy for a recent consulting project. Multitenancy is something I have been interested in for months. Surprisingly, searching for WordPress Multitenancy returned no results. For those of you that aren't familiar, I'll provide a definition of multitenancy. For a detailed explanation, I suggest reading Multi-tenancy Explained.
Multitenancy is an architecture in which a single instance of a software application serves multiple customers.
For WordPress, multitenancy means multiple WordPress sites running off a single WordPress codebase. This sounds similar to WordPress Multisite. However, WordPress Multisite combines all site resources (themes, plugins, etc) together under a single WordPress install (code and database). Whereas, multitenancy allows for completely individual WordPress sites (own resources and database) sharing a single WordPress codebase.
Any admin of a WordPress Multisite install bears the burden of the Network Admin. Any developer of multiple WordPress sites bears the burden of keeping WordPress updated. With WordPress multitenancy, the user has their own site and the developer manages WordPress in a single place. One ring to rule them all kind of thing. Adopting a multitenant architecture provides additional benefits, aside from management, such as scaling.
Let me be clear though, multitenancy is not a solution to a problem with WordPress. For most, WordPress Multisite and the integrated WordPress Updates cover the issues I mentioned. Multitenancy is a solution to an architectural problem. It's likely you found this post because you already know about multitenancy. So you're ready to setup WordPress multitenancy and I'm likely wasting keystrokes with this disclaimer.
In Thomas Edison fashion, I'll walk through the failed attempts before the solution. First, let me outline some terminology and the initial architecture. I'm using the term core for the central WordPress codebase and tenant for an individual WordPress site. To start, I deployed WordPress (version 3.4.1) in its own directory. For good measure, this directory was not web accessible and I removed its wp-content
directory. I also created two sites. Each with their own web accessible directories containing only the wp-content
directory.
I symlinked all of the top-level WordPress files and directories in the tenant to the core.
White screen.
After reviewing the error logs, I noticed WordPress failed to include wp-config.php
. WordPress performs directory traversal using PHP's __FILE__
constant. Turns out, PHP resolves the path (converting all symlinks) before setting __FILE__
. So WordPress looked for wp-config.php
in the core directory. I need WordPress to look in the tenant directory.
Fail.
After Googling, I learned about hard links. Honestly, I still do not fully understand hard links. So I won't try to explain. The gist is hard links work like symlinks, but maintain a hard reference to the linked file. Essentially acting like a physical file exists. As such, hard links set the __FILE__
constant with the tenant path instead of the core path.
But this introduced new problems. First, you can't hard link directories. There are workarounds. However they seemed platform specific. WordPress is compatible with a wide range of platforms. I did not want a solution that narrowed compatibility. Which leads to the second problem. I would have to hard link every core file of WordPress and re-create its directory structure.
Fail.
This was never really an option. Nonetheless, code to include wp-config.php
was only in six files. I entertained this idea for 3 seconds. Then remembered anytime I updated WordPress requires an audit of the codebase. A never-ending battle and exactly why you don't modify core code.
Super Fail.
Let's reflect… Symlimks worked – but PHP resolved paths preventing core from including the tenant code. Hard links were an option – but being limited to files make it a deployment nightmare. And, well, modifying WordPress is never a good option.
Nonetheless, like Mr. Edison, I learned something from my failures – 3 ways that don't work. I needed a solution with the ease of symlimks but the ability to configure core to reference the tenant. Enter wp-config.php
.
The purpose of the wp-config.php
is to configure WordPress. So leveraging it seemed appropriate. As learned from my attempts, the code that used __FILE__
only failed when referencing wp-config.php
. Theoretically other core code using __FILE__
should not fail since it relates to other core files. In the end, the only references to the tenant are the wp-content
directory and wp-config.php
.
The wp-content
directory is easy to configure as WordPress already provides a constant. WP_CONTENT_DIR
allows you to modify the location of the wp-content
directory. The fact that I can modify this inside of wp-config.php
lent even more credence to this solution.
So I have come full circle. Linking the tenant wp-config.php
is the key. If I make the assumption that core is used for a multitenant architecture (which is a safe assumption) things became easier. All I need to do is create a wp-config.php
in core to serve as a placeholder. Then the core wp-config.php
can include the tenant wp-config.php
.
To determine the location of the tenant I use PHP's super global $_SERVER['DOCUMENT_ROOT']
. Some developers advocate against trusting $_SERVER
values. While I typically agree, this particular value is set with your server's configuration (e.g. DocumentRoot
in Apache). Furthermore WordPress uses this value as well. So I haven't introduced a security risk.
By solving the issue of including the tenant wp-config.php
, I am free to symlink the rest of the core files and directories.
1<?php 2/** 3 * The base configurations of the WordPress. 4 * 5 * ... 6 * 7 * @package WordPress 8 */ 9// NOTE: this WordPress install is configured for multitenancy10require_once dirname($_SERVER['DOCUMENT_ROOT']) . '/wp-config.php';11 12/* That's all, stop editing! Happy blogging. */13 14/** Absolute path to the WordPress directory. */15if(!defined('ABSPATH'))16 define('ABSPATH', dirname(__FILE__) . '/');17 18/** Sets up WordPress vars and included files. */19require_once(ABSPATH . 'wp-settings.php');
1<?php 2/** 3 * The base configurations of the WordPress. 4 * 5 * ... 6 * 7 * @package WordPress 8 */ 9 10// NOTE: file lives outside webroot for additional security11 12// modify the config file based on environment13if (strpos($_SERVER['HTTP_HOST'], 'local') !== false) {14 $config_file = 'config/wp-config.dev.php';15} else {16 $config_file = 'config/wp-config.prod.php';17}18 19$path = dirname(__FILE__) . '/';20require_once $path . $config_file;21 22/** Database Charset to use in creating database tables. */23define('DB_CHARSET', 'utf8');24 25/** The Database Collate type. Don't change this if in doubt. */26define('DB_COLLATE', '');27 28// ...
If you are curious lines 13-17, I suggest you read my post on Configuring WordPress for Multiple Environments or watch my talk from WordCamp Chicago 2011.
While I tested and am currently running a multitenant architecture for WordPress sites in production, this solution needs more testing. It's almost too simple. Which leads me to believe this has been considered by WordPress. You think WordPress.com installs WordPress for each of the thousands of sites they host? Doubt it…
Nonetheless, WordPress is a large, feature-rich piece of software with a huge ecosystem of over 20,000 plugins and uncounted themes. If you adopt the solution or have one of your own please comment with your feedback and report your findings.
This post was inspired by an unconference talk on multitenancy given at PHP|tek 12 and a post by Mark Jaquith on WordPress Skeleton. Also a shout out to VIA Studio for providing a testbed and adopting this WordPress multitenancy solution.
]]>Here's my talk synopsis:
We all know WordPress is slow out of the box. This talk provides 21 ways to make WordPress faster. We'll start with basic theme optimizations and work our way up to server configurations. There's something for everyone. So if you want your WordPress site to load faster and handle hundreds of requests per second, don't miss this talk.
So come to WordCamp Chicago. And for those that can't make it, look for a follow-up post at the end of August.
]]>I created an initial set of tips that will help you become a better PHP developer. While these can be abstracted to any language, my examples are specific to PHP. Furthermore, I have left out those I felt were personal preference – such as code formatting or avoiding PHP's alternative syntax.
While I appreciate the shorthand, avoiding three additional keystrokes is the ultimate laziness. Especially when three keystrokes cost more than you realize – namely compatibility and portability.
Yes, short_open_tags
is an INI setting. Yes, it was re-enabled by default in PHP 5.3. But not every server runs PHP 5.3. Not everyone can modify their INI. Using XML? How do you differentiate between an XML header?
PHP short tags can get messy and confusing. Use <?php
. It's clear and says, “Hey bitches, I'm writing PHP!”.
Please stop using mysql_*
functions as they have not been updated in quite some time and are in the deprecation process. Use MySQLi or PDO.
If available, I recommend going straight to PDO. Do not pass MySQLi. Do not collect technical debt. However, read the docs for more details between choosing the API.
I see a lot of code for parsing or manipulating strings and merging or sorting arrays. Often this code is custom written. If I had a nickel for every line of code to search a string with a regex or sorting a multidimensional array…
PHP has thousands of native functions. Over 100 of these are array functions and string functions. Take 15 minutes to click through each of these functions and read the function definition. You will find gems like strpos()
, parse_str()
, array_filter()
, and array_reduce()
.
PHP has excellent documentation. Once you're done with String and Array, you should browse the other PHP functions.
I guarantee putting these tips into practice will put you on the path to becoming a better PHP developer. In the end, it's about knowing your language and staying current. On that note, you should jump over and read my post about Routines of a Good Developer.
This post is part of a series on How to be a Better PHP Developer.
]]>A developer executes. Their talents often focused to a single area. Without need for the “big picture”.
An engineer designs and plans. Always aware of the “big picture”. With talents in many areas. An engineer can assume the developer role. But an engineer's core focus lies with architecture.
This is not a judgement on either role. Simply a distinction I've come to realize between the two. An important one personally, as I intend for my next role to be an engineer.
]]>While none of my sites have heavy traffic, I outgrew shared hosting technically years ago. I began requiring upgrades or package installations that a shared host can not provide. In addition, I no longer used many of services provided by shared hosting. For example, I use Google Apps for email, calendar, and documents. Google offers Google Apps free for under 10 accounts. In the end, all I use is the technology on the web server.
Enter Amazon EC2. As admitted in my other posts, I am no sysadmin. But Amazon makes it super simple to setup an instance with anything you need. It's literally a few clicks within their AWS console. Furthermore, Amazon offers a “Free Website” plan for 1 year. It includes more than you'll need hosting a single website.
So when my shared package expired, I moved this WordPress site to Amazon EC2. Again, I don't receive a lot of traffic. So running on the micro instance provided by the “Free Website” plan was fine. Nonetheless, I found my site performed just as well, if not better, than the shared host.
So this WordPress site now runs on Amazon EC2. I'm in the cloud! I'd encourage anyone interested in improving their sysadmin skill set or who wants more control over their site to take advantage of Amazon's “Free Website” plan.
]]>I woke up in the middle of the night to what sounded like a cat scratching the back of a couch. A really big fucking cat. I knew it was right outside the shelter. At first, I told myself it could be raccoons. I knew it wasn't raccoons. I heard a food bag fall to the ground. Once I heard the crushing of metal pots, I knew it was a bear.
The other hikers were still sleeping. I calmly woke them up, asking who had a mess kit in their food bag. The north-bounder claimed it. I said, “I'm pretty sure a bear just got it.”. The south-bounder stirred into action and aimed his MagLite at the tree. It was difficult to see through the mountain fog. Adding to the mystery. But his food bag was definitely gone. There was nothing he could do. He complained about losing the expensive stove inside his mess kit. Then he went back to sleep.
I still had a bag in the tree. Although hung much higher, the bear now knew the tree had food. I thought about going out and raising or moving my food bag. Without seeing the bear, I didn't know its size or if it was just one bear. Fear set in and I stayed in the shelter. I laid there alert.
Shortly after, I heard the bear climb the tree again. Its claws sounded massive, scraping off bark on the way up. I grabbed my flashlight and shinned it towards the tree. Still unable to cut the fog, I couldn't see the bear but heard it retreat. Fortunately it was timid. We played this game for the next hour. Final the bear remembered it was a bear. My little flashlight was no threat. It continued to climb the tree. Finally in what sounded like a lunge off the trunk it got my bag. My food poured to the ground like a piñata. The bear fell as well. It hit with a thud and scrambled off. Must have hurt its pride.
The bear returned periodically taking food. It was 5:00am. I decided I would get up at first light. Around 5:40am the sky brightened enough to cut through the fog. I finally could see the bear. At roughly the height of a grey hound dog and husky (like a bear) it was likely not full grown. I made enough noise getting up for it to retreat. Knife at my side I went out.
The bear had punctured my bag towards the bottom. You could clearly see two claw marks. The punctured bag couldn't handle the weight the bottom ripped clean off. Dumping my food to the ground for easy picking. The bear took everything good: crackers, flat bread, tuna packs, summer sausage, peanut butter, candy snacks. In the process it stepped on most of my dehydrated meals, popping their seals. In the end, I salvaged 3 dehydrated meals, a few packs of oatmeal, and some candy. Enough for about a day and a half without skipping meals.
It's demoralizing. There might have been more I could do. But for the most part, you're helpless. Vulnerable. I remember playing Oregon Trail as a kid. I'd always laugh when receiving the notification:
A bear took 5lbs of food in the night.
I'd think “Yeah right!” Well little Jashon, it happens.
I now had a decision to make. I would cross another town in 10 miles – Wesser, North Carolina. I could resupply with 3 more days of food to finish the planned trip. Or I could get off the trail and head home early.
Everyone in the shelter was awake. The sun was out. Had it been raining, my decision would have been clear. I made the last of my oatmeal. Figured I'd eat hearty and try to make it all the way to town for my next meal. I picked up the trash from the bear and hit the trail early.
Hiking alone, I thought about my time on the Appalachian Trail. Why was I here? To experience the trail. Did I accomplish that for myself? I had experienced weather, wildlife. physical and mental challenges, nature's beauty, and fellowship. 3 more days on the trail wouldn't add more. It was time to go home.
Knowing my hike would end soon, I took my time. I crossed two mountains before descending into Wesser. The early morning sun provided some great views. I took side trails to the tops of each peak. Surprisingly, I had cell phone reception at the top. I called my parents and told them of my new plan. My Mom would drive down after lunch.
I struck up conversation with each hiker I passed. Telling them of my bear encounter. I sat on the edge of The Jump-off for some time. I looked out over the 2,500ft decent into the valley. I watched the clouds make shadows across the green mountains. I listened to the birds and the wind. What a view.
The trail dropped down to 2,800ft into a river valley. Elevation hadn't been this low since Neels Gap on Day 3. The decent was painstaking. The trail was narrow, muddy, and sometimes nonexistent. Runoff from all the rain must have eroded the trail as it flowed down into the valley. I could hear the road. But the trail switched back so many times it was still far off. I decided to stop for lunch. I needed water anyway.
“Bones” and “Shifty” weren't too far behind. Interested to hear about the bear they stopped and had a snack with me. They had camped farther up the trail and missed the bear story. I had stopped and told them I was hitting the trail early. But only mentioned the bear. They had thought I was joking. Only a mile from town they pushed on. Rumors of the good pizza at NOC kept them moving. I told them I'd catch up with them later.
The last mile into town was pure mud. I considered sliding down the ridge on my back to save energy. Ridiculous. I crossed the road into town and found a bench outside the shop. The north-bounder who's mess kit got crushed napped on the adjacent bench. He had reached the same decision as me – home. We hung out most of the day while waiting for our rides. The two college hikers came off the trail. I bought a six pack and we all had a beer together on the river bank. The water was cold. Some of us put our feet in to help with the swelling.
We wished each other safe travels and parted ways. I got pizza with the north-bounder. His ride pulled up shortly after. I asked if they'd give me a ride to the highway. It would keep my Mom from having to drive the mountain roads. We coordinated meeting at a gas station off I-40. We arrived around 9:00pm. My Mom suggested we stop for the night. I couldn't. Excited to be homeward bound, I drove through the night just to sleep in my bed.
~ Bootstrapper – 1001
]]>Today was hard. Just one day off the trail made me soft. My pack felt heavy. I added about 7lbs of food. But it may as well have been 20lbs. The afternoon sun made the forest humid. The elevation changes were gradual and never-ending. Today was hard.
I hiked most of the day alone too. Your thoughts only occupy your mind for so long. Then you make up games. Then you focus on the trail. That fills an hour on the Appalachian Trail. You hike for 9 more hours. After 8 days, I've realized I don't like hiking solo. It's lonely.
Hikers are staggered on the trail. Everyone hiking at their own pace. So you won't see anyone most of the day. You pass open campsites and empty shelters. It can feel like a ghost town. Especially when the clouds cover the mountain gaps. A cool sight a week ago. Now it reminds me I am alone.
My trail legs were still good. But my feet hurt. I don't think I stopped as much today. Unconsciously I just wanted to get the miles done. So I kept hiking. There was a good overlook and watchtower at the top of one of the mountains today. It overlooked the town of Franklin where we had stayed the night before. I tried to make it before the rain. It started drizzling just as I arrived. I managed to get a quick video.
I made it down to the shelter before the rain increased. For the most part, the trees act as an umbrella so long as the rain is light. “Shifty” and Kyle were inside along with a solo hiker. The guys were about to leave for the next shelter. It was another 5 miles, but it was only 5pm. I asked for a few minutes to put my feet up and decide if I wanted to go with them. They had to fill up with water anyway.
The shelter seemed new. I struck up conversation with the solo hiker while I took off my boots and stretched out on the shelter floor. He told me about the hikers he had passed along the trail. He cross paths with “Machine” a few days back. The college kid kept the trail name I gave him. It was the best thing I heard all day. It gave me the boast I needed to continue. I told the solo hiker he should come on with us to the next shelter. After all, he didn't want to stay there by himself, right?
Those last 5 miles hurt. Towards the end, I stopped every quarter mile. Fortunately I hiked with the guys most of the way. So it went quick. There was a south-bound hiker already in the shelter. He started in Tennessee. After some group chat, I heard he was a technology consultant for Oracle. My man. We spent the rest of the daylight talking about MySQL, Sun, and the upcoming Facebook IPO.
The shelter was cramped. The two college guys from Day 6 arrived shortly after we did. They decided to camp up the trail. “Shifty” and “Bones” quickly joined them. I suggested the trail name “Bones” for Kyle after following him up the last ridge. You could barely distinguish him from his hiking poles. Just a skeleton carrying a large pack wearing rain gear and a hat. Now with extra room, I asked the two others if I could set up my tent inside. I told them I needed to air it out. I didn't want to mention the mice I saw minutes before.
This isn't a very good entry. Like anywhere else, you have good days and bad days on the Appalachian Trail. Today was a bad day. I need some sunshine and my feet to not hurt.
~ Bootstrapper – 1000
]]>The rain started last night. It's still raining. Over 20 hours of rain. Sleeping in a tent in the rain is like being inside a microwave popcorn bag. Pop. Pop. Pop. The chaotic, but constant sound of rain drops hitting your tent. I didn't get much sleep.
On top of which it was cold. I slept in my rain gear for extra insulation. And it was incredibly dark. I literally could not see my hand in front of my face. Eire. Of course my mind began to wonder. I'd hear ground noise. I imagined a huge jurassic bear heading toward my tent. Ridiculous. I eventually fell back to sleep.
I set out in the morning with “Shifty” and Kyle. The two guys remaining from the group of four thru-hikers. We decide to push hard through the rain and get into Franklin for the night. “Shifty” and I had a mail drop in Franklin and planned to resupply Monday. Pushing the extra miles meant a hot shower, soft bed, and the chance to satisfy some food cravings.
We did the first 5 miles in under 2 hours. I'd say those trail legs kicked in. We stopped for a full lunch at a shelter and a chance to get out of the rain. We caught up with “Colonel” and another couple that was finishing a round trip weekend hiking. The “Colonel” was hiking a few hundred miles of the Appalachian Trail after his son had hiked it years earlier. He stayed in the same shelter as us from the night before. We gave him the trail name “Colonel”, as he was a military man. Not sure if he liked it or not. But sometimes you don't choose your trail name.
During lunch we noticed a dramatic incline on the topography trail map. A virtual right angle. It didn't disappoint. It was nearly straight up. Some of it was trail stairs, most were boulders. I packed the hiking poles and used my hands for climbing. Definitely an extreme for the Appalachian Trail - tackle a vertical rise in the cold rain, with a 40lbs pack, after fatigued from the morning miles. Get serious.
The rest was a pretty gradual up and down through the forest. The trail crossed 2 roads today. We decided we'd try to hitch-hike at the first, and continue to the next if we had to. I slowed up after the incline. The guys went ahead and by the time I came out they were already loading their packs in a car. A girl researching trillium for her doctoral thesis was heading into Frankin. In addition it was a rental car. So she didn't care we were muddy, wet, and stank.
We got dropped off at the Budget Inn. Everyone mentioned this place. And the second I arrived I didn't know why. It was one of those old stucco one level motels that hadn't been maintained, much less updated since the 1980s. They offered no special amenities for hikers. Seems more like they were exploiting them. There were several places in Franklin and I'm sure anyone of them would have been better. Yet, compared to sleeping, shivering in the mud, it was fine.
We got cleaned up and set out for some food. We decided Mexican sounded the most appetizing. Unfortunately all the recommended places were closed on Sunday. “Shifty” saw a Mexican grocery and we assumed we could at least buy chips and salsa. As we walked up, I noticed tables in the back. We entered and no one spoke English. I could tell the guys were uneasy. I muddled some Spanish to the man at the counter about chips and salsa. “Sí. Sí.” I told the guys, they had what we wanted. After ordering and consuming a Mexican Thanksgiving, the guys said, “Good call, Bootstrapper”. The man told us to come back anytime and nudged the checkout girl rubbing his fingers together, indicating that we spent a lot.
We left and headed to the grocery store down the block. A good thing we went after dinner, otherwise, I would have bought much more food than I did. I decided to mail most of my dehydrated meals back. Instead I would pack with more comfort food. I picked up some summer sausage, tortillas, tuna, and a mixed bag of mini candy bars.
I finished packing for the morning and cleaned my tent. I also called my Mom since it was Mother's Day. I know she was glad to hear from me. Cell phone reception was better than I expected on the Appalachian Trail. But short of a few quick texts, we hadn't talked since I left last week.
The day was coming to an early end. We had gotten a quick ride into town and everything we needed was within walking distance. Walking distance – that term has such a far range now. Today marked 100 miles and a week on the Appalachian Trail.
I am ready to be back on the trail.
~ Bootstrapper – 0111
]]>Trail legs. I read about them when researching the Appalachian Trail. People talk about “when I get my trail legs”. They are when you can hike the trail dawn to dusk, day after day, and crush miles. I got mine today.
I wasn't too sore this morning after 18 miles on Day 5. My left Achilles was stiff. I felt a sharp pain when I misjudged a dip yesterday. I could tell it was a little swollen this morning. It took a few miles to loosen up. During which I was well behind the thru-hikers. It wasn't a big deal though. Everyone hikes at their own pace throughout the day. We leap frog and typically end up at the same place for the night.
I did notice “Red Fox” fell behind. When he caught up, he complained about his ankle and knee. He decided to “bail out” at the border. I could tell “Cloud” dropping yesterday played a factor. It's infectious. Each time someone talks about anything off-trail it's a downward spiral. The next time the trail crosses a road you think how easy it is to get a ride into town. You can sleep comfortably, take a shower, eat a full meal. You have to put that all out of your mind. You have to stay out here. Although I'll be in town in a few days, it's to pick up my mail drop. Then right back to the trail.
There were several people that also stopped at the border. Not sure what it was about North Carolina. I quickly found out. The trail immediately changes. There were more switch backs. The path was rockier and criss-crossed with laurel roots. Elevation stayed above 4000ft and reached 5500ft for a while. I must have strong ankles. I rolled them several times today, fortunately without injury.
The day went fast. Even though we got an early start it seemed to be 3pm instantly. And I had already gone 12 miles. I walked alone most of the day. I caught up with an older couple. They were hiking to NOC (about 30 miles up the trail). They were actually at the shelter before and decided to stop for the day at the current shelter. 4pm is too early to stop. I believe they were worried about the rain.
I kept going with intentions of stopping at Beech Gap campsites around 16.5 miles. I got there right before 6pm. No one was there. It was a poor site. It felt boxed in by the trees and had a mud puddle for a water source. Not to mention right behind the white blaze was a North Carolina Bear Sanctuary sign. The combination left me feeling uneasy. I didn't want to spend my first night alone in this place.
I noticed a note on the trail marker.
Bootstrapper,
We pushed on to Carter Gap shelter. Hope to cross paths down the trail.
- Shifty.
I broke out the map to see the distance to Carter Gap shelter. A little over 3 miles. The first 2 were basically flat and the last 1 was over a 700ft elevation. It was 6:10pm. I could make it. I ate a handful of trail mix. Then I returned to hiking the trail.
I arrived about 20 minutes after the guys. They were surprised and glad to see me. Two other guys were in the shelter. They were hiking sections of the Appalachian Trail whenever they had time. This time with a goal of 400 miles in a month. We all ate dinner and hung our food bags. I decided to set up my tent instead of the shelter. While the shelter is easier, my tent holds up well in the rain and provides some personal comfort. Plus I've been lugging the weight, so may as well use it.
The goal tomorrow is to get as close to Franklin, North Carolina as possible. That way I can get in and out for my mail drop and still get good miles for the day.
I will know tomorrow if I truly have my trail legs or if 37 miles in two days is the end of my physical ability.
~ Bootstrapper – 0110
]]>We dug deep today for 18. We're calling it Beast Mode. The young group of thru-hikers arrived at camp late last night. Like me, they hoped to hike to Tray Mountain shelter but ran out of time and energy. This morning I banded together with them to get back on schedule – Plumorchard shelter. It would be an all day 18 mile hike with over 4,000ft of elevation change.
The plan was worth it for a few reasons. First “Sidewinder” and “Beast” (father/son group from Day 3) were stopping at the Georgia/North Carolina border. I needed more miles. So I needed a new group. Second, something about being on schedule keeps your mind right. One less concern on the trail. Finally, I wanted to know what high miles felt like.
Hard. I was constantly eating and using the electrolyte mixes. When you push that hard food equals energy. And you're using every bit. I ate a huge lunch. It was the first time I was close to feeling full. I snacked often. But shortly after each, I'd hit a wall. In the real world, you rarely think of food as energy. Normally it's a ritual. Something you do at noon or the evening. On the trail, you skip a meal and your setting yourself up for exhaustion.
I caught up to the guys from the younger group at the last road crossing in Georgia. There was another 3 miles with some elevation change. Relative to the day it was nothing. Yet, it was also the end of the day. I had already gone 15 miles over similar elevation to Day 2. 15 miles is normally as far as I go in a day. I told the guys I'd like to hike with them the rest of the way if they were willing. They let me take point and set the pace. We hit the shelter a little after 8:00pm. It took all day. With the exception of a few short breaks, I'd been hiking since 9:00am. Given my state and the time, I opted to sleep in the shelter. It's saves time both at night and in the morning. I may regret it, most are critter invested. Right before bed, “Red Fox” came hollering into camp.
There was some trail drama today. “Cloud”, the girl from the younger group, was having serious knee pain. At lunch, “Red Fox” decided to wait for her. He had an eventful day yesterday. He left his mess kit in the back of the pickup when they hitch-hiked into Helen. He had gone on a solo mission to get it back. “Red Fox” rolled into Cheese Factory around midnight boasting his 31 mile day. Today he wasn't boasting. He hurt. So waiting for “Cloud” also meant a break for him. In the end, “Cloud” went into town to get her knee checked out at the next road crossing. “Red Fox” high tailed it to catch up with the remainder of his group.
Tomorrow I'll cross into North Carolina. Now that I'm back on schedule it'll be a 16.5 mile day. North Carolina maintains a higher elevation. So their peaks are taller. Standing Indian Mountain tomorrow is 5,500ft. The highest on the trail so far. Hopefully I'll feel fine in the morning. I chose a heartier dinner – Spicy Sausage Pasta. A small comfort. “Runner” and “Speedy” were at the same shelter. They offered some vitamins targeting joint pain. Between that and a good night sleep, I'll make the miles tomorrow. I have to.
~ Bootstrapper – 0101
]]>Each day is a new challenge. Maybe you're sore. Maybe you have miles to make up. Maybe the weather is bad. Maybe you wake up late. None of which factor in terrain, elevation, or distance you hike in a day.
But you have to keep moving forward. It's a game of steps. The Appalachian Trail is hard. You give it everything you got and it'll just take it. Try to push through and it'll push back. Think you're at the top of the mountain? The trail switches back for another quarter mile incline. Believe you hiked 2 miles. You've only hiked 1. In the end, all you can do is put one foot in front of the other and see how far you get before the sun goes down.
It reminds me of a quote by Jimmy Dugan (Tom Hanks) in A League of Their Own.
It's supposed to be hard. If it wasn't hard everyone would do it. The hard… is what makes it great.
Each day comes down to distance. And I learned today sometimes you're not going to make the distance. There are trade offs. Sometimes you can't go another 2 miles. It takes planning. Not the plan I made at home before on the trail. The real plan. One adjusted almost hourly. You set goals and do your best to keep them. While not killing yourself, but still making miles. Life is much the same. The trail is no different.
I spent most of the day with the father/son group I met on Day 3. The father's trail name is “Sidewinder” and the son's “Beast”. Today they were mostly ahead of me. I appreciated the company. I planned the day out to reach Cheese Factory. I wanted to reach Tray Mountain shelter. It was another 2.2 miles. But there was too much elevation change. Four mountains today. They formed a W. All the way up. All the way down. Do it again. Also the sun was out. Which was welcome, but made it hot. I might have been able to push myself. But at what cost? It likely would have been after dark and I could have pushed too hard. Plus I knew I could camp with others at Cheese Factory. I still haven't spent the night alone. At this point, I don't think I want to.
I'm far enough along the trail now that I see familiar faces each day. There's the father/son group – “Sidewinder” and “Beast”. Together they have a similar pace to my own. “Beast” could likely hike 18 miles in a day. But Sidewinder hikes around 12 comfortably. There is a two man group of runners – “Runner” and “Speedy”. When they “feel like it” they will run part of the trail. They hike ultra-light – with packs around 15lbs. I'm jealous. There is a group of four college kids. They are all thru-hikers that banded together on their first day. Three guys and a gal. Only two have trail names – “Red Fox” and “Cloud”. They seem to hike what they feel. Sometimes only a few miles and other times many miles.
While I typically hike alone, I'll see these hikers at lunch, in passing, and at the end of the day to camp. A lot of hikers went into Helen, Georgia today. It was the first major town on the trail. I didn't want to go. Honestly, I was worried I wouldn't come back. The whole point of my trip is to be out here. Out in the wilderness. Out of my comfort zone. I've almost gotten to the point when people talk about home or comfort or food, I leave the conversation. I need to keep my mind right.
I made another camp fire tonight. Probably a good thing. The heat of the day reminded me that I haven't showered. So the smoke was a good mask.
I'm going to bed a little early. I'd like to make up those miles tomorrow.
~ Bootstrapper – 0100
]]>I woke up to rain. It took forever to fall asleep. I battled a cold before the trip and there's still a little cough that comes at night. None of it matters. Because I have to hike. I get up, make breakfast, pack my gear, and hike. Knee still bothering me. Hike. Raining. Hike. That is what you do. Hike.
I study the map and set a schedule. I do my best to stick to it. If I don't, I have to make it up tomorrow. And guess what I'm doing tomorrow – hiking. Today's goal is Low Gap shelter. I planned it to be 12 miles away. Intentionally shorter to give myself an easy day. But since I didn't make Neels Gap yesterday, it will be 14 miles today.
The distance becomes a game. You divide and conquer. The entirety is too much. If I thought when I started I have 14 miles to go, I would stop after the first incline. You make deals. I'll get here in an hour. I want to make it there before lunch.
I make it to Neels Gap quickly. It has a hostel and outfitter (supply store) right on the trail. I bought a Powerade to curb the dehydration from yesterday. I also got some cough drops hoping they might help me fall asleep easier.
The college kid that I teamed up with on Day 2 seemed ready to make more miles today. I told him to go on. Upon leaving he shouted back, “Hey Bootstrapper, thanks for the trail name”. On the Appalachian Trail you have a trail name. Either you have one or one is given to you. I named myself “Bootstrapper”. Given his pace I named him “Machine”. Sounds like he'll use it.
The weather was surreal. Like the rain forests of the Pacific Northwest – constant rain and fog. A steady wind turned the rain into mist. The clouds hung low in the mountains. Visibility couldn't have been more than 100ft. At the top of the second ridge, I came across a beat up tent. “Hello”. A lanky, middle-aged southerner stumbled out. His trail name was “Pop Tart”. I immediately realized why as his food supply consisted mostly of Pop Tarts. He offered me one several times. He was taking a zero (not hiking any miles that day) before continuing south. We discussed the weather. He said all the wind was going to move the rain out. He was a chatter. But I was glad for the conversation.
Most of my day was spent alone. I kept leap frogging a father/son group. I'd pass them, they'd pass me. I helped them with the map and told them I was heading to Low Gap. They thought about it for a while and the next time we crossed paths they agreed to Low Gap. We went the last few miles together. Right as we made it to Low Gap, the sun came out. Just as Pop Tart said.
Although my shoulders were strengthening, my left knee was still bothering me. I set up my tent quickly. Hoping to rest up. However, the shelter was full. More people meant more activity. We decided to make a fire. I never pass up a fire. A thru-hiker named “Turtle” had already been collecting wood. I helped him organize the piles into kindling, timber, and logs. Everything was still wet. We used one of his fire sticks to ensure it started. As soon as the smoke hit the shelter, everyone came up and circled around the fire. Amazing how in the wild, fire brings the tribe together. I sat around the fire until dark.
Upon leaving the fire, I realized the temperature had dropped significantly. It had to be low 40s. I could see my breath. I had foregone my sleeping bag due to its bulk. I had my Mom sew together a two sided lightweight bag – thicker cotton on one side and flannel on the other. This way I could rotate it for more warmth. But tonight was cold. I decided to sleep in my rain gear to help reflect my body heat.
I have a big day tomorrow. I cross two major peaks. Both over 4000ft.
Lessons I learned today:
~ Bootstrapper – 0011
]]>Woke up with my right shoulder stiff and my left knee sore. I popped an Aleve for a temporary fix. It wouldn't last. I'm carrying so much food I can't pack it right. One side of my backpack is heavier. So that shoulder suffers. It'll be a few days until I've eaten enough food for everything to fit right. Until then, I'll switch sides each day.
My knees aren't bad. It's just the weight and the elevation changes. I use the pain as an indicator of when to stop. Normally my knee starts to feel a little thick. When it does, I know I have another mile. Then I should rest.
Still a little uneasy on the trail. I keep looking for signs of bear. Watching for snakes. Nothing so far. I'm less uneasy than yesterday. I imagine in a few days I'll be one with nature.
I powered through 6 miles in the morning. The goal is 16.8 miles for the day. While I planned for distance I didn't consider elevation changes. I crossed 3 mountains already. Still with Big Cedar and Blood Mountain ahead – the highest peak on the Appalachian Trail so far at 4,755ft. Good views though. The sun manages to come out when I reach the top of each. In addition, I passed an awesome waterfall. With all the rain, it flowed right across the trail.
I passed a few south-bounders on the trail in the morning. The first north-bounder I ran into was a college kid from Connecticut. He's a thru-hiker (Hiking Georgia to Maine). His goal is to complete the Appalachian Trail in 100 days. That's an average of 22 miles per day. I stopped to take a video while he kept going. I caught him a few miles up the trail filtering water. We discussed the “bear zone” ahead. Flyers were posted at each road crossing indicating a 6 mile stretch of the trail that had been designated “bear active”. To stay in this area required a bear canister – a crush proof capsule for your food. They were expensive and heavy. Most hikers didn't have them.
It was getting late in the day. We decided we'd get as far as we could. If necessary, we'd camp together in the “bear zone”. We pushed hard to a campsite about 1 mile from the edge of the “bear zone”. The elevation changes were slowing both of us. We were only a third of the way up Blood Mountain. We sat around the campsite for about 30 minutes. Unsure if we should push on or set up camp. We hadn't seen anyone else on the trail. Blood Mountain shelter was at the top. A little over a mile away and another 1000ft climb. We decided to go for it. We agreed to take breaks along the way and stay together. Just as yesterday, as the day winds down, so does morale. Exhaustion sets in. It's tough.
We stumbled into an empty Blood Mountain shelter around 7:30pm. A break in the clouds let the sun out and lifted our spirits. Since the shelter was empty, we decided to set up our tents inside. The shelter was an old stone cabin. Looked abandon for years. Like something out of Blair Witch Project. If nothing else, the tents could air dry from the rainy night before and would keep the critters out.
Blood Mountain had a rocky top. I used my last bit of energy to climb the highest boulder and enjoy the view. I felt like shit. I was hungry, tired, and dehydrated. I definitely pushed myself to the limit. My original goal was to make Neels Gap. Another 1.8 miles away. I would not have made it. Blood Mountain was far enough. I felt a lot better once I had dinner and a Propel mix. It provided the energy to spark up conversation with my fellow hiker. He didn't have a trail name. So I suggested “Machine”. He had been in front of me all day. Rarely stopping. I have no doubt he could have gone on to Neels Gap. But I was glad he stuck around.
I had passed several people during the day. A lot were questioning their commitment to the trail. Blood Mountain is the first milestone. It's nearly 30 miles from Springer Mountain. You cross several mountains before Blood Mountain. Combined with the “bear zone” it seems hikers were dropping out. With barely 1% of the trail complete, it had already separated the men from the boys. I was proud to make the first cut. Even if the downhill to Neels Gap would have to wait until morning.
A few lessons from the day:
~ Bootstrapper – 0010
]]>The Appalachian Trail is marked with white blazes – a painted white stripe. It's like Miyagi sent Daniel-son into the woods to randomly make perfect brush strokes on trees.
And they are random. I questioned several times today if I was still on the Appalachian Trail. Eventually when I'd see one, I'd shout “white blaze”. This served as both a positive reinforcement and a bear alert. It quickly turned into a game. I started to sing “white blaze” (I did so in a Robert Goulet voice). I'd also sip from my Camelbak every other blaze. Anything to pass the time.
The day started with a small success. It was unclear how to reach Springer Mountain most efficiently. Coming in FSRD 42 is best. It puts you .9 miles north of Springer Mountain. While you double-back, it's the closest you can get. Springer Mountain is the southern end of the Appalachian Trail. I had to start at the beginning. There is an approach trail to Springer Mountain. 8.8 miles to the top. But who wants the extra miles.
My parents dropped me off. We stayed the night in Ellijay, GA so I could start the trail first thing Monday morning. They did the .9 mile hike to Springer Mountain with me. We took pictures at the start of the trail and signed the hiker log. We each grabbed a rock from Springer Mountain. It's tradition for thru-hikers to carry the rock to Katadin Mountain – the northern end of the Appalachian Trail in Maine. We got back to the parking lot and said our “Goodbyes”. It was 11:30am when I hit the trail.
It rained on and off. About 20 minutes each time. Pretty steady downpour. It was a good distraction. I still had some anxiety about being on the trail. It was all so unknown. Although in shape, I was not a hiker. With almost 50lbs on my back, who knew how far I could hike in a day. Or how many days I could hike in a row. Also, I was a solo hiker. I'd never camped alone before. Would there be people on the trail? May is considered a late start for the Appalachian Trail. A lot of unanswered questions.
About a mile in I passed a father/son group. Soon after I passed a family. They split into two groups. The parents were first, and the kids about a mile ahead. I also passed another father/son group. The son had gone ahead to hold a spot at Hawk Mountain shelter. Everyone seemed to have Hawk Mountain as their stopping point for the day.
I reached the shelter around 2pm. Right on schedule. I made a quick peanut butter sandwich (I mistakenly bought chunky) and gave the legs a 20 minute break. The shelter was already near capacity. And as much as it was nice to socialize, I decided to move on. Hawk Mountain was only 8.3 miles into the trail. My goal was to do around 14 miles a day. 2:30pm was too early to stop. I felt confident I could make it farther before dark.
Justus Creek was another 6 miles. It offered water and campsites. To my surprise that 6 miles crossed 2 mountains. By the time I reached Justus Creek, I was exhausted. My knees were shaky and my arches felt flat. Mainly though, my shoulders were sore. I'll pack differently tomorrow and see if that helps.
I spent the day hiking alone. And after Hawk Mountain, I didn't see anyone on the trail. But fortunately as soon as I crossed the creek I saw a couple filtering water. As a courtesy I asked if I could camp with them. I was glad they said “Yes”. While I would have kept going, the next shelter was another 1.7 miles. It would have been slow-going.
I didn't want to spend the night alone. I think that would have been tough on the first night. There was a point after dinner when the couple went back to the creek for a good half hour. About 15 minutes in, I felt pretty lonely. I think the exhaustion and the hunger allowed negative thoughts to creep in. Once I rested and ate I felt better. Emotions seem to swing easily on the trail. This was going to be as much a mental challenge as a physical one.
It took me a good half hour to hang my food bag. Hanging your food is a precaution for bears. Black bears are excellent climbers. My research dictated at least 15ft off the ground and several feet from the trunk of the tree. At first the line was tangled. Then it was too close to the trunk. It was nearly dark. A hook-shot over a 30ft high branch takes a few tries. I finally hung it where I felt comfortable. I'll know in the morning.
A few lessons from the day:
I better get to bed. Trying to hike 16.8 miles tomorrow. I did 15.2 miles today. From 10:00am to 6:30pm. So long as the legs aren't sore, I should be able to hike it.
Writing this entry before bed helped me relax. I'll likely make this a routine.
I look forward to the morning.
~ Bootstrapper – 0001
]]>After a week on the Appalachian Trail, I sent the following items home:
In addition, I did not take all of my dehydrated meals from my resupply. Instead I bought some lightweight items such as tortillas, snack crackers, tuna packs, and summer sausage. I noticed other hikers with such food. At first, I thought they were inexperienced. But it turns out these items are not only lighter, but higher calorie. They were also more appetizing. All of which are welcome after a long day of hiking.
I definitely could have gone lighter. 40lbs is my upper limit. Without the tent, large food supply, and additional gear I likely would have been under 35lbs. However, I preferred sleeping in my tent, and limiting trips into town saved time and money.
]]>In May I will set out on a 14 day, 206 mile hike through the Georgia section of the Appalachian Trail, continuing on to Tennessee. I will be dropped off at the southern trailhead – Springer Mountain, Georgia. I plan to journal each day. When able, I will post my entries under Appalachian Trail.
I labeled this trek Bootstrapping. Both for the hiking hyperbole and the computer reference – a successive process that evolves a base program.
I will do this alone. For me. To find more of myself. Nature as my catalyst.
My feet will carry me. Hiking as much as 18 miles a day. Lugging 35 lbs of gear. Crossing mountains and creeks. Rain or shine.
Once on the trail, there is one simple bearing – North.
]]>For years I have looked for a Louisville PHP User Group. As Louisville is primarily a .NET town, my hopes for PHP have never been high. Unfortunately the Louisville tech community doesn't cross pollinate. Nonetheless, I have come across several developers and shops over the years using PHP. So there is PHP in Louisville.
If you want something done, do it yourself.
So I'm starting the Louisville PHP User Group. The first meetup will mostly be a meet and greet. We'll vote on a group name. Something catchy like LouPUG or PHINKY. I'll also provide a brief recap from attending php[tek] the week before. And of course they'll be PHP swag.
The proposed schedule is to meet the last Wednesday of the month. Details for our first meetup are below. Please comment with your interest and help us spread the word.
Louisville PHP User Group
Wednesday, May 30th @ 6:30pm
VIA Studio
1201 Story Avenue
Suite 203
Louisville, KY 40206
Get Directions
Each year I look to extend the reach and features of PocketBracket. PocketBracket really took shape in 2010. The app was rewritten as a completely native app. The original app (2009) contained several web views. Now the app contains only two. In addition, new sections were added for Pools (create and view), PocketBracket Network (view other's brackets), and Scoreboard (game schedule and scores).
PocketBracket shot a quick jumper at the new Android Market in 2010 that was a brick. Under the time pressure of March Madness app development was rushed. With so many Android versions and devices, an untested PocketBracket app became an epic #fail. This resulted in a backlash of negative user reviews (which are hard not to take personal) and low downloads. In the end, I refunded users of their purchase (an option in Google Checkout). While ultimately some transactions cost money, it was the right thing to do.
PocketBracket became profitable in 2010. The iPhone user base grew by 80% and rose to #3 in Top Paid Sports Apps and #78 in Top Paid Apps. While PocketBracket for Android failed, it became a learning opportunity.
In 2011, I put full focus on a return to the Android Market. With thorough testing and an earlier release, PocketBracket for Android was a success. We ended the season with a 3 star rating and set the bar for platform downloads. PocketBracket for iPhone grew more social in 2011. Facebook, Twitter, and email sharing was available for Brackets and Pools. In addition, more features were added to the Scoreboard. This included an extended game detail screen with stats and PocketBracket's GameVote (up vote your favorite team) and GameTalk (in-app conversation during the game) features.
PocketBracket also shifted its pricing model. Instead of being an annual upgrade, it became a new annual download. While there was concern about user falloff (due to the repurchase) this was inline with other Sports apps – MLB.com, ESPN, CBS On-Demand. In the end, while I received a handful of nasty emails, it didn't slow growth.
This year, PocketBracket tackled Windows Phone 7. While this platform currently has smaller marketshare than Blackberry, it was a strategic move. I believe Windows Phone is an up and comer (not to mention Blackberry is dying) and as such will gain market share by 2013. As with Android in 2010, PocketBracket faced challenges in the new platform. The app had a nasty bug with the Scoreboard once the tournament began. Fortunately I was able to work with Microsoft to expedite an app update.
PocketBracket for Android evolved nicely in 2012. I've learned it takes two seasons for the app to really hit its stride on a new platform. The Android version was rewritten for Android 2.0 as well as correcting bugs, given a more native Android UI, support for larger screens, and porting the features from PocketBracket 2011 for iPhone.
I also released PocketBracket Mobile – a limited HTML5 version of the app. It was available for free and targeted users that either didn't have an iOS, Android, or Windows Phone device or didn't want to pay 99 cents for the app. While I intentionally released it late with limited marketing (as not to cannibalize app sales), it was still relatively successful.
I really wanted to see PocketBracket for iPad this year. In fact, I wanted it for 2011. Unfortunately, between the expansions above and updates to the PocketBracket API an iPad specific version didn't happen. Attention to PocketBracket for iPhone suffered slightly also. There was only time for bug fixes, an upgrade to iOS 5.0, and a handful of new features.
2012 was by far PocketBracket's best year (so far). PocketBracket for iPhone rose to #1 Top Paid Sports App and held this position for 11 days. We also topped out at #28 in Top Paid Apps, passing icons like Angry Birds (Rio) and Words With Friends.
PocketBracket for Android passed previous year sales 20%. Not as much growth as we see in the iPhone market, but growth nonetheless. I believe that Android users are not as app-centric as iOS users. Specifically when it comes to paid apps. It topped out at #4 in Top Paid Sports apps.
PocketBracket for Windows Phone did well relative to its market share. It also reached #1 in Top Paid Sports apps. I also received a lot of user feedback thankful – and impressed – for bringing PocketBracket to their platform.
In addition, the PocketBracket team got interviewed by the local news. It was nice to receive some local publicity. Especially as Louisville has a seemingly small tech scene.
Marketing is difficult for any app, but more so for PocketBracket. PocketBracket deals with a niche market. PocketBracket targets someone with an iOS, Android, or Windows Phone device, interested in sports (particularly college basketball), and willing to pay for an app. By the time you filter through that criteria our addressable market is small.
PocketBracket also deals with a time sensitive event – the NCAA College Basketball Tournament. It's called March Madness for a reason. That is the madness doesn't happen until March. As such pre-March marketing usually falls on deaf ears. Furthermore, once the tournament starts – typically the second Thursday in March – interest drops dramatically. So that only leaves two weeks for prime marketing.
Due to the combination above, online marketing is challenging for PocketBracket. In the past, App Review Site Ads, Google or Facebook Ads resulted in very poor ROI. Specifically app review site ads are a complete waste. App review sites typically offer monthly ads and have a backlog for review. So timing is never right, not to mention that market is completely saturated. I abandoned such online marketing for the 2012 season. I may reconsider in the future through partnership or custom ad scheduling.
The best marketing for our app has been email campaigns to our users and App Store rank. Of course, these build upon one another – more users mean more emails and more downloads (higher rank). But emailing existing users doesn't reach new users. Not directly anyway. However, if worded and timed correctly, it can provide focused downloads. And that increases our App Store rank.
Ultimately App Store rank is critical for marketing to new users. Which is inline with our addressable market – sports fans willing to pay for an app. What better way to reach this audience than by being #1 in Top Paid Sports apps? While the path will continually change, I know that's where PocketBracket needs to be.
Without a doubt PocketBracket will be available for iPad and Amazon Fire next year. Development for these two devices is already overdue. Of course, I'll gladly consider any device which gains significant marketshare in the next year.
PocketBracket Mobile will receive more attention. Not only in features but also reach. I believe that in the next few years mobile web apps will surpass native apps. Admittedly, PocketBracket currently does not have native app requirements (camera, sensors, etc). Furthermore, selling the app as a service directly would mean 100% of the revenue (as opposed to 70%). So exploring this space is in our best interest.
PocketBracket constantly receives user feedback and suggestions. These typically become features for next year. I like to emphasize this responsiveness. I believe it is what keeps us in competition with big name competitors like ESPN, Yahoo!, and CBS.
If you are interested in learning more about PocketBracket, please visit www.pocketbracket.com or feel free to contact me directly.
]]>Right now, for learning purposes, I have an EC2 micro instance running Amazon Linux 64-bit. That likely doesn't matter for the install. There are a few conventions I follow:
With that said, the following steps install and configure AWStats (version 7.0).
Download, extract, and install AWStats
1wget http://prdownloads.sourceforge.net/awstats/awstats-7.0.tar.gz2tar -zxf awstats-7.0.tar.gz3sudo mv awstats-7.0/ /var/www/awstats
Enable CGI including the .pl extension under Apache. There are alternatives if you don't want to enable CGI globally.
sudo vi /etc/httpd/conf/httpd.conf
Change:
#AddHandler cgi-script .cgi
To:
AddHandler cgi-script .cgi .pl
Run the AWStats Tool and follow the instructions. I followed the defaults and named my server ec2test. From what I read, the name doesn't really matter.
sudo perl /var/www/awstats/tools/awstats_configure.pl
Create the dataDir for AWStats
sudo mkdir /var/lib/awstats/
Enable combined logs. Ensure the CustomLog
for your sites use a combined access log
CustomLog "/var/log/httpd/sites/domain.tld-access_log" combined
Although the AWStats tool does, I restarted Apache again as I made changes in the last step.
sudo service httpd graceful
View AWStats at http://yourec2domain.com/awstats/awstats.pl?config=ec2test
When I first visited my AWStats, I got a 404. After some digging around, I found the /etc/httpd/conf.d/awstats.conf was missing the following critical line:
ScriptAlias /awstats/ "/var/www/awstats/wwwroot/cgi-bin/"
AWStats didn't 404. But there was no data. AWStats has an updater you need to run for each of your sites.
sudo /var/www/awstats/wwwroot/cgi-bin/awstats.pl -update -config=ec2test
If you only have one site putting the above in cron is no big deal. But if you have multiple sites with multiple configurations, that's another story. There's a maintenance overhead for making the conf file and then adding the command to cron.
I found a shell script that does all this for you. Essentially, it examines your site logs and ensure that an AWStats configuration exists. Under the assumption if a site has an access log you want AWStats for it. It then runs the AWStats updater for that configuration.
You need to create a conf file to be used as the template when creating new site configuration. I simply copied my main configuration file:
sudo cp awstats.ec2test.conf template.conf
I changed a few lines in the template:
Here's the script. You can add it solely to cron – one script to rule them all.
1#!/bin/sh 2 3# find new sites 4sites=$(ls /var/log/httpd/sites/*-access_log) 5for site in $sites 6do 7 domain=$(echo $site | sed -e "s/^\/var\/log\/httpd\/sites\///" -e "s/\-access_log$//") 8 if [ ! -e /etc/awstats/awstats.$domain.conf ] 9 then10 domainregex=$(echo $domain | sed -e "s/\./\./g")11 cat /etc/awstats/template.conf | sed -e "s/domain\.tld/$domainregex/g" > /etc/awstats/awstats.$domain.conf12 fi13done14 15awstats="/var/www/awstats/wwwroot/cgi-bin/awstats.pl"16cd /etc/awstats17 18# update all sites with configuration files19for file in $(ls awstats.*.conf)20do21 domain=$(echo $file | sed -e"s/^awstats\.//" -e "s/\.conf$//")22 $awstats -config=$domain -update23done
Run it:
sudo sh /etc/awstats/daily.sh
There were several good references for installing and configuring AWStats. However, nothing seemed comprehensive or specific for Amazon EC2. So if nothing else, I figured I'd post and fill the keyword gap to hopefully help those like me starting our with server admin and Amazon EC2.
]]>I vaguely remembered a script in the CakePHP Book, but couldn't find it. I figured I could have searched for one or write one. In typical developer fashion, I chose the latter.
1public function generate_passwords() { 2 // get the users that need their password hashed 3 $results = $this->User->find('all', array('recursive' => -1, 'fields' => array('User.id', 'User.passwd'), 'conditions' => array('User.email LIKE' => '%@example.com', 'NOT' => array('User.passwd' => null)))); 4 5 $count = count($results); 6 foreach ($results as $result) { 7 $result['User']['passwd'] = $this->Auth->password($result['User']['passwd']); 8 9 if (!$this->User->save($result)) {10 echo 'Could not update account for User.id = ', $result['User']['id'], PHP_EOL;11 --$count;12 }13 }14 15 echo 'Updated ', $count, ($count == 1 ? ' record.', 'records.'), PHP_EOL;16 exit;17}
Paste this code into any controller that has access to the Auth component and your Auth User model. Then visit the URL. In this case /users/generate_passwords. Only run this once. Otherwise, it will double hash your passwords.
You should only need to adjust the conditions
option for the find()
method so that it only returns the user accounts that need their passwords hashed. Also note that this code is built for CakePHP 1.3. However, it should port pretty easily to 2.0. If you do so please let me know.
I purchased Apple TV and Netflix over a year ago. Been very happy with both. So much so that I recently bought an Apple TV for my parents and included them on my Netflix account. From an subscription perspective, I see no problem with this as Netflix allows your account on up to 6 devices. But after about a week I noticed my Recommendations were skewed and some odd items in my Queue. And of course they were. My viewing habits are different than my parents. I though my Netflix account should have more than one Profile. To my knowledge, such a feature does not exist.
The following is a letter to Netflix requesting this feature. Although I have submitted this request to Netflix, I'm posting it here in hopes the feature might gain more traction.
]]>Dear Netflix,
I have a feature request. As your streaming plans currently support up to 6 devices, it's common for a single account to be shared. Say for example, between family members. However, currently all aspects of the account are shared. Most notably Recommendations and Queues.
This really degrades the Netflix experience. So I'm recommending the concept of Profiles. Profiles would encapsulate Netflix features. A Netflix account can then have multiple Profiles. As such a user would toggle their Profile to receive their personalized Recommendations and Queues.
Incorporating this feature into the UI would be simple. For the web and mobile app UI, a user could toggle from a drop down menu in the upper right. For Apple TV, add another option button above Logout. As far as adoption, it is in the users best interest to toggle their Profile.
The application of Profiles extends beyond this use case. For example, Parental Controls could be built around Profiles. The concept of Profiles is widely used by Satellite TV. Netflix should incorporate its own version of Profiles.
Customer,
Jason McCreary
I heard about I/O Docs in a tweet from @Mashery last August. One of their evangelist developed I/O Docs with node.js and released the project on Github. I've wanted to check it out for two reasons. First, I have an undocumented private API – PocketBracket – that, well, I said it already, was undocumented. Second, I wanted a reason to develop with node.js.
From the I/O Docs synopsis:
I/O Docs is a live interactive documentation system for RESTful APIs
Some of the highlights of I/O Docs:
The README within the project provides pretty good instruction for getting started with I/O Docs. It notes the changes you need to make to each file as well as full detail on how to begin documenting your API using their JSON format.
Unfortunately they gloss over the prerequisites for node.js and redis. If you're running Mac OS X, check out my previous post on installing node.js, npm, and redis on Mac OS X. Otherwise, the links they provide should get you started.
Out of the box some of the sample APIs did not run. After setting "debug": true;
in config.json, I noticed these were the API requests only passing an API key. After revisiting GitHub, this was a known issue which lead me to a fork by ezarko.
I applied ezarko's patches to app.js and config.json. This got me most of the way there. I also had to add the following to unsecuredCall()
(~ line 504):
options.headers["Content-Length"] = Buffer.byteLength(options.body);
Unfortunately the DELETE requests still failed for my PocketBracket API. I realized I was expecting the API key as part of the request body. I/O Docs still appended it to the query params. For a minute I questioned my API architecture. However, using the request body for a DELETE did not violate the constraints of REST or the HTTP spec. In fact, to me, it seems more intuitive. In my opinion, only a GET request should explicitly utilize the query params.
I made a few changes to ensure DELETE requests utilized request body properly. I provide my app.js file below. So in summary, I audited the code for DELETE requests and ensured they behaved like PUT/POST (2 places). I also had to modify the if
statement to ensure the request body was sent with the request (~ line 600).
While running I/O Docs locally worked, I needed to share the documentation with my team. Heroku to the rescue. Heroku is a cloud hosting service that plays nicely with git, node.js and redis. In this case, all were free add-ons. The sign up process for Heroku was simple and I was ready to deploy an app in minutes.
I started following a post about deploying I/O Docs to Heroku by Princess Polymath. Unfortunately as noted in my comment on her post, it didn't get me all the way. Although it ran fine locally, I received an error regarding the redis configuration when running on Heroku.
Heroku required some configuration changes in more spots than Princess Polymath noted. I added the following updates to app.js while to be minimally invasive (I hate hacking core code).
Modify the config
object before creating the redis connection (~ line 60).
if (process.env.REDISTOGO_URL) { // use production (Heroku) redis configuration // overwrite <code>config to keep it simple var rtg = require('url').parse(process.env.REDISTOGO_URL); config.redis.port = rtg.port; config.redis.host = rtg.hostname; config.redis.password = rtg.auth.split(':')[1];}
Modify the port
(end of file):
// use production (Heroku) port if set
var port = process.env.PORT || config.port;
app.listen(port, config.address);
I plan to start contributing to the I/O Docs project once I become more familiar with git/GitHub (I know). My fork of I/O Docs is now available on GitHub. All other changes should be configuration specific to your environment.
minYear
and maxYear
attributes.
The code in my view (CakePHP version 1.3.7).
1echo $this->Form->input('cc_expires', [2 'type' => 'date',3 'label' => 'Expiration Date',4 'dateFormat' => 'MY',5 'empty' => true,6 'separator' => ' ',7 'minYear' => date('Y'),8 'maxYear' => date('Y', strtotime('+7 years'))9]);
Although the options range is correct, this seemed unintuitive. In addition, I felt it was slightly poor usability. So I wanted to fix the order.
I dug around in The Book. Nothing. I was about to submit a ticket. But before I do, I typically check my version and the core. Upon searching for minYear I found the function in question – year()
. Apparently an undocumented attribute exists – orderYear
. After adding 'orderYear' => 'asc'
to the options array I got the desired output.
Two notes here. First, CakePHP has many undocumented features. It never hurts to dig around the core. Second, the orderYear
attribute is completely unnecessary in this case. In fact, it is only used for the *year* drop-down. It could be easily determined from comparing minYear
and maxYear
. In this case, minYear
is 2012 which is less than maxYear
is 2019. Display in ascending order.
Maybe orderYear
has uses. But today it wasted my time.</rant>
We drove up the night before to be closer to the event and get extra sleep as we were the 9:00am wave Saturday. We carb-loaded on the way up eating a maximum amount of calories for dinner. Rage Against the Machine helped get our minds right.
I read several blogs about what to wear. Tough Mudder is about just that – mud. Since our event was in November I wanted to balance warmth, breath-ability, and durability. In the end, I went with layers. Headbands off to those that wore costumes or limited clothing.
We arrived the recommended 2 hours early to park, register, and prepare. This turned out to be more than enough time. You sign a death waiver. You get your number marked on your forehead. It's serious.
The course changed slightly. It dropped from 12 miles to 10 miles. But they added 3 additional obstacles, “just to kick our ass”. They send you out in waves of about 500 every 20 minutes. Blared Eye of the Tiger. Popped the orange smoke. And off we went.
Tough is a dynamic word. I couldn't say what the toughest obstacle was for me.
Physically would have been Swamp Stomp. It was probably a third of a mile in waist deep, cold swamp water. Nothing to help balance. No end in sight. Just wading, trying not to get stuck in the mud or break your ankle under a tree root. My feet were numb.
Tough as in mean. Probably Chernobyl Jacuzzi. Essentially a 30ft construction dumpster, lined and filled with dyed green water and ice cubes. You climb up, jump in, swim under a divider, and climb out the other side. Pure instinct sets in. Once in the water, my brain screamed “get out”. I had to focus just to breathe. And I see the divider with a down arrow. I have to go under to get out on the other side. But something in you says not to put your head under the water.
Tough as in rugged, Electroshock Therapy. This obstacle is right at the end with all the spectators. Everyone loves the Electroshock Therapy. It's the signature Tough Mudder obstacle. A gauntlet of dangling hot wires above mud and haybales. You just go for it. You just take it. Because on the other side they crown you with your orange headband.
A few noteworthy obstacles I enjoyed: Funky Monkey, Everest, and Walk the Plank.
After the race I was immediately shivering. I honestly believe if we hadn't been moving the whole time, hypothermia would have set in. I had some thigh muscle craps in the final miles. The last obstacle my left leg basically locked up.
When changing, I couldn't take off my shoes. When I tried, my calf muscle spasmed. Very odd, painful feeling. In addition, mud was on everything. I noticed many people throwing away clothes and donating their shoes. Next time, I will do that and bring a plastic bag for the clothes I do save.
We toasted to our accomplishment with our free Dos Equis and watched the other finishers. Between the cold and exhaustion, we didn't stay long. We started home, demolishing a KFC buffet on the way. Before parting ways, we all agreed we would do another Tough Mudder…
]]>I've been wanting to mess with I/O Docs for some time now. I/O Docs requires Node.js, npm, and redis. I hear the buzz around these technologies, but I have yet to use them. Although I found several posts and a package for installing Node.js and npm on Mac OS X, each had issues. Mac OS X runs atop BSD Unix. So, while potentially intimidating, you can install all these yourself by running commands within Terminal.
After much Googling I discovered an overwhelming set of Node.js installation instructions. In a nutshell (no pun), this installs Node.js under a newly created local
folder in the current user folder and adds that folder to your PATH
so you can run Node.js simply by typing node.
1echo 'export PATH=$HOME/local/bin:$PATH' >> ~/.bash_profile2source ~/.bash_profile3mkdir ~/local4mkdir ~/node-js5cd ~/node-js6curl http://nodejs.org/dist/node-v0.4.7.tar.gz | tar xz --strip-components=17./configure --prefix=~/local8make install
A few notes.
First, this installs Node.js version 0.4.7. From what I read, this is currently the most compatible version. If you require a different version, I'll assume you know more about installing Node.js than me.
Second, bash on Mac OS X uses .bash_profile
not .bashrc
. I've modified the original script to reflect these changes.
Once you have installed Node.js, you can install npm
with just one command.
1curl http://npmjs.org/install.sh | sh
I should pass along the warning that this runs commands streamed from the internet. If you're paranoid about that kind of stuff, you should download and verify install.sh
first.
Redis was a straightforward install. For the most part I followed the redis quickstart guide. I modified the script below slightly to use curl
as Mac OS X does not include wget
.
1curl -O http://download.redis.io/redis-stable.tar.gz2tar -xvzf redis-stable.tar.gz3rm redis-stable.tar.gz4cd redis-stable5make6sudo make install
Note: rm redis-stable.tar.gz
is simple cleanup. sudo make install
is optional as it adds the Redis commands to /usr/local/bin/.
In time, you may need to update the versions for Node.js and Redis. Both offer a latest download. Feel free to substitute these into your script. The commands above should still work. Nonetheless, I tried to provide links to the original documentation when available.
This post came from getting started with I/O Docs. As I/O Docs required Node.js and redis.
]]>Each Tough Mudder course is different. But the following video demonstrates the most common obstacles. You also see the fine line between toughness and craziness.
A man should measure himself against a strong force at least once in his life to see if he can handle it.
Tough Mudder is as much about physical endurance as it is will. In addition, several of the obstacles are designed to require a group effort. Many races or events are about the individual. I like the camaraderie Tough Mudder adds. You have to band together to complete it. Finally, Tough Mudder isn't about results. There are no times, no scores, no places. It's about finishing.
I trained for 5k races in the summer. So I had a base to start Tough Mudder training. I added weight lifting and the Tough Mudder workout to the weekly routine.
Any opportunity to add grit to the training was taken. My parents had an uprooted tree that needed removal. Instead of a chainsaw and trailer, we used axes and carried the logs. Before our long weekend runs we dump buckets of water on ourselves. I've started running home from work once a week. Particularly on the days that it rains.
I have no idea how difficult Tough Mudder will be. My goal is to finish – run the course and complete all the obstacles. I hope to have fun and stick together as a team.
]]>Unfortunately the euphoria was short lived. The user interface changes soon outweighed the new theme. With due respect to the “reluctance to change” and “learning curves”, I question some of the decisions made in PHPMyAdmin 3.4. Here's my quick list the UI pros and cons of PHPMyAdmin 3.4.3. Let me disclaim that I use PHPMyAdmin as a development tool.
All in all, it appears that PHPMyAdmin 3.4 caters to new users. I suppose you can't fault them for appealing to the masses. Yet for my usage the cons of PHPMyAdmin 3.4 outweigh the pros. Although I'll probably stick with it on my personal server, I have left PHPMyAdmin 3.3 on our work servers. Those extra clicks spread across 4 developers add up. As far as the new features, well, ignorance is bliss.
]]>After debugging the login()
and logout()
actions I noticed that Auth.redirect
was not being cleared from the session. I inspected the core file for the Auth Component (auth.php) to see when Auth.redirect
updated. It turns out that the startup()
method had some interesting code.
1if ($loginAction == $url) {2 // ...3 if (!$this->Session->check('Auth.redirect') && !$this->loginRedirect && env('HTTP_REFERER')) {4 $this->Session->write('Auth.redirect', $controller->referer(null, true));5 }6}
The interesting piece is the inclusion of $this->loginRedirect
. According to the documentation:
The AuthComponent remembers what controller/action pair you were trying to get to before you were asked to authenticate yourself by storing this value in the Session, under the
Auth.redirect
key. However, if this session value is not set (if you're coming to the login page from an external link, for example), then the user will be redirected to the URL specified inloginRedirect
.
Yet, according to the code above, $loginAction
sets Auth.redirect
unless it or loginRedirect
is set. I added the following code to my Auth Component configuration:
1'Auth' => ['autoRedirect' => false, 'loginRedirect' => '/']
After doing so, I expected that the Auth Component would no longer remember the requested URL if I was not logged in. But, contrary to the documentation, I was still redirected when attempting to access a secure area of the site before logging in.
Honestly, my head exploded on this one. I'm still a little fuzzy on loginRedirect
. But here's my two cents. The original issue only occurred after logout. Since logout redirects to loginAction
, the referrer was the previously requested page. Although logout()
cleared Auth.redirect
, the code above stored the referrer in Auth.redirect
. Upon setting loginRedirect
, the logic above failed. Since this code only runs when $loginAction == $url
, it does not prevent Auth from remembering the requested URL when it matters.
I find many developers dislike the Auth Component. Whether it's too complex or not enough features, I don't know. What I do know is there is value in using native functionality. So, to be clear, this post is about the unclear documentation for the loginRedirect
property and not bashing the Auth Component.
With that said, I wanted to share the resources for my talk. As this was more or less the same talk I gave at WordCamp Chicago, I've provided some links to that material to avoid duplication. You can find the slides on SlideShare. Code samples of the wp-config.php
files and using environment constants taken from my WordCamp Chicago post. Finally, the original post leading to this talk can be found on the VIA Studio blog titled Configuring WordPress for Multiple Environments.
After the talk I received several questions regarding migrating the database between environments and handling absolute URLs. This seems to be a continual pain point. I've put it on the list to write a post or possibly develop a WordPress plugin. Look for more information here or the VIA Studio blog in the coming weeks.
I welcome your feedback and questions regarding my talk. Speaking is a recent development for me. I find it rewarding and look forward giving more talks at future WordCamps. I also enjoyed meeting everyone that stopped by the “Genius Bar” hosted by VIA Studio and the after party at the BBC. Please feel free to contact me or us at VIA Studio. Also, if anyone took any photos during my talk I would appreciate a copy.
]]>Here's the talk synopsis:
WordPress boasts a “5 minute install”. This is great for simple sites running only in a production environment. But if you're using WordPress as a development platform or following a software development life cycle things become a little tricky. This talk will cover ways to migrate WordPress between different environments smoothly, including: code, database, and environment specific tasks. Although some aspects of the talk may be advanced, there will be demos, code samples, and time for Q&A. So if you use WordPress in more than just production, this talk's for you.
In addition, VIA Studio (my day job) will be the title sponsor for WordCamp Louisville. So I'm also running a “Genius Bar” with my team. We'll be available to answer any user or development questions you may have about WordPress. I know I go to a conference hungry for answers to very specific questions. Hopefully this WordPress “Genius Bar” provides that, and of course drums up some business.
Register for WordCamp Louisville. It's only 15 bucks!
]]>configure
and make
) remains intimidating. I do what most people would do – went to Google and searched for “installing siege on mac os x”.
One result looked promising. I attempted to run Step 1 on the command line. Error. If Step 1 fails, move on.
To step back, siege is an http load testing and benchmarking utility. Lately I've taken a strong interest in benchmarking my web applications. Mainly because I am developing APIs and using WordPress (which is notorious for being slow under server load). Although ab
(Apache Benchmark) comes bundled with apache
(which is pre-installed on Mac OS X), I've been hearing a lot about siege
at conferences. As any good developer should, I wanted to tinker with it myself.
Download the latest version of siege (currently 2.70)
1curl -C - -O http://download.joedog.org/siege/siege-latest.tar.gz
Extract the tarball
1tar -xvf siege-latest.tar.gz
Change directories to the extracted directory (again, currently siege-2.70)
1cd siege-2.70/
Run the following commands (one at a time) to build and install siege
. If you have an older version of siege read the INSTALL file for more instructions.
1./configure2make3make install
This installed siege
to /usr/local/bin/
. This should already be in your PATH
, so type:
1siege
You may be presented with a message that instructs you to generate a siege configuration file. If so, follow the on screen instructions.
The following sends a 10 requests across 10 concurrent connections for benchmarking (no delay between requests).
1siege -c 10 -r 10 -b /
If you want to learn more about configuring or using siege type siege -h
or visit the siege manual.
I just completed my talk on Configuring WordPress for Multiple Environments at WordCamp Chicago. Probably close to a hundred in the crowd. Being only my second talk, it was a bit intimidating. But the feedback has been positive. So much so that I've been asked to release my code samples and slides immediately.
The talk was an evolution from an earlier blog post of the same name – Configuring WordPress for Multiple Environments. It includes a detailed write-up and code samples (although they might be dated).
The slides for the talk will eventually be on SlideShare. For now you can download my slides as a PDF. There were several demos. I tried to include a summary slide after each demo slide. Nonetheless, code samples are below and you can always contact me for more detail.
The following demonstrate using the VIA_ENVIRONMENT
constant to perform environment specific code.
Include Google Analytics in just Production (in theme's header.php
):
1<?php 2if (VIA_ENVIRONMENT == 'prod') { 3?> 4<script type="text/javascript"> 5var _gaq = _gaq || []; 6_gaq.push(['_setAccount', 'UA-#######-#']); 7_gaq.push(['_trackPageview']); 8(function () { 9 var ga = document.createElement('script');10 ga.type = 'text/javascript';11 ga.async = true;12 ga.src = ('https:' == document.location.protocol ? 'https://ssl' : 'http://www') + '.google-analytics.com/ga.js';13 var s = document.getElementsByTagName('script')[0];14 s.parentNode.insertBefore(ga, s);15})();16</script>17<?php18}19?>
Use minified resources for any non-Development environment (in theme's header.php
):
1<?php 2if (VIA_ENVIRONMENT == 'dev') { 3?> 4<link rel="stylesheet" type="text/css" media="all" href="<?php bloginfo('template_directory'); ?>/res/css/global.css" /> 5<link rel="stylesheet" type="text/css" media="all" href="<?php bloginfo('template_directory'); ?>/res/css/off-season.css" /> 6<!--[if lte IE 7]><link rel="stylesheet" href="<?php bloginfo('template_directory'); ?>/res/css/ie.css" type="text/css" media="all" /> <![endif]--> 7<?php 8} 9else {10?>11<link rel="stylesheet" type="text/css" media="all" href="<?php bloginfo('template_directory'); ?>/res/css/global-1.0.min.css" />12<link rel="stylesheet" type="text/css" media="all" href="<?php bloginfo('template_directory'); ?>/res/css/off-season-0.2.min.css" />13<!--[if lte IE 7]> <link rel="stylesheet" href="<?php bloginfo('template_directory'); ?>/res/css/ie-0.2.min.css" type="text/css" media="all" /> <![endif]-->14<?php15}16?>
After strong interest I have spoken with the WordCamp Chicago organizers about adding an unconference. We've been approved to use the open time slot from 9:00-10:00 Sunday morning. I will be helping anyone interested in setting up a local development environment on their Mac. If you'd like to do so on a different OS I will try to find additional moderators. Please reach out to me at the after-party or on Twitter, @gonedark, if you plan to attend.
See you at the after-party!
]]><label>
as the markup.
In CakePHP this presented a challenge. If you are using the Form Helper, the markup is generated for you. I wanted a solution that would inject my guidance text or instructional markup into CakePHP's generated output.
By default, the following simple method:
1echo $this->Form->input('username');
will output:
1<div class="input text required">2 <label for="UserUsername">First Name</label>3 <input type="text" id="UserUsername" maxlength="20" name="data[User][username]">4</div>
I was struggling to figure out how to achieve the following output:
1<div class="input text required">2 <label for="UserUsername">Username</label>3 <input type="text" id="UserUsername" maxlength="20" name="data[User][username]">4 <p class="guidance">Must be the same as your AD Account</p>5</div>
Then I found it. The Form Helper input method accepts options of before
, after
, separator
, etc. I had originally assumed options were only for the automagic date fields. But sure enough, when tried the following, I achieved my desired output:
1echo $this->Form->input('username', array('after' => '<p class="guidance">Must be the same as your AD Account</p>'));
I look forward to the evolution of options passed into the Form Helper. In this specific case, personally I would have felt better about setting a guidance
option rather than the after
. Maybe with the adoption of HTML5, CakePHP may very well offer such an option. Until then, I hope this helps.
Then it hit me, we enabled multisite for this WordPress install. After looking under the hood, although WordPress could connect to the database, it didn't find a matching entry for our staging URL. Apparently it still displays "Error establishing a database connection" message. A quick update to the records in the wp_blogs
, wp_sites
, and wp_options
database tables resolved this.
Hope that helps someone. Check out my other post if you're interested in setting up WordPress for multiple environments.
]]>The other day, I had a requirement for one of the applications for conditional data validation. CakePHP provides flexible and simple validation of your Model data that combined forms very complex rules. Unfortunately, nothing out of the box handled conditional validation.
To be fair, there are some native options that may work for you in simple cases. You could add 'allowEmpty' => true
to your rules. Yet, setting anything at the Model rule level applies across all Controllers. Conditional validation validates the Model one way in Controller A, but differently in Controller B. Yes, I know that's lame for data integrity. But we developers must support real world demands from clients. Anyway, there are also ways to validate from the controller. These looked promising. But in practice, the code quickly becomes bloated. You begin to have calls to validate()
before every save()
. Even more for multi-model saveAll()
calls. You also have to list the Model fields to validate in the Controller. Too much coupling in my opinion. So this becomes a maintenance issue beyond a few isolated cases. Another alternative is create custom validation rules. Similar to the above though, code becomes bloated outside a few rules. In addition, you are now responsible for validating the data yourself and can't take advantage of CakePHP's core rules (e.g. email, ssn).
Before I began developing anything, I did a quick Google search. The only thing I found was an outdated Model Behavior. So I decided to make my own with the following goals:
So here's what I came up with. Validation rules could be set by passing a condition to a Model method. All the logic to setup the appropriate validation is encapsulated within this method. The controller simply calls this function with the argument to perform conditional validation for that Model. An example call would be:
1$this->Employee->setValidationRules('it');2// ...3$this->Employee->save($this-data);
If no conditions are passed, the Model would use the default validation rules. In order to set these automatically, I overrode the constructor method. The reason I put this here instead of leaving it as a Model property was to allow the Controller to reset the validation rules.
1function __construct($id = false, $table = null, $ds = null) { 2 parent::__construct($id, $table, $ds); 3 4 $this->setValidationRules(); 5} 6 7function setValidationRules($condition = null) { 8 if ($condition == 'it') { 9 // turn off field requirements for nea_it users as they don't have this data yet10 unset($this->validate['computer_type']);11 unset($this->validate['computer_service_tag']);12 $this->validate['company_email'] => array('boolean' => array('rule' => array('email', 'allowEmpty' => true)));13 }14 else {15 // default validation rules16 $this->validate = array('rental_car_cards' => array('boolean' => array('rule' => array('boolean'))),17 'company_car' => array('boolean' => array('rule' => array('boolean'))),18 'company_car_allowance' => array('boolean' => array('rule' => array('boolean'))),19 'company_cell_phone' => array('boolean' => array('rule' => array('boolean'))),20 'company_cell_phone_plan' => array('dependent' => array('rule' => array('notempty'))),21 'computer' => array('boolean' => array('rule' => array('boolean'))),22 'computer_type' => array('dependent' => array('rule' => array('notempty'))),23 'computer_service_tag' => array('dependent' => array('rule' => array('notempty'))),24 'company_email' => array('boolean' => array('rule' => array('email'))));25 }26}
It's primitive. But it does satisfy the client's spec and meets my goals. I think adding some callback hooks to reset the validation automatically could be helpful. Then conditional validation would behave much like bindModel()
or $this->Model->recursive
where it only effects the next call to the Model. Which is more Cakeish. Yet validating data on the same Model under two different conditions in the same request is probably very rare. In the end, I think it's a straightforward way to do conditional validation in CakePHP.
app_controller.php
and app_model.php
in my app directory. I copied the respective files from cake/libs/controller
and cake/libs/model
. I added my customizations and refreshed the page. Nothing. I checked the filenames and output a few debug()
calls. Still nothing. I added beforeFilter()
with just an echo
. Nothing! My controllers and models weren't inheriting any of the custom parent methods. Finally, it hit me – clear the cache. It worked.
Maybe that is a rookie mistake. Nonetheless, hopefully that saves someone the 15 minutes I lost. Clearing the cache was actually the solution to a problem a few months back. Which is actually the only reason I tried it. So when in doubt with CakePHP, clear the cache.
]]>Let me start by saying it's unbelievably tiny (TWSS). I actually had a hard time finding it in the Apple Store. It's just wider than my wallet and about an inch tall. Although Apple is great about including all cables with their products, it did not come with the HDMI cable. For $99 I didn't really expect it. Of course, the Apple Store had one for $19. Sold. I was setup in minutes. Plugged into the outlet, Airport Extreme, and Plasma TV then power on. I will also say the remote is pretty sleek.
I instantly had access to the iTunes Store, Netflix, YouTube, Flickr, and my computers. I hand to enable Home Sharing in iTunes to allow the Apple TV access to my iTunes Library. But once I did, all my Music, Movies, Podcasts, and Playlists were all available. I can play them right thru my TV and audio system. This actually eliminates my need for Airport Express. Previously I was using this to stream my music to my audio system. Now this is unnecessary. So maybe I can Ebay it to recoup some of the Apple TV cost. It's been great to watch my easily podcasts on my TV and I look forward to move of them being offered in HD.
I really only watch movies and maybe a small set of TV series. While I love Apple, iTunes isn't really economical when it comes to that. For their prices you could argue purchasing the DVD just to have something tangible. With the Apple TV as a Netflix compatible device it was a no brainer. Netflix pricing model suits me better – $8.99 for unlimited streaming and one DVD at a time. Although not all of it is available for instant streaming, I was impressed with the Netflix collection.
I have a pretty quick internet connection, so the streaming has been great. There have been a few times it lagged. But the way I look at it, it can only get better. The picture is impressive, and that's not just my 50" Plasma. The only annoying problem I have had so far as been connecting to Netflix. It keep asking me to sign in with error 112 and 114. But I really believe that was more the Apple TV than Netflix. I say that because I finally resolved the issue by selecting one of the featured movies on the main Apple TV menu. It took me right into Netflix.
I have to be honest that I am not impressed with catalog browsing. You really have to know what you want to watch. There's no, "hey what's on Netflix". I realize that may be critical. Maybe I am comparing apples and oranges. No pun intended. But as a web and mobile application developer, I really look at these things. I expect a streaming media service provider based online to have this figured out. Their recommendation system seems pretty good. I do believe that if I continue to rate movies and tweak my personal settings. There needs to be more though. What if I don't know what I want to watch? I have genres to browse. But again, I don't know what I want to watch? There needs to be something broader. We have this in traditional TV in the form of channels and stations. Why not take a page out of that book? Some kind of Netflix guide that provided sub groupings of their collection. Within those groupings could be new releases, user voted picks, as well as recommendations. So I'll just say I am excited to see more innovation as Netflix continues to grow.
I have to say streaming media is here. It just feels right. Maybe it is something about our generation having online access to media. It's actually amazing how quick the transition has been from Movie Theatres to DVDs to Internet. Anyway, that's another blog post. In the end, the cost and features of Apple TV with Netflix is about the best you can get.
]]>So here's what I found interesting. All of which are facts at the time of this post. You draw your own conclusions. The Facebook iPhone App has icons on the on the application home screen. One of the icons is for the new Places functionality. This icon is square. The icon is a graphical rendering of a map. The icon contains lines which intersect in a pattern. This pattern forms a four.
I don't like the conclusions I am drawing from what I see here. This tells me a good idea is no longer enough. Most of us developers know that intellectual property really means shit. But now, it would seem, being first to market no longer matters either. Unfortunately, I already figured this out too with LastPlayed. What seems to matter now is how large the platform from which you shout. And, at the moment, Facebook has a much larger platform than Foursquare. In the end, the probability is in Facebook's favor to beat out Foursquare. No matter if it was indeed Foursquare's idea or if they were first. As an aspiring web and mobile application developer, it's tough to see even at the highest level, it's a chicken eat chicken world.
]]>I am a developer, so I am around computers most hours of the day. I can't tell you how many times I have written some code, ran it, and got an error. I can say if I had a dollar every time, I'd be able to write a lot more blog posts. Now for the real question for all you developers. How many times do you know the error? I don't mean you read the message or got the line number. I mean in the same instant you realized it didn't work, you also knew the problem. Now most would immediately suggest that this is nothing more than experience. And I would agree that any good developer intimately knows their code. Yet, I am beginning to believe there is something more here. Why didn't I know the error moments earlier, before I tried to run my code? Did the literally computer tell me the error once I ran the code?
Lets consider another example that removes experience. I often have my iPhone on silent (without sound or vibration). For meetings or in an effort not to be rude, I flip that little switch on the side. More often than not I have pulled my iPhone out of my pocket to find someone calling or that I just received a text. I'm not talking about a call I was expecting. This is a truly random call. How did I know that my phone was ringing? What triggered my reaction to reach into my pocket and check my iPhone at a near unconscious level?
I say the answer to these questions is electrosis. No one can disagree that these devices put off energy. Both the electrical device and the human body are sophisticated things. What if we have a sensitivity to the energy given off by one another. In doing so we created some kind of symbiosis. Is it really that crazy to think that those of us frequently around electrical devices have formed some kind of bond? To me it's no different than adapting to your natural environment. We are in the Age of Technology. Technology driven to be more integrated, personalized, and usable. It's not a great leap that these devices are becoming part of us.
]]>This is backward to me. I have an analytic mind. It has taken me a while to channel my thought processes, and I am still dialing in. But over the years, it has helped me major in Computer Science and minor in Philosophy and Psychology. It compliments my current profession as a developer. Although exhausting at times, it is a great benefit.
Well armed I have become proficient at hunting down the root cause of problems. To me, root cause analysis is the most important step in solving a problem and an indicator of a good developer. So much energy is wasted when solutions are formed without this step. You are merely proposing something unproven and based on a limited understanding. Yes, maybe your solution works. But does it last? Did it just mask the problem? Did it create a new problem? Can this solution be applied to the same problem again? Did you just get lucky?
You don't have to break out your lab coat and microscope. But invest a few extra minutes next time you are presented with a problem. I have found those few minutes pay dividends later. Either by saving time or adding experience, in the end it feels right.
]]>This year I wanted to add features that didn't make it into the initial release to keep PocketBracket competive in the ever growing App Store. PocketBracket stood out amung last year's 25,000. But against the 160,000+ apps this year, who knows. Furthermore, March Madness is a crazy time for sports and very short lived. There's not a lot of time to gain exposure for the app. And unforunately, with many companies finally embracing the App Store, it's only a matter of time until ESPN, CBS, or some other big name creates their version of this app.
I will be the first to admit that version 1.0 was rather limited. As one of our reviews said, it's basically a website. This was true. But in all fairness, most applications are like this and the client-server/cloud architecture is necessary. Think of Facebook, Twitter, etc. Nonetheless, offline mode with a more native interface was top on the list. In addition, although I can't say it was all positive, we received lots of feedback from our users: joining multiple pools, making pools private, easier score updates, sharing features.
I prioritized a list of all these features. There were 14 total, 10 were user requested. I am proud to say that the top 11 made it into PocketBracket 2.0. The other 3 were left out due to time constraints. Of course, the day 2.0 released, I had feedback regarding the 3 that didn't make it. Sorry. Maybe next year. Regardless, I think 11 of 14 is pretty impressive. I don't feel PocketBracket is anywhere close to full potential. Yet, I hope to relay to our users that we are growing in response to their feedback.
My goal for PocketBracket is to become the mobile application for managing your NCAA Basketball Tournament brackets and pools during March Madness. There are two important points of this goal. First, there are several big name online bracket management sites. I could never and will never compete with these sites on my own. Moreover, I truly believe this is a perfect app for mobile devices. It makes completing a bracket quick, easy, faster, and green. Second, PocketBracket needs to support multiple mobile platforms. Although the iPhone is a revolutionary mobile device, it's still just one device. So this year, I wanted a version for Android. Initially, I thought there would only be time for a lite version to be released in the Android Market. Yet, running off the same RESTful PocketBracket API and having the existing UI, PocketBracket for Android is full featured version. Android runs on more devices which I found is both good and bad. Unfortunately, we are currently experiencing problems on some of the HTC models. I need testers…
With 160,000+ apps in the store, it can be your own worst enemy. As I said, PocketBracket is an extremely time sensitive application. Plus the nature tournament makes the app arguably unusable before Selection Sunday. I encourage users to create sample brackets using last years data, as well begin as organize pools. But really, the madness doesn't begin until the year's tournament selection are made. That is PocketBracket's biggest day. Yet, the app needs to be positioned in a good spot. This is very difficult when the 5 other junk apps that won't survive past this year suck up the higher ranks for some unknown reason. I call them junk because I have evaluated them and their experiences is lacking. But they have a higher spot because they either have a more precise keyword, snazzier icon, or they appeared in the recent queue longer. This latter point bothers me because updates don't seem to appear in the recent queue. So no points for updating your app with all these great features.
As much as I appreciate the App Store and give it due respect, for without it there would be no PocketBracket, it is still in its early stages. I believe in merit and that the better product should rise to the top. But when you have 159,999 other apps surrounding you, that is difficult. Furthermore, most of my marketing metrics seem to indicate that users find PocketBracket by name. While that is excellent for the brand, it sucks for the App Store. In the end, market is tough no matter the industry, and I am no marketer.
So, in an effort to build some buzz I am going to give something away. Everyone loves free stuff, right? At first, I thought an iPod Touch. But then I noticed that the iPad hits the market a few days before the tournament ends. Now that is perfect timing. So, PocketBracket is giving away an iPad at the end of the 2010 PocketBracket Network Challenge. You don't have tobe the best bracket, you just have to register. In addition, there are other ways you can increase your chances to win. Check out the PocketBracket iPad Giveaway.
There is a lot going on with PocketBracket – local storage, network syncs, Facebook/Twitter integration, custom UI components, data pushes – and that's just the app. There is a whole API that drives the app as well as website. The point is, it takes hundreds of hours of work. Now I love building applications, and websites, but at $.99 you don't make up that deficit quickly. Not to mention the costs of marketing, ads, and of course the promotion. Yet, it's not about the money for me. Although many believe that app makers rake in millions, that really only a stand out stories from the early days of the App Store. I just want awareness and users to achieve my goal for PocketBracket. So check in next year for PocketBracket 3.0, hopefully with more features and supporting more platforms. But for now, go get PocketBracket.
]]>All of the devices that run iPhone OS have limited resources and last I looked Flash can be a resource hog. It takes a lot of processing power, and memory, for all those flashy things that make Flash, well Flash. Apple can not guarantee that these devices could run every Flash app. Even if they could, your battery would probably last an hour. That's problematic, and boils down to a liability for Apple. After all, it's easier for a user to blame the device than an application (i.e. Flash).
Flash support would more than likely be available only within the Safari app to view websites. I assume this is the initial user demand – to view sites with Flash content. However, Flash has uses well beyond web content. Most of us see Flash as media players and games. Both of which have implications, but let's focus on the latter: Games. It's estimated that 70% of the current 150,000 applications in the App Store are games. Apple receives 30% of the revenue generated by a paid application. We are all aware of Apple's application review process as there are twice as many articles on that topic. Of course, Apple does not review web content displayed within the Safari App.
So lets add this up. If Flash were supported within Safari, Flash developers could make applications for the device without having to pass the notorious application approval process. With far more Flash developers than iPhone developers a flood of unregulated applications would hit to the device. Just as it did with the web several years. So, why would Apple support technology that could directly compete with one of their largest sources of revenue for the device? They won't, and neither would any business.
Apple needs to do with is best for themselves and the users of the device. Currently that means no Flash support. I believe this is an active choice. A technical decision made by Apple. It's not personal, it's business.
]]>It stops. A woman boards. Doors close.
It stops. A man with handbags boards. Doors close.
We arrive at the ground floor.
The man steps forward, stops, and holds the door with his bag.
The woman stop-starts, looks at the man, waits, then exits the elevator.
The man motions me. I motion for him to go. He motions me to go. I start to exit. He starts to exit. We both stop and smile awkwardly. He exits.
I exit the elevator and want to scream.
Elevators are part of everyday life. They can be annoying by nature: over-crowded, slow, unpredictable. They're also perfect for social experiments. Ever select the wrong floor or face anywhere but the door? Even with such oddities aside, elevators still become annoying from common behaviors. Consider my experience. We've all been in a similar situation. So, I established an elevator etiquette of one rule, one exception, and one guideline.
Your only focus on the elevator is to exit. If the elevator is crowded, exit in order. Don't stand in the front and hold the door for everyone else behind you. It's nice, but unnecessary. Herd mentality kicks in and people freeze. Therefore, it's inefficient and, considering the size of elevators, you are just in the way.
If you are the only male on an elevator, be a gentleman and let the women off. This is the only exception to The Rule. So, no matter your place on the elevator, as a gentleman you exit last.
Much like the gentleman, it is polite to let someone else exit before you. If you wish to assume this responsibility, motion and wait. Yet, be prepared to forfeit your place. If others follow, continue to wait. If someone else is polite and motions you, exit. Under no circumstance should you continue to be polite. They have assumed the role of the polite person. The elevator only needs one.
You're a male in the front of the elevator with 2 females and 3 males.
The Rule: Exit in order. Other males are on board, so you're absolved of your gentleman responsibilities. As you are in the front, being polite would lead to confusion.
You're a male in the middle of the elevator with 3 females.
The Exception: Solo males should be gentleman. You go last.
You're in the middle of the elevator, 4 people of the same sex.
The Rule: Exit in order. You're all equal, no need to be polite. In fact, don't even make eye contact.
It's not your turn to exit the elevator, but someone motions you.
The Guideline: Be polite, but not too polite. You exit. This person now bears the elevators polite responsibilities.
This etiquette has infinite application: movie theater, airplane, any mass exodus. I encourage you to put it into practice.
]]>Why not?
First, the technical industry runs its own course, potentially immune to economic trends. That is to say technology, in some fashion, is always in demand. Whether I must become a Java developer, web developer, or iPhone developer, development work exists for me.
Second, from past experience, I've been fortunate in finding work. I've been told I "interview well" and possess a "solid skill set". Furthermore, I noticed that regardless of title I don't see this in developers around me. Now I live and work in Louisville, Kentucky. So admittedly this isn't a technology mecca. Nonetheless, I do consider myself a good developer. I believe two underlying qualities keep me ahead of the rest.
This can be summarized in the quote, "If your only tool is a hammer, everything looks like a nail"
. Very few things are built purely using a single tool. So although it's great that you know every Java Class by heart, it doesn't help for iPhone Development. You need more tools in your toolkit. Although knowledge transference can save the day, a good developer will tinker with other technologies and at least become familiar. In doing so, they can call upon this knowledge when presented with something different.
In practice, I make an effort to visit technical blogs weekly, read one technical book a quarter, and learn one new language a year. If budget and timing align, I also attend a conference. This may sound like a lot or a little. Yet it's a small investment for the dividends it will pay.
There are a lot of developer stereotypes. One of the largest being anti-social behavior. As much as we may want to code undisturbed, in the dark, with the soft glow of our screens, that won't do. I worked alongside a very bright developer that could rock out a Perl script without even looking up from the keyboard. I worked with other developers that sat through a requirements meeting, then went off and developed their own. That's not good. A good developer is engaged. They want to know more about the project. They must know more, because they care to do it right.
In practice, I ask questions in meetings and provide alternate solutions. No assumptions. Sometimes this doesn't win me any points. But, I have yet to see where this failed to help. In addition, when I hit that "coders-wall", I get up. I go talk with my co-developers. Most of the time, it gets me past my wall. Even if not, I am socializing. To me, this lends to a healthy, arguably more productive, development environment.
A developer with these two qualities is a good developer. They possess the fundamental elements to continually forge ahead using any technology while collaborating with those around them. In the proper environments, a good developer could become a rockstar – being that key piece to success.
]]>I'll admit, I have an extremely low tolerance for when a meeting gets derailed. Blame it on my efficiency, but for me, it's literally painful. I imagine I am not alone in this regard. So I have compiled a list of some meeting guidelines.
There are two keywords for this tip: clear and goal. This should be Meetings 101, but somewhere someone forgot. All too often I sit through a meeting that seems as though it has no direction. Then it hits me, "This meeting is AWOFT."
A meeting should have a goal, and it should be stated clearly. It may sound lame, but it takes 4 seconds to say, "I brought us together to determine web form markup." The meeting now has an objective that everyone is aware of and can actively participate. This also gives wrong people the opportunity leave (see below). As a quick aside, don't take offense, in fact, offer attendees the option. With a clear goal set there's less probability the meeting becomes AWOFT.
A 4+ hour meeting is ridiculous. There's a high probability that it is AWOFT for most attending. Personally, I think a good meeting has a life span of one hour. One and a half at the most. I think you would agree that you would rather sit through a 30 minute meeting where you were focused than a 3 hour meeting that became AWOFT after an hour. Remember, you can always schedule a follow up meeting or ask if people are available to stay a little longer.
Bill the printer technician doesn't need to attend your meeting about mailing invoices. Now that he's in your meeting, he's going to give his two cents. In doing so, the meeting is now AWOFT for just about everyone else, because everything Bill is saying about printer cartridges doesn't matter in respect to your meeting goal. It's sweet, but don't invite Bill.
There is another implication to the rule, to ensure you have all the right people. Although you don't need Bill, you probably do need Betty, the invoicing manager for the past 4 years. It'd be wise to have her in the loop.
A meeting is, by nature, a formal event. It's a scheduled event in a specific place at a specific time for people to communicate. Be that as it may, formal does not mean long duration (see above). First and foremost, formal means be on time. Second, formal means that you don't need to schedule a meeting with three other people to review the documents I requested. That's AWOFT, for everyone. Don't do it. Informally come over to my desk. If that's not enough for some reason, then you have bigger problems on your team.
Try these in your next meeting. Maybe you can't do all of them. In the end, these are simply tips I have come across from various sources and find valuable in my personal experience. I see more engagement, less time wasted, and find myself scheduling fewer meetings.
]]>LastPlayed combines access to iPod Library with in-app Google Maps, new to iPhone SDK 3.0. It's centered around answer a common question – "What are you listening to?" It does so by broadcasting your currently playing song across the LastPlayed Network. This is visible to other users when they first open the app or are in your proximity, and when browsing the map view.
There is also a plus version, for 99 cents, that adds some valuable features. First are integrated player controls. This keeps you from having to bounce between the iPod app and LastPlayed, and I spent extra time ensuring that the controls function just like the iPod. Second are some social networking features that allow users to share their song info via Facebook and Twitter. Sharing happens automatically for each song or manually depending on your settings.
For screenshots and a more detailed description check out both LastPlayed and LastPlayed+.
LastPlayed had two pain points during development. Surprisingly, accessing the iPod Library and Google Maps were not painful. Between the WWDC sessions and developer reference, they were relatively easy. My walls were hit when developing the interaction with the LastPlayed Network and placing pin on the integrated Google Map View.
Parsing XML seems to be the bane of any programming language. Most web languages have either added native support or offer some library extension. Objective-C has both a native, NSXMLParser, and library, xmllib2, solution. However, these are rather heavy and as such can make the learning curve just a bit steeper.
I spent some time researching XML solutions before deciding. For this app, I had a small dataset but a high transfer rate. So I wanted something really lightweight, both from a size and development perspective. After countless web searches and reading dozens of docs, I decided on using PLists. In doing so I realized something: Apple loves PLists. PList is a simple XML format, that takes about 6 minutes to learn. Since I controlled the web service, I just had the server output this format. Objective-C has several PList methods for reading, storing, and converting. Once I downloaded the data from the server, I had the PList parsed into a dictionary with 2 lines of code. 2 lines. If you have a small dataset and control the source, I suggest trying PList.
I drop pin annotations on the map to represent where a song is playing. For scalability, I needed to determine if a pin already existed on the map so the new pin would not overlap. Both a WWDC session and the docs lead me to believe that this should be easy to determine. Somewhere, either by my misunderstanding or incorrect documentation, something went wrong.
In theory, I could simply test the occupied rectangle for the existing pin against the new pin. Yet, in practice, this didn't hold true. If I added a new pin to the same map coordinate the tip of the pin appeared at the upper left of the existing pin. Shouldn't it have put in the same place as the existing pin? There is a centerOffset property, which I expected to return an offset to compensate for such behavior. But it did not.
I battled with this for about a day. In the end, I offset the new pin by half the size of the existing pin. This gave me the expected results. I will not go so far to call this a bug, but at the least, it was unintuitive.
I felt the idea of LastPlayed was novel. I did my best to rush it to market. But as I often find with the App Store, although there was no competition during development, others existed by release. It's such a coincidence, it makes me wonder if Apple holds similar apps and releases them simultaneously to create competition. But, although biased, LastPlayed has much better features and interface.
Regardless of features and first to market, getting an app into the App Store is a two fold marketing nightmare. First, there's really no way to know exactly when your app will be approved. So it's very difficult to coordinate any kind of initial release. Second, with 100,000 apps and counting, your app drowns within 2 days. Unless you have the best app ever or backed by a company budget, it's tough to stay on top.
All us garage developers are left with is:
Unfortunately, these are closed looped and there is no guarantee the audience has an iPhone or iPod Touch. Personally, I find ads to be a waste of money. Not only for the reason above, but ROI is minimal, possibly negative, and the metrics are poor. The latter is especially true with Facebook.
The good news is LastPlayed+ was built to market itself. Users more than likely buy the app to share what their listening to with friends on Facebook and followers on Twitter. Therein lies the rub. As LastPlayed+ grows, so does the amount of people that see it. At least that's the theory.
In order to get the app to market, the vision for LastPlayed was scaled back to a quarter of what is was. There are so many features I want to see in future version of LastPlayed. I am leery to publish them in this article. Nonetheless, the next update will include the ability to control the shared message and participate in #MusicMondays on Twitter.
I also have the intention of having LastPlayed+ features slowly filter down to LastPlayed. Of course not all features will end up in the free version. That would just piss people off. But don't be surprised to see player controls in the next upgrade of the free version.
Right now, it's difficult to decide the exact direction. Are the social networking features more appealing or the combination of player controls? In addition, with Apple now allowing In-App Purchase for Free Apps, LastPlayed and LastPlayed+ could soon merge.
LastPlayed has place in the App Store. It's a great idea and suits a music device like the iPod Touch and iPhone. I am proud of this app and can only hope to get the chance to continue adding features to see what the future brings.
I value your feedback. At the moment, I still have several promo codes remaining to get LastPlayed+ for free. First come, first served.
]]>Nonetheless, in the past two years Microsoft has released two major versions of IE. During which time many high-profile websites have discontinued support for IE6. I have yet to do so, but today I wrote my last IE6 hack, a CSS rule:
1/* my last IE6 hack */2* html #client_logos li {3 display: inline;4}
This means I will not allow IE6 to factor into decisions. In addition, I will no longer develop additional styles or code to support IE6.
The web is a constantly evolving landscape and IE6 is old. It arguably should have died naturally by now. I won't go into the fact that IE6 is poorly developed browser that didn't even support web standards of its day, much less present day. Simply put, supporting IE6 is a ridiculous waste of time. I admittedly have a low tolerance for such things. In addition, it hinders the overall design and development of a website.
You should upgrade.
For client work, I may not have the luxury to completely abandon IE6. I can hope to make educate a client of missed opportunities or the cost of developing for IE6. Yet if a true need exists, I will continue to support the browser. In the end, if you write semantic, valid front-end code there are only a handful of IE6 bugs. All of which are well documented and, in my opinion, any web developer has come across several times before.
I by no means think this is a bold movement. Yet, this decision should not be made on a whim. You should consider development time, designs, usage statistics before making your own.
]]>I went with the installing a new trampoline. Although this the most expensive option, it's probably the simplest. Plus having a brand new trampoline really made the hobie cat look sharp. Aside from the sails, it visually dominants.
Hobie parts seem to only be sold thru their distributors. Short of finding used parts on Craigslist, Ebay, etc. I ordered a catalog from Hobie Cat directly. It was free and came in a few days. From there I just matched up part numbers and called my nearest dealer. Although the catalog had all the information, the dealer was knowledgeable and made some helpful recommendations – such as purchasing extra line. It took about 10 days for them to get the parts and then ship to me. If you live in a sailing area, not the Midwest, your dealer may be close enough to drive.
Before I tackled this project, I did my usual Google Search to familiarize myself with the process. Short of a post on the Hobie Cat Forum and another repair instructional, I did not find a good DIY. I read these two and then inspected my Hobie. It's important to take a minute and plan your attack. The last thing you want is to get everything apart and realize something's missing. Don't be that guy.
I did this project with the boat on the trailer in about 2 hours and used the following tools:
As I purchased a brand new trampoline and line, I didn't need to save anything. So I cut out the old line to save time. You could undo the knots and lacing if you wanted to reuse the line. Tip: I took pictures of the ends, knots, and lacing with my iPhone for reference. Unlacing also gave me a good idea of how everything is assembled. In a nutshell, the port and starboard tramps were laced to each other down the middle and along the rear strip. Everything tied off in the rear center, with the rear strip line starting thru a hole in the hull cover.
Once the line was removed, I pulled out the three trampoline pieces. There is lipping that runs the around the inner frame of the boat securing the edges.
For the port and starboard pieces:
For the rear piece slides our like the other two from either side of the boat. Some water may help ease this process. But if you're replacing everything, then there's no reason to be gentle.
Essentially this was the reverse of the steps above. The footstraps and pocket are obvious indicators to which side belongs up. For the rear piece there are other visual indicators such as stitching and glossiness. Tip: I recommend cleaning out the lipping and inner frame before installing the new trampoline while you have this chance. I used compressed air and a rag. The new pieces may not be positioned exactly right. Don't worry or force things. The lacing will bring it together. I found that using some of the old line to temporarily lace and pull the ends worked well also. Water could also help lube the lipping. That's what she said.
Depending on your set up, there could be rigging, wings, or racing platforms in the way. If it's the latter, you should know more about these things than me. Either way, you may need to remove these components. My boat is stock, so I am of no help in this area.
First, I am sure there are an infinite combination of lacing methods and knots for the trampoline. There was nothing special about the previous installation. In retrospect, asking the dealer for instruction or a diagram would be best.
I started in the front of the boat lacing down the middle. I used my pictures as reference for how to start lacing. Mine started at the first grommet on the port side. The rope was tied to itself underneath the first grommet on the starboard side with two half hitches. I feed thru the tops on the starboard and bottoms on the port. Again, no reason other than I felt this looked good making Z's all the way down. Although I pulled the rope thru all the way, I didn't pull tight until every third pass. I left about a foot of excess at the end of the last starboard grommet (it has one more) and then cut the line. I then went under the boat and pulled the line from front to rear like monkey bars (wear gloves).
For the rear, I put a stopper knot on the end and feed it thru the side holes. I laced and tightened just like the middle. When I reached the end, there was a single center grommet on the rear strap that was open. I tied all of my line ends to this with a bowline. Although I felt I may have done something wrong this was how my previous installation was done.
In the end, I used three lines total – middle, rear starboard, rear port. However, it seemed entirely possible to use just two, keeping the same line for middle one rear side. This may indeed be the dealers recommendation. For me, tautness and symmetry were my gauge.
Personally, I find DIY rewarding because it builds my knowledge of the boat. If something were to happen on the water, it's better that I know. Of course, some things are either not worth the time or better left to an expert. It's up to you, but hopefully this helps replace a trampoline.
]]>PocketBracket is an app for March Madness (which put us on tight timeline). It allows users to create brackets and organize pools, as well as get stats, scores, and rankings all with iPhone or iPod Touch convenience. With the ability to create unlimited brackets and share pools, it can reach those without thru the PocketBracket Network.
iPhone Apps at the core are developed in Objective-C. From my perspective, this is basically C with brackets around everything. To begin development, I had to sign-up as an Apple Developer. I was then able to download the SDK, as well as update XCode. Of course, the catch is this software requires an Intel-based Mac. I am sure other tools exist, but I can only imagine the pain in getting everything to work. So if you don't have a Mac and want to develop iPhone Apps, you may consider making the switch. Actually, you should consider it regardless. Anyway, having a MacBook Pro, I was able to be up and running in 20 minutes. Most of which was the download time for the 2GB package.
Anyone can be an Apple Developer, which provides access to the Apple Developer Connection (ADC). This portal has sample code, videos, and additional references. I found the videos to be great motivation, but unfortunately more of a sales pitch than actual how-to. So I ordered a book on Objective-C and iPhone Development. As much as these helped, they weren't going to build the app for me. I just had to get down to it. Some people may say it's easy. I felt there was a bit of a learning curve, but as I went thru more examples from the ADC and books, things started to click. My advice is to just in there and start messing around.
All in all, development took about 2 weeks. PocketBracket was pretty straightforward, only five screens without any advanced features in this first version. We already had a list of features that we planned to leave out of the first version due to timing constraints. We added several to that list during development.
As with any project, most of the final days of development were spent resolving things found during testing. But probably the biggest thing I learned was to test on the device. I typically built to the XCode iPhone Simulator. So when I finally built the app to a device I found several things:
Some of these were not related to development. Some were unavoidable. The biggest one learned was the App Name. Each app icon and name is allotted a certain amount of space. Depending on the characters in your app name this could be anywhere from 10-13, with 10 being the unofficial recommendation. We got around this by branding our app icon. This isn't really typical, and although you could say it sets us apart, it was really an oversight. One that won't happen again.
As odd as it sounds this was probably the most frustrating part. Then again, I am a geek, so I enjoy development. So long as I am making progress. Essentially this is one simple step: Putting your app in the iTunes App Store. Unfortunately, it is an involved process. I'll outline this process below and provide some tips.
As I said before, we were on a tight timeline. Each of these phases was alloted about 2 weeks. Marketing was no different. We had to organize and run a massive campaign in a short amount of time. Our marketing strategy was a bit of a shotgun approach, consisting of:
Check out our PocketBracket YouTube Ads, media releases, and business cards.
Currently, we are #3 in Top Paid Sports Apps. By review, we are the best iPhone March Madness application on the market, with a 4.5 of 5 star rating.
Beyond the application, the website has excellent presence. Placement on Google and Yahoo search for our keywords are excellent. We have a following on Facebook. And for their purposes, the YouTube videos have done fairly well. Not to mention the website gets over 10,000 hits a day.
Our download count is not where we want. We are not even close to breaking even. But we do feel confident we are positioned in an excellent spot to be ready for the Madness that will ensue on Selection Sunday once the 2009 Men's College Basketball bracket is determined. Either way, we are excited to see every download.
From the beginning, PocketBracket goes beyond just March Madness and College Basketball. Although we plan to have this application as our flagship, it has potential to lead a fleet of similar applications for tournaments worldwide.
Even without PocketBracket, our list is still out there and it is growing too. So who knows what's next. This was an excellent experience. One I know we all want to do again. Personally, I am no where near the knowledge level I want to be with iPhone Application development. So a journey lies ahead.
]]>For me, a tab solution should meet the following requirements:
As I said before, the W3C's solution was a bit specific. The containing elements where <fieldsets>
within a <form>
. I converted these to a <div>
wrapped within a <div>
. It may border "divitis", but it affords greater flexibility.
Their solution did an excellent job of adding the JavaScript progressively. With JavaScript disabled, it degrades to stacking the tabbed content. The tabs still function as navigation. This comes together elegantly by a named anchor. Many of the solutions I reviewed had obtrusive JavaScript with onclick
attributes or href="#"
. So credit to the W3C developers on this.
As a small note, their solution manipulated the hash (named anchor link) with JavaScript. Maybe a requirement for their needs, but it didn't seem necessary. In addition, with JavaScript disabled it breaks page links containing the hash. Very small, but it can function without manipulating the hash.
Finally, there were not configuration options. At a minimum it should have the following options:
So here is an example of the tab solution or you can download the source. I will discuss the XHTML, CSS, and JavaScript below. However, I recommend looking thru the example first.
The markup requires three placeholders. A containing element with an id
attribute referenced by JavaScript and class
attribute of tabset
. A toggle element with a class
attribute of tabset_toggle
. I use a <ul class="list-disc pl-4">
for semantic reasons and style the <li>
and anchor tags to make the tabs. You can wrap the anchor within other tags, such as a heading tag for SEO. Finally, a content element with a class
attribute of tabset_content
. Again, I use a <div>
for flexibility. Tabs are paired with content in order, so the first tab links to the first content <div>
. I could have paired them by id
with the named anchor. However, that would require code which I felt unnecessary given the content should always follow in the same order as the tabs.
1<div id="tabs1" class="tabset"> 2 <ul class="list-disc pl-4 tabset_tabs"> 3 <li class="active"><a href="#tab-one">Tab One</a></li> 4 <li><a href="#tab-two">Tab Two</a></li> 5 <li><a href="#tab-three">Tab Three</a></li> 6 </ul> 7 <div class="tabset_content_container"> 8 <div id="tab-one" class="tabset_content"> 9 <h2 class="text-2xl font-bold leading-none">Tab One</h2>10 <p>Content goes here....</p>11 </div>12 <div id="tab-two" class="tabset_content">13 <h2 class="text-2xl font-bold leading-none">Tab Two</h2>14 <p>Content goes here....</p>15 </div>16 <div id="tab-three" class="tabset_content">17 <h2 class="text-2xl font-bold leading-none">Tab Three</h2>18 <p>Content goes here....</p>19 </div>20 </div>21</div>
tabs.js contains a class extension using Prototype that allows you to create Tab objects. You can create a new Tab with the following code:
1document.observe('dom:loaded', function() {2 new Tab({id: "tabs1", rounded: 1, height: 1});3});
This will setup the behavior and add any markup progressively based on the options provided. Currently, there are three: id
, rounded
, and height
. id
is required and must match the id
attribute of the containing element with markup above. rounded
is optional. If set to a true value, by JavaScript convention, it will create markup to give the content area rounded corners in the top right and bottom. Finally, height
is optional. If set to a true value, it will set all tab content areas to the height of the tallest content area.
If multiple tabs exist on a page the explicit creation of a new Tab
seemed redundant. Furthermore, if you use a CMS or work on a team, adding JavaScript may not be an option. The follow code leverages the existing tabset
class and could be added to a JavaScript init script.
1function prepareTabs() {2 $$('.tabset').each(function(e) {3 new Tab({id: e, rounded: 1, height: 1});4 });5}
As it is now, each tabset
shares the same configuration. It would be difficult to adjust for individual tabs. One way around this would be to create more tabset
classes to represent different configurations. However, with more than few options, the permutations add up.
As with most of my UI projects, the CSS is the trickiest part. However, by shifting all design responsibility to CSS I can style this to fit any design. There are a few areas of note. The tabs images use the sliding door technique. The content areas fade in by setting the opacity
and toggling between display: none
and display: block
. If configured with rounded corners, JavaScript will add <div>
's to the top and bottom of the content area with classes of tr
, bl
, and br
. There are a few special styles for IE. All of which are commented. Most deal with hasLayout. I also had to add a background to the elements I noticed a ghosting bold during the effect. I hope to remove these in time. Finally, be aware of box model browser inconsistencies when adjusting the height, width, padding of your tab elements. They caused the most headaches.
Tab solutions are common and should be simple to use. They are a great way to group content and maximize page real-estate. This solution works very well in that respect. It provides several configurable options, fits any design, uses valid/semantic XHTML, and degrades gracefully.
Note: You could use these tabs for site navigation by splitting the content across other pages and transfer responsibility of some JavaScript code to a back-end language. Feel free to post a comment or contact me for more details.
]]>In this case, I felt there were pieces of both solutions that were good. I decided to merge the two, and use Brian Crescimanno's as a base. If you want more detail on the individual solutions, I suggest reviewing the articles above. As such, I have provided an outline of the changes:
display
styles, used height
/width
consistently.initialize
parameter into an options hash.So without farther ado, here is an example of the merged accordion solution or you can download the source.
The markup requires three placeholders. A containing element with an id
attribute you reference with JavaScript. A toggle element with a class
attribute of accordion-toggle
. I use an anchor tag for semantic reasons, but it can be anything. A content element with a class
attribute of accordion-content
. There is a one to one relationship between toggle and content elements.
1<div id="test-accordion">2 <a href="#" class="accordion-toggle">Main</a>3 <div class="accordion-content">4 <p>Lorem ipsum dolor sit amet, consectetuer adipiscing elit.</p>5 <p>Mauris dictum congue lectus.</p>6 </div>7</div>
Currently the configuration options are the accordion type and event. Type can be horizontal
, vertical
(default), or vertical-multiple
. Event can be any event supported by Prototype (e.g. mouseover, click). In addition, you can change the class names within the initialize
method. However, keep in mind these are shared for all your accordions. The following code from the example creates a vertical and horizontal accordion on page load:
1document.observe('dom:loaded', function() {2 accordion = new Accordion({id: 'test-accordion'});3 accordion2 = new Accordion({id: 'test2-accordion', type: 'horizontal'});4});
The CSS is the trickiest part. In modifying the CSS, I found that most bugs were related to the styles. When styling your accordion remember the box model. Padding, margin, and borders all affect the effect. Which makes sense considering this solution modifies height
/width
. If you start noticing jumpiness in the effect, check these properties.
An accordion solution is relatively progressive. Although I feel this solution degrades better than others, it is not fully functional without JavaScript enabled. To resolve this, you will need some back-end support. By modifying the toggle elements to link to the current page with a URL parameter. On page load the back-end could parse this URL parameter to identify which node to expand and add the necessary CSS class (active
).
Understand the web is a continually evolving environment. The code within this article is offered with an as-is warranty. My goal is that the article may help more than the code. Nonetheless, I always welcome your feedback, good and bad. Just know, that I know, this is not the solution and therefore may not work for you… Although in an ideal development world it would.
]]>As a developer, I know over a dozen languages – C, Java, Perl, PHP, Ruby, ColdFusion… I've wondered why there are so many. Understandably technology evolves like anything else, and languages must be updated or replaced. But are each necessary?
Let's look at it from the another angle. Similar to the original storyline, consider the capabilities of a united development community. Think of development using a single language, independent of hardware or medium. Platform and compatibility become non-issues. It's like an open-source dream. How quickly could your projects be completed if they used a singular technology. How much could be shared? How quickly could we learn?
Of course this reaches much farther than just the development community. Imagine the world at large using a unified language. (there are even variations of sign language.. psht!)
One could argue that such a world would lack competition. Competition that drives us to excel. Again, this is just conjecture. Be that as it may, I would argue in return that we may excel at a greater pace united.
I don't know how we could get there, even just at a development community. Yet, I believe that united effort has great potential. I can't explain why we haven't achieved some variation of the. Maybe we just all seek to stand out. However, is this an inherit human quality or a pressure of society.
]]>As a back-end programmer, front-end cookie management seems silly. Why would I need or want to use something like JavaScript to manage cookies. Until recently, I would have just used PHP or Ruby for the job. However, I have found myself on contract as Lead Front-End developer. As such, those technologies are not available to me. Furthermore, tasking someone down on the IT side of the house can be a time consuming hassle. And came you blame them? I'm able to reverse the roles, and if some marketing guy asked me to set up a cookie to store XYZ, I'd laugh. Rightly so too, why should I waste such time storing things like text size, toggled modules, etc on the back-end. After all, aren't such examples why cookies exist. User settings or preferences may necessitate back-end involvement, and these can be stored in a cookie for convenience. Yet, something dealing with the UI doesn't really warrant involvement.
So the obvious choice to manage cookies on front-end is JavaScript. During research, I came across two interesting pages. The first was a collection of Top 10 JavaScripts, with the top being cookie management functions ported from PHP. Second was a JavaScript class called CookieJar. At first, I didn't quite understand the point. See to JavaScript the cookie comes across as a simple key value pair as semi-colon separate string in document.cookie
. If you want to track several variables, you would need to set as many cookies. That would get old… err stale. Anyway, instead of having all these cookies floating around, the JavaScript CookieJar organized then for you.
CookieJar was a little primitive. The premise, to store the variables as a hash in a single cookie, was sound. But it didn't actually handle cookie storage. Now this may be kitchen for the Object Oriented elitists, but I merged the two scripts. To regain some ground, I wanted my Cookie class to be a Singleton Gateway. As such, it should do everything required to access, manage, and maintain the Cookie. Since I was already using Prototype, I took advantage of its Hash object. I ended up with the script below.
1var Cookie = { 2 data: {}, 3 options: {expires: 1, domain: "", path: "", secure: false}, 4 5init: function(options, data) { 6 Cookie.options = Object.extend(Cookie.options, options || {}); 7 8 var payload = Cookie.retrieve(); 9 if(payload) {10 Cookie.data = payload.evalJSON();11 }12 else {13 Cookie.data = data || {};14 }15 Cookie.store();16 },17 getData: function(key) {18 return Cookie.data[key];19 },20 setData: function(key, value) {21 Cookie.data[key] = value;22 Cookie.store();23 },24 removeData: function(key) {25 delete Cookie.data[key];26 Cookie.store();27 },28 retrieve: function() {29 var start = document.cookie.indexOf(Cookie.options.name + "=");30 31 if(start == -1) {32 return null;33 }34 if(Cookie.options.name != document.cookie.substr(start, Cookie.options.name.length)) {35 return null;36 }37 38 var len = start + Cookie.options.name.length + 1;39 var end = document.cookie.indexOf(';', len);40 41 if(end == -1) {42 end = document.cookie.length;43 }44 return unescape(document.cookie.substring(len, end));45 },46 store: function() {47 var expires = '';48 49 if (Cookie.options.expires) {50 var today = new Date();51 expires = Cookie.options.expires * 86400000;52 expires = ';expires=' + new Date(today.getTime() + expires);53 }54 55 document.cookie = Cookie.options.name + '=' + escape(Object.toJSON(Cookie.data)) + Cookie.getOptions() + expires;56 },57 erase: function() {58 document.cookie = Cookie.options.name + '=' + Cookie.getOptions() + ';expires=Thu, 01-Jan-1970 00:00:01 GMT';59 },60 getOptions: function() {61 return (Cookie.options.path ? ';path=' + Cookie.options.path : '') + (Cookie.options.domain ? ';domain=' + Cookie.options.domain : '') + (Cookie.options.secure ? ';secure' : '');62 }63};
Currently, the Cookie class only handles a single named cookie. This is acceptable since you can store multiple variables in a single cookie. However, I want to refactor this class from a Singleton to a Factory. Look for that in the future. In the meantime, here are some current sample uses:
Cookie that expires 90 days from visit, and sets a value:
1Cookie.init({name: 'yourdata', expires: 90});2Cookie.setData('favorites', false);
Cookie that only lasts the session, with default data:
1Cookie.init({name: 'mydata'}, {foo: 'bar', x: 0});2alert(Cookie.getData('foo'));
I wanted all the cookie variables to be stored in a single cookie. The class does allow you to still make independent Cookies. In order to store data, I would need some format to store my Cookie data. What better than JSON, and Prototype has a toJSON
method.
I also wanted to encapsulate the cookie data. Plus since I was storing the cookie data as a Hash, I may have future changes. So the getData
, setData
accessor methods can be used for data management. And In Rails-esk fashion, I auto-save the cookie at the end of setData
.
Finally, the Cookie auto-loads or is auto-created depending on the name passed to init
. It will look in document.cookie
and if it doesn't exist it will create a cookie with the settings provided. Finally, it loads the cookie data.
Prototype did not natively extend JavaScript with a Cookie object. However, by leveraging a few other classes, and the scripts mentioned above, I came up with a quick solution. Given, this class does not contain everything and could benefit from a code review. In the future, I may revisit the loading and possibly build some convenience methods to allow Cookie['key']
instead of Cookie.getData('key')
. Yet for what it does in 60 lines, it is more than able to handle my front-end needs.
During the development process I may have several CSS files containing all sorts of rules. These names may be based by page or the general rules contained in each file. However, in production, from both a maintainability and performance perspective, the last thing you want is several files. Ideally, you would like a single, compact CSS file for production. If usings themes, you may want more. So between development and production, you want two very different things.
Normally, when one needs to go from a raw material to a finished products, a tool is used. In this case, I need something that can process my CSS files between development and production. Maybe it can also do some additional items during processing, like code formatting, file organization, or minification. I did not find such a tool that existed. So I have undertaken this project to develop such a tool.
With any tool there are guidelines or a practice. You wouldn't use a chainsaw while building a dollhouse. So even though this will not fit the need, my hope is that this tool will nonetheless help.
I know we are all different, which makes this project near impossible. I have done the best to accommodate that into this spec. Nonetheless, with every tool there are guidelines. I mean you wouldn't use a chainsaw while building a dollhouse. My hope is that by adopting a few industry conventions, and drawing some lines, this tool will help a maximum audience.
I have begun an alpha version following the above spec in Java. My goal is to create a proof of concept and use it during a project before releasing a web version on this site. However, you requests are required. So please, post comments or send me feedback directly.
]]>I am a developer, not a designer. I may have a vision, which can be frustrating because it takes me forever and never looks like I right. Yet, for this site, I wanted a Web 2.0 Design (not that I agree with this definition). Simply a few gradients, badge logo, drop shadows, clean web font, and a bright color. When design falls in my hands the following links provide me enough samples, tutorials, and inspiration to get the job done:
Beneath the design lies the code, holding it all together. With due respect, a good design makes a site. But a good design can't stand alone (I must stay true to my development colors, err, code). Anyway, there are two layers of code, by industry standards: front-end and back-end. Front-end, the high level of code, renders the design, behavior, and some simple functionality. Back-end, the lower level, stores data and performs more advanced functionality. Some blur these lines. Others demand segregation. I look at it like food on a plate. When you are hungry, you don't care, it can all run together. Yet, when you make it or pay for it, you want it to look good.
A few years ago I swore off table based layouts and migrated towards the Semantic Web. It's amazing how much tag bloat existed. I normally see a reduction of 40%-60%. Even today, I still refine tags when developing a site. At the end of the day, less code is less work.
When it comes to front-end code I validate HTML 4.01 Strict and CSS 2.1. I am a fan of the Strict Doctype. I like the subset of tags and attributes. Not as restrictive as XHTML Strict, but limiting enough to force basic usage of CSS. I haven't made the shift to XHTML yet, mainly because of browser inconsistencies.
I am currently not using JavaScript heavily, but if I were Prototype would be on the scene.
My two cents on front-end development:
Over the years I have developed the back-end with many languages. Some of those languages have come and gone, some I got paid to use, some aren't even web languages. The one still standing and evolving with me is PHP. I like the scripting syntax. I am not a fan of tag based back-end languages. They clutter up the front-end code in my opinion. PHP handles the session management, templating, and database interaction for this site. Since I have used PHP for so long I have a collection of custom tools for Staying DRY. For the database, I use MySQL for the same reasons as PHP – free and familiar.
There were not too many pieces of this site that were challenging. In fact, had I gone the "buy" route, these would be moot. Of course, I wanted to do it myself. So, two of the more difficult pieces were the CAPTCHA and marking up an article.
I evaluated several PHP versions of a CAPTCHA. I started out with a library download from someone's blog which didn't work (sorry, no plug for you). I then tried reCAPTCHA. reCAPTCHA worked, but seemed heavy. Sign up for a API key. Download files. Configure. Moreover, it used an <iframe>
and JavaScript. Finally, I couldn't control the module. As much as I appreciated the built-in functionality, I just needed the CAPTCHA image. Older versions were that simple, but they "grew-up". This combination lead to a thumbs-down for reCAPTCHA.
By then I knew how a CAPTCHA worked. So what did I do – you know it – I built my own. I opened up Fireworks and saved a blank PNG as a base background image. I used native PHP image functions to overlay a random string onto my base image. In the end, it was only a few lines:
1<?php 2require 'WEBROOT/scripts/init.php'; 3 4$output = 'abcdefghijkmnopqrstuvwxyzABCDEFGHJKMNPQRSTUVWXYZ23456789'; 5$output = substr(str_shuffle($output), 0, 5); 6 7$_SESSION['captcha'] = $output; 8 9$im = imagecreatefrompng(WEBROOT . '/assets/images/images/captcha.png');10imagettftext($im, 24.0, 0, 10, 40, imagecolorallocate($im, 0x55, 0x88, 0xAA), WEBROOT . '/assets/images/verdana.ttf', $output);11 12header('Content-type: image/png');13imagepng($im);14imagedestroy($im);15?>
A few things to note. First, I store the CAPTCHA string in the session – initialized in init.php – to verify later. Second, I uploaded a true type font file in order to customize the text output. Finally, I output the image directly. This allows me to put my CAPTCHA anywhere on the site with:
1<img src="/includes/captcha.php" alt="Captcha" />
Admittedly, this is not the greatest. I could have changed text color, size, and rotation. However, for sending comments and feedback on my little site, this should do the job.
I did notice during testing that something may be amiss using the $_SESSION
in certain browsers (Safari). I believe this steams from the <img>
source request. I imagine certain browsers may not send session information on these requests for security reasons. Any feedback on this is appreciated. For now, something to keep in mind.
On a geek note, using the data: URL scheme was my first choice, but it lacked support in IE and you still can't ignore their market share.
With my articles primarily technical, I needed something to format my article text and highlight syntax in code samples. I figured I could just use HTML. Why not? It is for the Web anyway, right? But what if I needed the article in another format, an RSS feed or PDF? Furthermore, if I wrote the article in HTML, why generate my page with PHP from a database. You see how that became a slippery slope. I needed something simpler. I thought about using message board markup tags like [B]
for bold. That seemed to leave me in the same predicament as HTML. I thought about using LaTeX or another variant. The learning curve seemed steep, although it did offer built-in syntax highlighting. I did some Google searches and found several possibilities. In the end, they all seemed too heavy. I stepped back and worked on the rest of the site. Then, I stumbled upon Markdown
Markdown is a text-to-HTML conversion tool for web writers. Markdown allows you to write using an easy-to-read, easy-to-write plain text format, then convert it to structurally valid XHTML (or HTML).
It looked promising, and I had unknowingly used its basic syntax for years in my README and TODO docs. Immediately, it provided a simple, intuitive syntax without limiting my output. In addition, it's support for inline and block code provided me a foundation for syntax highlight.
I know this site could have been built in a day with Blogger or WordPress. What made it worse, as a personal project, it took a backseat to my other work. But as a developer, I wanted to build my own, it's the developer's curse. Hey, I did adopt Markdown. The thing to emphasize is the value of first-hand knowledge. My DIY attitude now will provide a foundation to make stronger decisions to build or "buy" such things in the future.
]]><itag>
here was <cftag>
there. I used ColdFusion again for a client a few years later, now version 6 (MX). Not much had changed, which allowed me to get the job done quickly. A developer normally adopts using a language for such reasons. Yet, I didn't. Even as a developer with a ColdFusion shop for 3 years, I never personally adopted the language.
Why? The answer is simple, in my experience of the language, across several versions, it has not evolved. Maybe the language's change of hands, Allaire – Macromedia – Adobe, put it behind the times. Understandable. Yet, I feel that even the languages core features left wanting.
As I said before ColdFusion is a tag-based language. This makes the language simple and straightforward. But you immediately lose the efficiency of developing complex code with a simple script. <cfscript>
the evangelists scream. <cfscript>
made ground in ColdFusion 8 (I will come back to this). Yet there is something fundamentally limiting about <cfscript>
. It doesn't support ColdFusion tags, you can only use ColdFusion functions within a <cfscript>
block. Wait, that means within a <cfscript>
block you lose most of this tag-based language's features. Opps!
Not to harp on the limited scripting of ColdFusion, but their lack of basic operators. As I referenced above, it wasn't until ColdFusion 8 that the language added support for post-increment and overloaded assignment operators. Before that if I wanted to increment a variable I had to write:
1<cfset Variables.SomeValue = Variables.SomeValue + 1>2<cfset Variables.SomeValue = IncrementValue(Variables.SomeValue)>
Finally, after version 8.
1<cfset Variables.SomeValue += 1>2<cfset Variables.SomeValue++>
I mean, even QBASIC had these operators. Another example of how behind ColdFusion is compared to other languages.
In my opinion, tag-based back-end languages are a thing of the past. Most tag-based languages are used for simple markup on the front-end (e.g. HTML, XML). They thrive on the front-end, but fall short on the back-end. They are unweildy in that capacity. I believe ColdFusion has reached that critical mass. Developer's require more elegant solutions, and ColdFusion is not up to the challenge.
This leads me to my second big complaint of ColdFusion, Not Object Oriented. ColdFusion does have the concept of a <cfobject>
created from a <cfcomponent>
(among others). These are primitive stages and only recently was support for core OO principles such as inheritance added. OOP has been around since the early 1970′s and has taken off on the web with the rise of MVC (also from the 1970′s). It's sad to think that a language, even by version 8, doesn't support OOP these days. Unfortunately, ColdFusion isn't the only one.
ColdFusion is the limited array support also stiffles me. Admittedly this is not as strong a point as the others. Nonetheless, it fits the bill. Array's are a basic data structure of all launguages. Although ColdFusion does have arrays, they are not used by core features. ColdFusion uses Lists instead. A ColdFusion List, essentially, stores a delimited string. Most functions and tags accept or return lists. Whenever ColdFusion abandoned arrays and went their own way with lists they made a mistake. They turned their back on developers using a fundamental data structure.
Every language deals with consistency issues. The order of arguments for a List function differs from String function. ColdFusion is no different. But there is a specific set of display features in ColdFusion that in all my experience I can't explain. I have submitted bug reports, emailed user groups, asked speakers at Adobe Max and CFObjective. Nothing. I open to the possibility that maybe some else is wrong in my code. But one would like to think that after all the steps above such an explanation would have been provided.
cfoutput
and cfloop
Output in ColdFusion has always been a finicky beast. The amount of whitespace left from the original markup is annoying in itself. Configuration options exist, but it's really a choice between the lesser of two evils. I suppose you could litter your code with <cfoutput>
only where you needed dynamic data. But that seems pretty tedious. Whitespace aside, <cfoutput>
is an also finicky. It is a tag that you can or can't nest depending on the data you wish to output. If you add the group
attribute, well, good luck. But the one that takes the cake is a combination of <cfoutput>
, <cfloop>
, and <cfquery>
cfdocument
<cfdocument>
is the nail in the coffin for ColdFusion. As much potential as this tag has, to output content to PDF/Flash Paper, it is horrible. For me, this single tag embodies the entire language. ColdFusion Team developers have openly cursed this tag in talks and screencasts. I know any developer that has attempted to use this tag for even a slightly complex task agrees with me. As such, I won't waste time explaining all bugs. Since the existence of this tag, there are 3 issues that no amount of configuration, markup, upgrades, bug report, or development insight has solved.
<cfdocument>
tasks. A refresh displays the latest.<cfdocumentsection>
. Instead the last set of headers/footers overwrite all.ColdFusion really could turn around. Yes, I have been complaining about it for several paragraphs. Indeed, I feel they are all good points. Yet, I give ColdFusion due credit in a few areas.
These last two items are where ColdFusion could really shine and overcome a majority of the issues I mentioned above.
Java is an object oriented language. There is no excuse for ColdFusion not to leverage or expose this native support. After all, "ColdFusion is Java". At least that is what I keep hearing in conference talk directly from the CF Team. So I should be able to write Firstname.substr()
or access a custom Java class. You can do these things now, but you have to instantiate a Java object or package you Java classes. Make it seamless. Make <cfjava>
It may be messy, but allow some kind of hybrid interface.
ColdFusion has supported native PDF generation for some time now. Albeit buggy as mentioned above. But this is a really nice feature for a web language to have out of the box. When Adobe bought Macromedia, I had high hopes for features like Flash integration or image manipulation. I thought at least the <cfdocument>
issues would be fixed. No, they spend time on tags like <cfwindow>
, <cfajaximport>
, etc. Why is a back-end language wasting time on front-end technology? In my opinion, this was a silly attempt to bring a dated language up to speed by integrating some of the latest web trends. <cfpdf>
did come out. But it primarily manages existing documents. Adobe has a great product line, so let's see some synergy between products. Please though, now under Adobe at least fix features involving their trademark PDF.
Until ColdFusion addresses the items above, they don't stand a chance at evolving. ColdFusion will become exactly that cold, as in dead. They could be an enterprise web language. Maybe not a contender with .NET, but most organizations still haven't taken that leap to open-source technologies. For whatever reason, they don't view them as grown up or supported. With ColdFusion now under Adobe's product line, that could provide an edge. And that is exactly it. If they took full advantage of their partnerships with Adobe and Java, the language would have much more potential.
]]>